Master the Cosmos: A Beginner's Guide to Building and Deploying Smart Contracts
Software Engineer | Developer Advocate | Technical Writer | Content Creator
The Cosmos network is one of the most promising blockchain networks that enable interoperability between different blockchain platforms, and it's becoming increasingly important for developers to understand how to build and deploy smart contracts on this network.
Smart contracts are self-executing contracts with the terms of the agreement written directly into code. They are a vital component of decentralized applications and are crucial for creating trustless and transparent systems. As the demand for decentralized applications rises, understanding and using smart contracts is a prerequisite skill for developers building and developing applications in Web3.
Does the cosmos support smart contracts? Yes. In this tutorial, we will learn about the Cosmos ecosystem and how to build and deploy a smart contract on the cosmos network.
Understanding the Cosmos Network
The Tendermint Core consensus engine powers the independent, parallel blockchains that make up the decentralized Cosmos Network. The Cosmos Network aims to build a decentralized network of interconnected blockchains that can expand and cooperate, facilitating the exchange of data and value between various blockchain platforms.
Tendermint is a Byzantine Fault Tolerant (BFT) consensus engine that enables fast and secure transaction processing. It allows a group of validators to agree on the state of the network through a voting procedure. Tendermint enables quicker transaction processing than conventional proof-of-work consensus methods, such as those employed by Bitcoin and Ethereum (Now Proof of Stake).
The Cosmos Network's use of the Inter-Blockchain Communication (IBC) protocol is crucial. Interoperability across several blockchain systems is made possible by IBC, which enables the transfer of value and data between various blockchains in the Cosmos Network.
Additionally, the Cosmos Network features a hub-and-spoke architecture that enables the development of standalone blockchains (spokes) that can communicate with the Cosmos Hub (the hub). Data and currency can be exchanged between the various blockchains in the network thanks to the Cosmos Hub, which acts as the network's hub.
Scalability, security, and interoperability are just a few of the Cosmos Network's benefits over other blockchain platforms. It is an intriguing and promising blockchain network overall.
It is a desirable alternative for developers looking to create decentralized applications due to its capacity to handle colossal throughput and connect several blockchains.
Why Cosmos?
The Inter-Blockchain Communication (IBC) protocol and the Tendermint Core consensus engine form the Cosmos network's foundation, enabling the exchange of value and data between various blockchains within the Cosmos Network. This was covered in more detail in the previous section when we discussed the Cosmos ecosystem.
The Cosmos Network's main traits include the following:
Tendermint Core Consensus Engine: A Byzantine Fault Tolerant consensus engine, Tendermint provides quick and secure transaction processing.
Inter-Blockchain Communication (IBC) protocol: IBC enables communication across several blockchains inside the Cosmos Network, allowing for the exchange of value and data.
The Cosmos Network provides support for custom token creation. These tokens can be used in decentralized apps to represent digital assets or as payment.
Scalability: Using independent blockchains with Tendermint Core enables quicker transaction processing times and the capacity to process many transactions per second.
Interoperability: The Cosmos Network's interoperability feature enables developers to create decentralized applications that communicate with many blockchain systems, including Bitcoin, Ethereum, and others.
Hub-and-spoke architecture: The Cosmos Network's hub-and-spoke architecture enables the development of separate blockchains that can communicate with the Cosmos Hub. The network's central node, the Cosmos Hub, facilitates the exchange of money and information among its several blockchains.
In the following section, let's dive deeply into the practical aspect of building and deploying smart contracts on the cosmos network.
Prerequisite
Let's make sure Node/NPM is set up on our computer. Here is a guide if we don't already have it installed.
Project Setup and Installation
Let's navigate to the terminal. We'll need to cd into any directory of our choice and then run the following commands:
mkdir cosmos-project
cd cosmos-project
npm init -y
npm install --save-dev hardhat
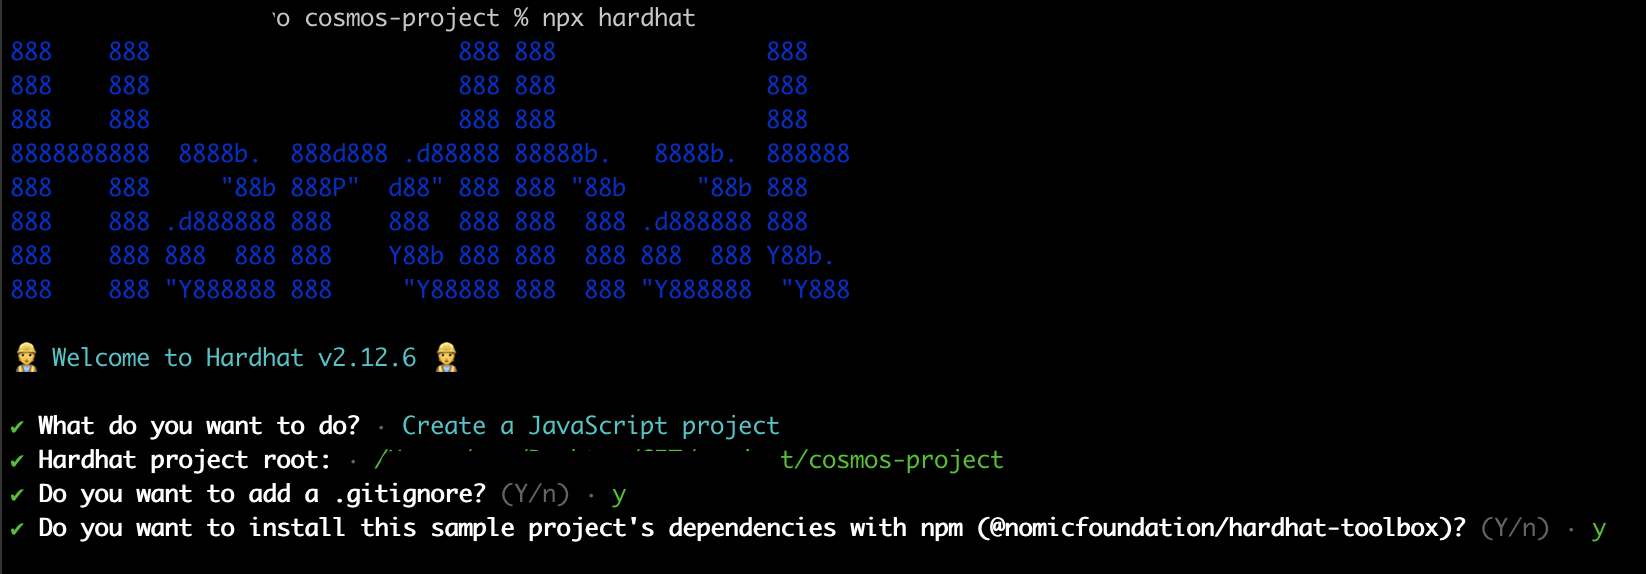
Let's create a sample project by using the following command:
npx hardhat
The above command will check if we have hardhat installed globally; if not, it will download it from the npm registry and run the command using the downloaded version.
Accept the following options.
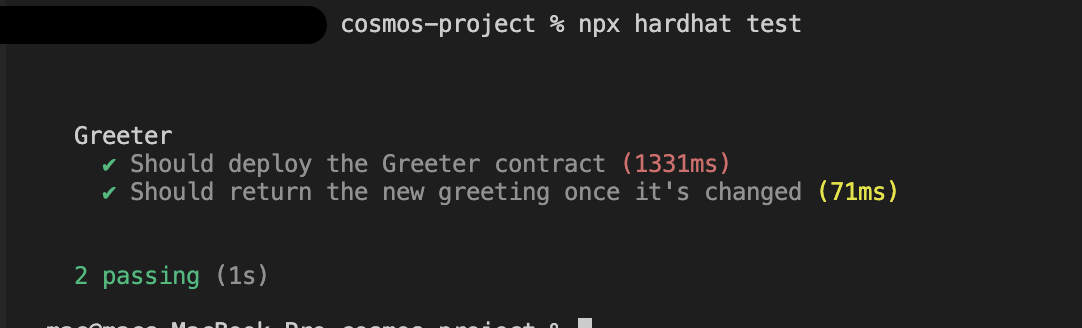
Let's run the command below to verify that everything is operating as it should.
npx hardhat test
A passing test result will appear in our console.
Now, Lock.js may be removed from the test directory and deploy.js the scripts directory. After that, delete Lock.sol in the contracts directory.
The folders themselves should not be deleted!
Create a Greeter Smart Contract
This section will create a Greeter.sol file in the contract directory with the following code snippet.
// SPDX-License-Identifier: UNLICENSED
pragma solidity ^0.8.9;

// Define a smart contract called "Greeter"
contract Greeter {
    // Define a public variable called "greeting" of type string
    string public greeting;

    // Define a constructor that takes in a string and assigns it to the "greeting" variable
    constructor(string memory _greeting) {
        greeting = _greeting;
    }

    // Define a function called "setGreeting" that allows the "greeting" variable to be changed
    function setGreeting(string memory _greeting) public {
        greeting = _greeting;
    }

    // Define a function called "greet" that returns the current "greeting" variable
    function greet() public view returns (string memory) {
        return greeting;
    }
}
In the code snippet above, it's important to note that the line SPDX-License-Identifier: UNLICENSED serves as a unique identifier to signify that the code is unlicensed and available for anybody.
Testing the Smart Contract
Create a new file called Greeter-test.js inside the test directory and update it with the following code snippet.
const { expect } = require("chai");
const { ethers } = require("hardhat");

describe("Greeter", function () {
  it("Should deploy the Greeter contract", async function () {
    // Get the contract factory for the "Greeter" contract
    const Greeter = await ethers.getContractFactory("Greeter");
    // Deploy the contract to the blockchain
    const greeter = await Greeter.deploy("Hello, world!");

    // Wait until the contract is deployed
    await greeter.deployed();

    // Check that the contract's greet() method returns the expected greeting
    expect(await greeter.greet()).to.equal("Hello, world!");
  });

  it("Should return the new greeting once it's changed", async function () {
    // Get the contract factory for the "Greeter" contract
    const Greeter = await ethers.getContractFactory("Greeter");
    // Deploy the contract to the blockchain
    const greeter = await Greeter.deploy("Hello, world!");

    // Wait until the contract is deployed
    await greeter.deployed();

    // Check that the contract's greet() method returns the expected greeting
    expect(await greeter.greet()).to.equal("Hello, world!");

    // call the setGreeting method
    const setGreetingTx = await greeter.setGreeting("Hola, mundo!");

    // wait until the transaction is mined
    await setGreetingTx.wait();

    // Check that the contract's greet() method returns the new greeting
    expect(await greeter.greet()).to.equal("Hola, mundo!");
  });
});
Next, run the following command in the terminal to compile test cases.
npx hardhat test
We should have something similar to what is shown below.
Compile and Deploy the Greeter Smart Contract to the Cosmos Network
To compile the smart contract, we will need to create a new file deploy.js inside the scripts folder and update it with the following code snippet.
const main = async () => {
  // Get the contract factory for the "Greeter" contract
  const greeterContractFactory = await hre.ethers.getContractFactory("Greeter");

  // Deploy the contract to the blockchain
  const greeterContract = await greeterContractFactory.deploy(
    "Hello, Hardhat!"
  );

  // Wait until the contract is deployed
  await greeterContract.deployed();

  // Log the address of the deployed contract
  console.log("Greeter Contract deployed to: ", greeterContract.address);
};

const runMain = async () => {
  try {
    // Call the main function
    await main();
    process.exit(0);
  } catch (error) {
    // Log any errors that occur
    console.log(error);
    process.exit(1);
  }
};

// Run the main function
runMain();
In the code snippet above,
This script deploys a smart contract called
Greeterto the blockchain using the hre.ethers library.The
greeterContractFactory.deploy()method deploys a new contract instance to the blockchain.await greeterContract.deployed()method is used to await the contract deployment.The address of the deployed contract is then logged into the console, and then
runMain()function is a wrapper function that runs the main function and catches any possible errors.
Next, create .env on the project's root directory to store the private key, which we will use in the hardhat.config.js file during deployment.
PRIVATE_KEY=
Navigate to the hardhat.config.js file and then add the following code snippet.
require("@nomicfoundation/hardhat-toolbox");
require("dotenv").config();

/** @type import('hardhat/config').HardhatUserConfig */
module.exports = {
  // Specify version of solidity compiler
  solidity: "0.8.17",

  // Define networks to be used for testing and deployment
  networks: {
    // Hardhat network is a built-in development network in Hardhat
    hardhat: {
    },
    // Local network is a network running on localhost
    local : {
      url: "http://localhost:8545",
    },
    // evmos network is a network hosted by evmos
    evmos: {
      url: "https://eth.bd.evmos.dev:8545",
      // Use the private key specified in the .env file
      accounts:[process.env.PRIVATE_KEY],
    },
  },
};
This is a configuration file for the Hardhat development environment.
We will deploy the smart contract in the next step, but we need to ensure we fund our wallet with a test EVMOS (A decentralized proof of stake blockchain in the Cosmos ecosystem) token. Set up evmos on MetaMask and fund the wallet using this evmos faucet site.
After requesting a faucet, we should have something similar to what is shown below.

Now we can deploy the smart contract on the Cosmos network using the following command.
npx hardhat run --network evmos scripts/deploy.js

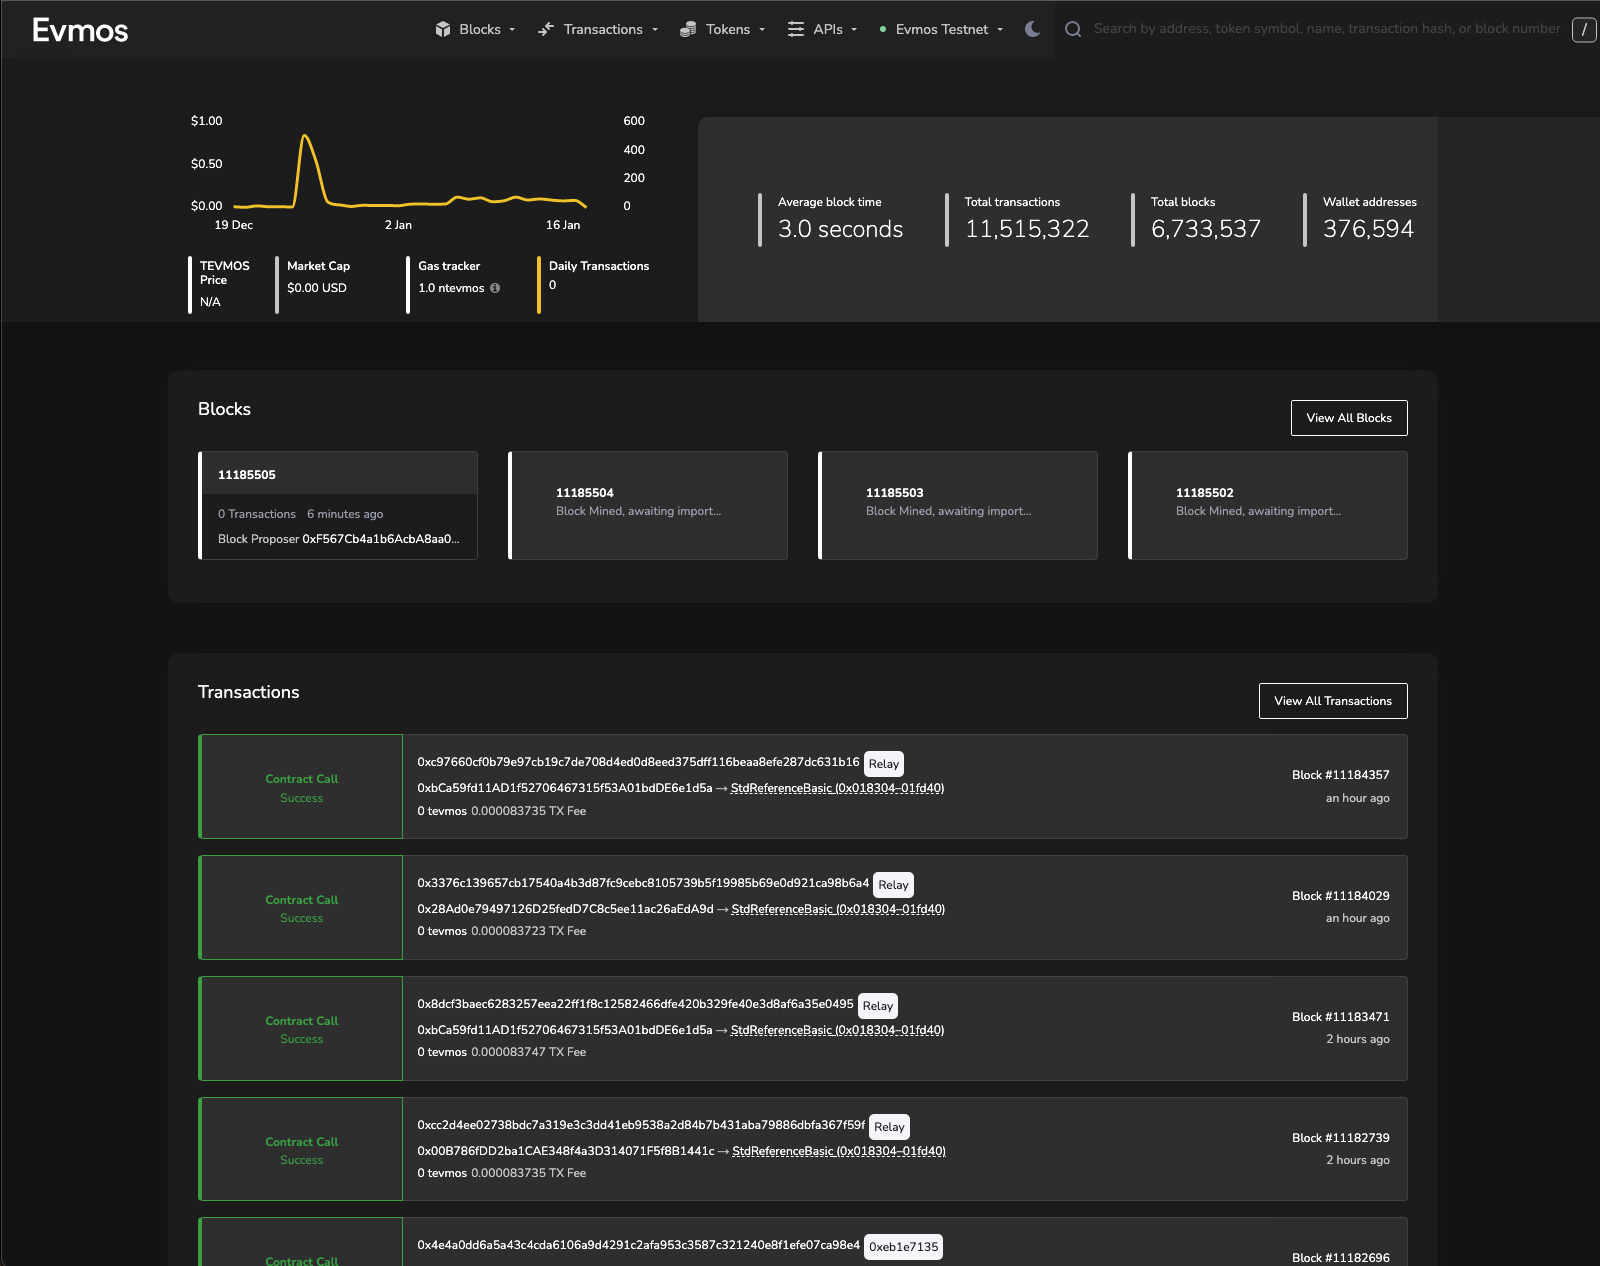
Verify Contract Deployment on EVM Explorer
Let’s view this block in the EVM Explorer https://evm.evmos.dev
To follow up, you can find the entire code for this project here.
Conclusion
This article provided a beginner-friendly guide to building and deploying smart contracts on the Cosmos network. Using the Hardhat development environment, we also demonstrated how to deploy a smart contract to the Cosmos network.
I'd love to connect with you on Twitter | LinkedIn | GitHub | Portfolio
See you in my next blog article. Take care!!!