Token Series: Build, Deploy & List ERC721 token on OpenSea

Software Engineer | Developer Advocate | Technical Writer | Content Creator
The technology that enables NFTs is one of the most important reasons they explode.
Tokens are practically impossible to discuss without mentioning crypto and Web3. Furthermore, tokens are categorized into fungible and non-fungible tokens (NFTs).
This post will teach us how to build and deploy the ERC721 (NFT) token and get listed on OpenSea.
What is ERC721 Token?
The ERC-721 sets a standard for NFT, which means that this form of Token is unique and may have a different value than another Token from the same Smart Contract, for example, due to its age, rarity, or even its aesthetic.
ERC-721 tokens and NFTs can represent ownership of a wide range of natural and digital assets, making them versatile and dynamic. They can represent virtual collectibles like CryptoKitties, tangible goods like houses, and negative value assets like debt.
It has features like transferring tokens from one account to another, getting an account's current token balance, finding the owner of a specific token, and seeing the entire token supply on the network.
We'll utilize IPFS, a peer-to-peer file storing and distributed system, to host our NFT art and create a metadata file before developing our NFT contract.
What is IPFS
IPFS is a distributed file, website, application, and data storage and retrieval system.
IPFS is a distributed file system. Git, a version control program, is one of the most widely used decentralized systems. Every developer who cloned a repository has a copy of the complete repository, including the history, on their computer, making Git a distributed system.
Any reproduction of the central repository can be used to restore it if lost, adopting the distributed notion to store and retrieve files.
Upload Metadata to IPFS
Follow the installation guide in the IPFS documentation to download and install IPFS CLI for our operating system.
After successful installation, we will go through the following steps to host our image and metadata.
Creating IPFS repository
We will use the following command to create the IPFS repository.
ipfs init
Starting the IPFS daemon
We will start the IPFS daemon in a separate terminal using the following command.
ipfs daemon
We should see something similar to what we have below.
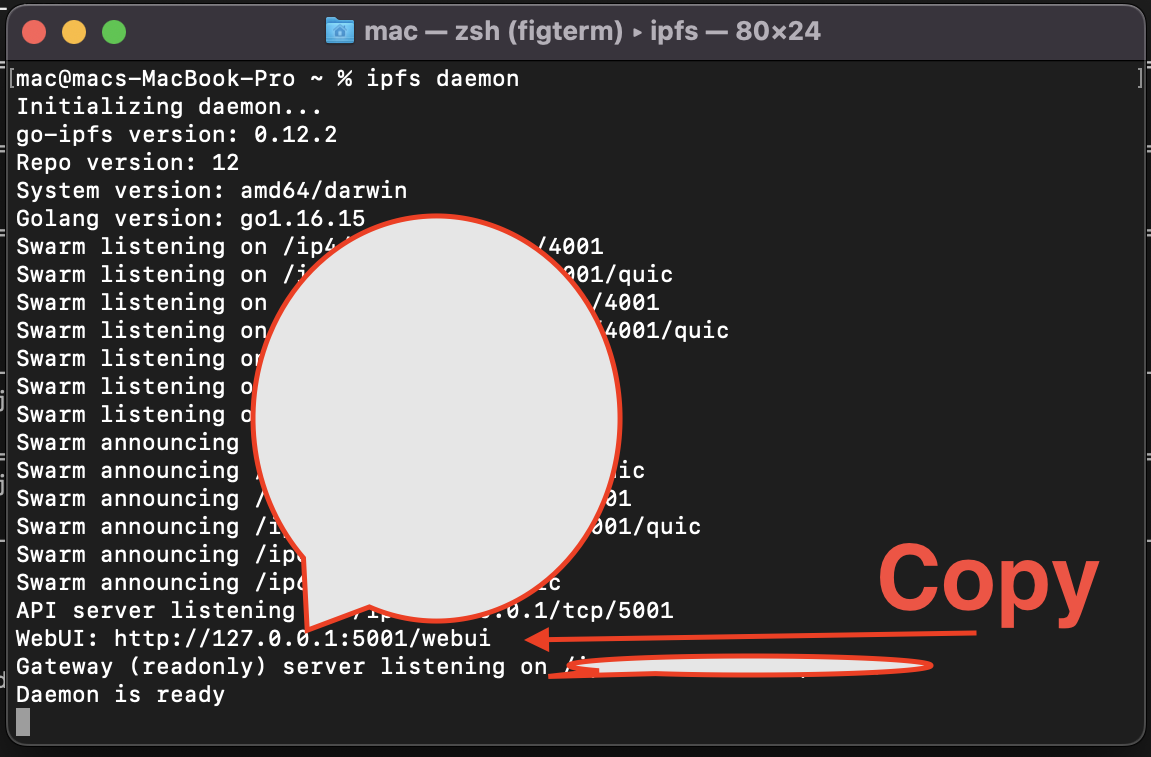
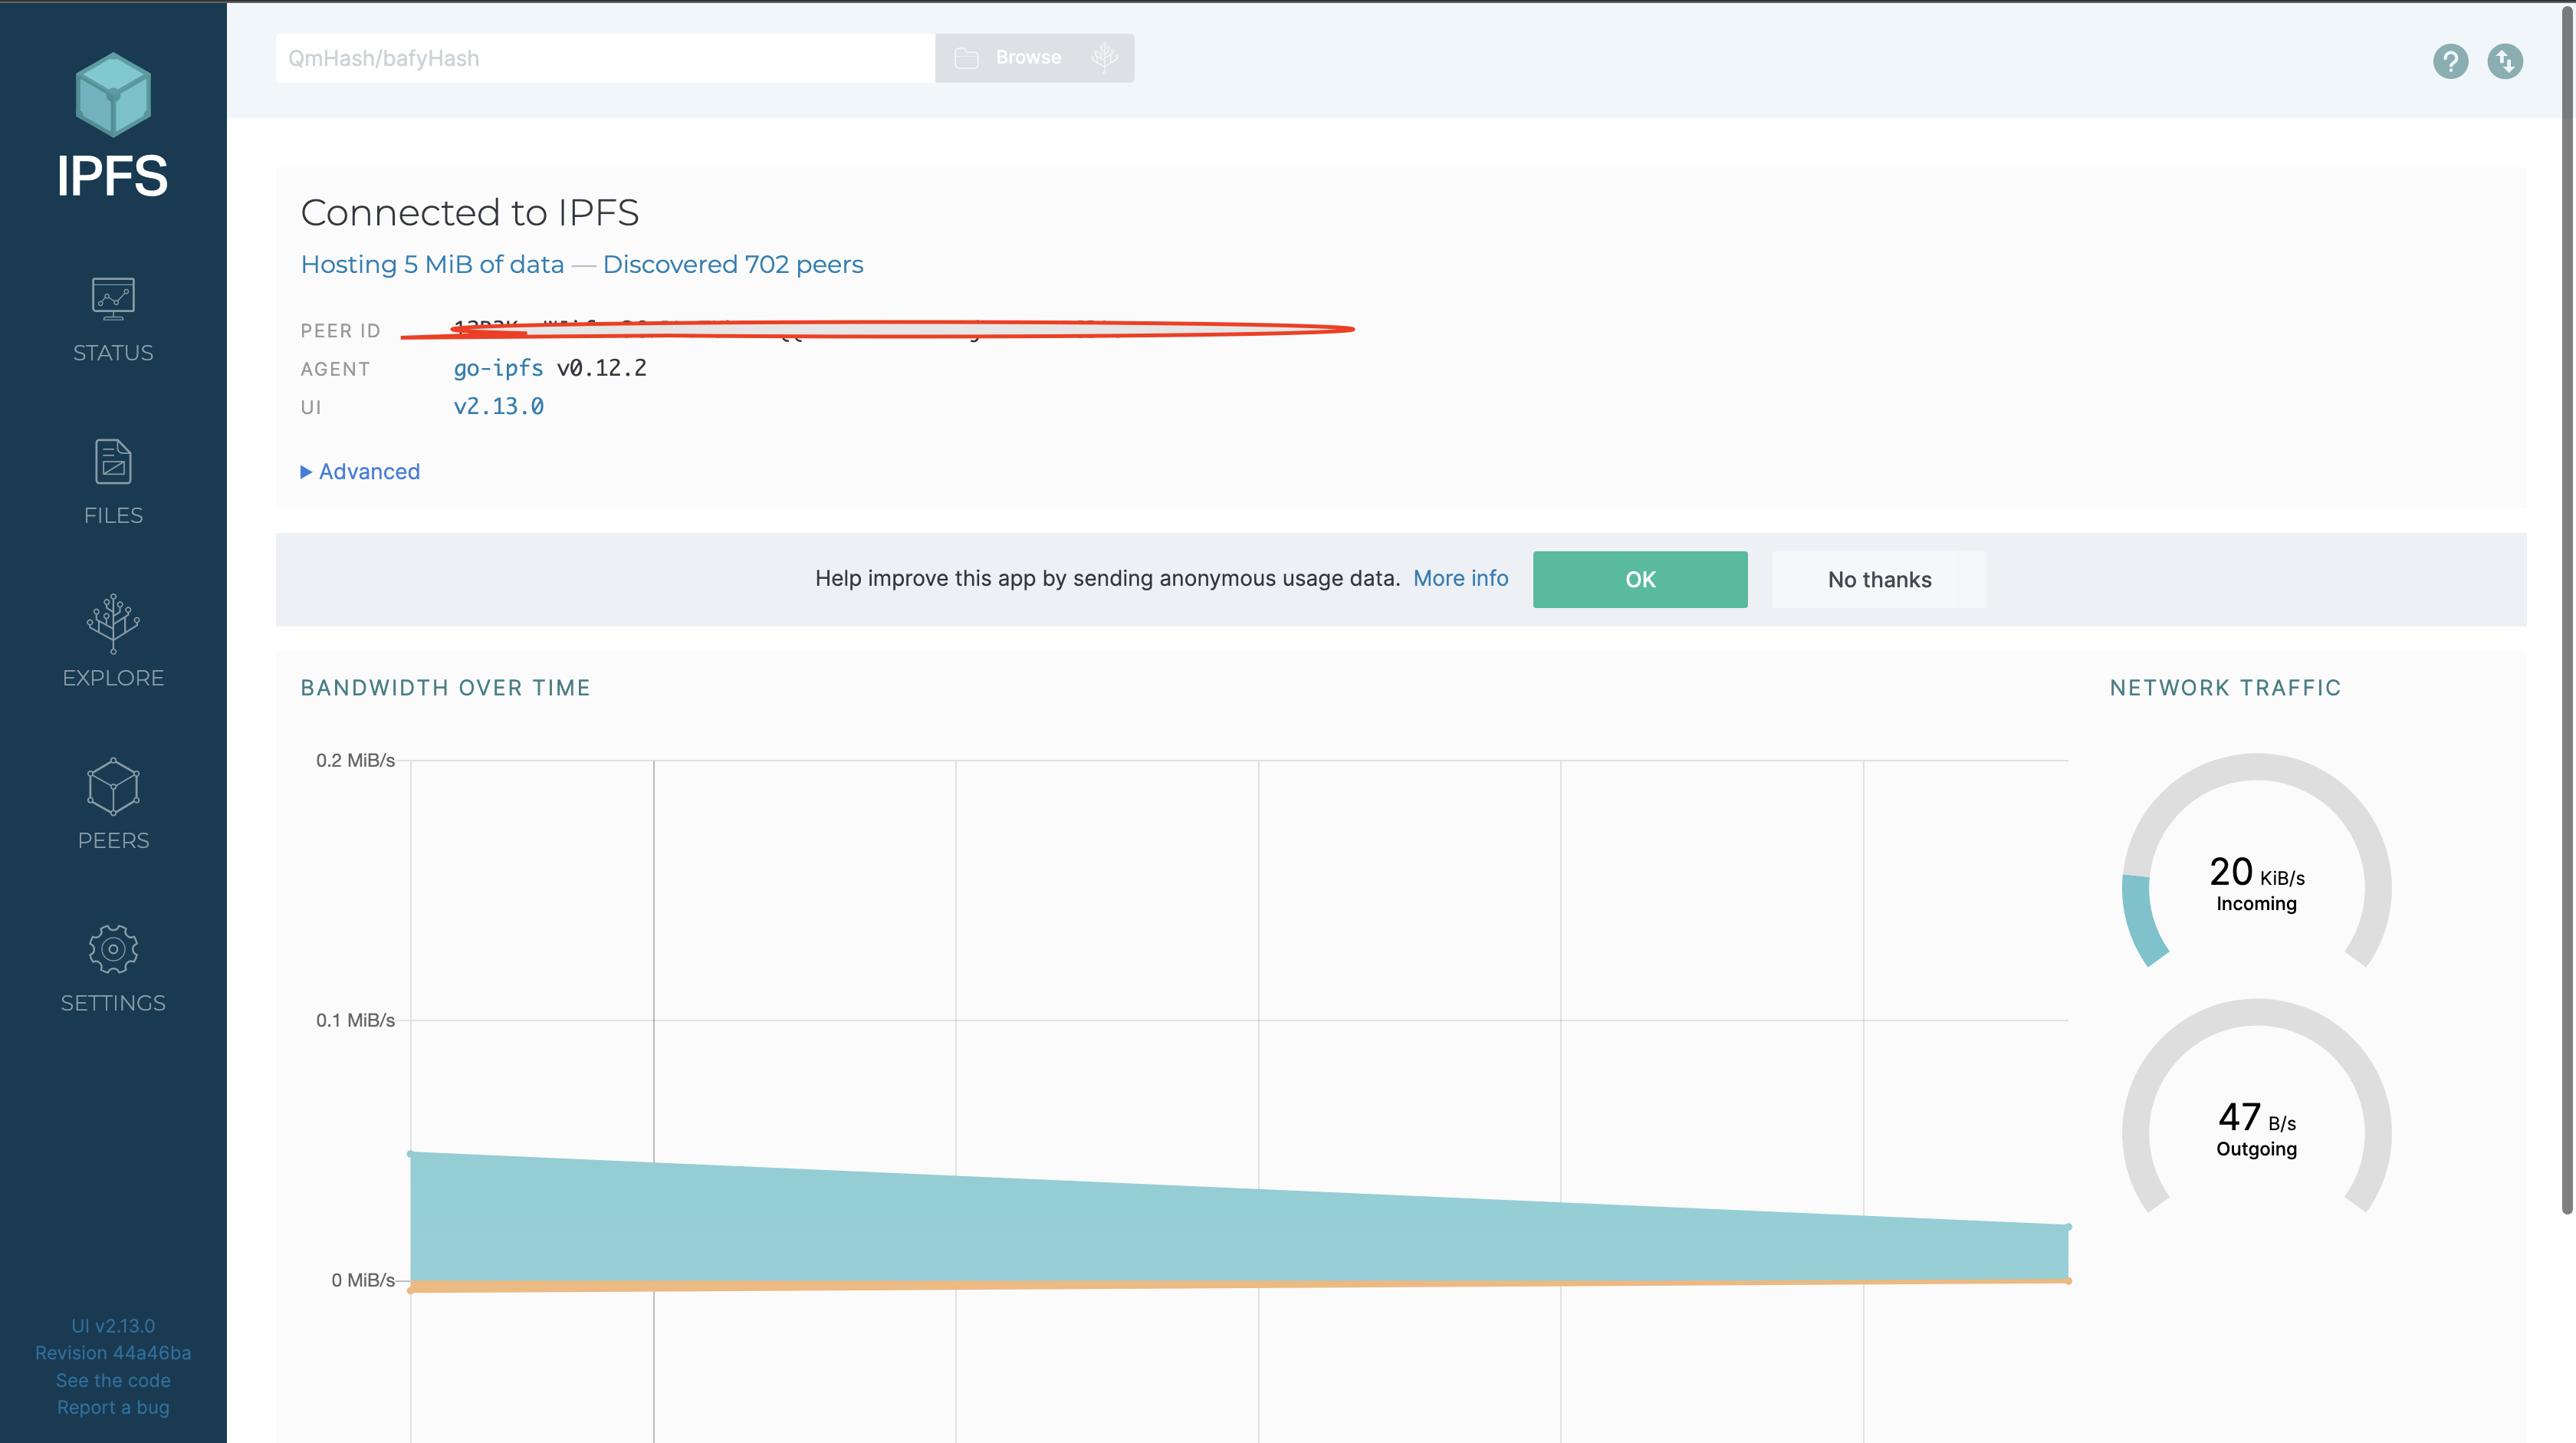
Let us head over to the URL we copied above. We should see something similar to what is shown below.
Adding an image to IPFS
This section will add an image(s) my-art.png to IPFS directly on our browser.
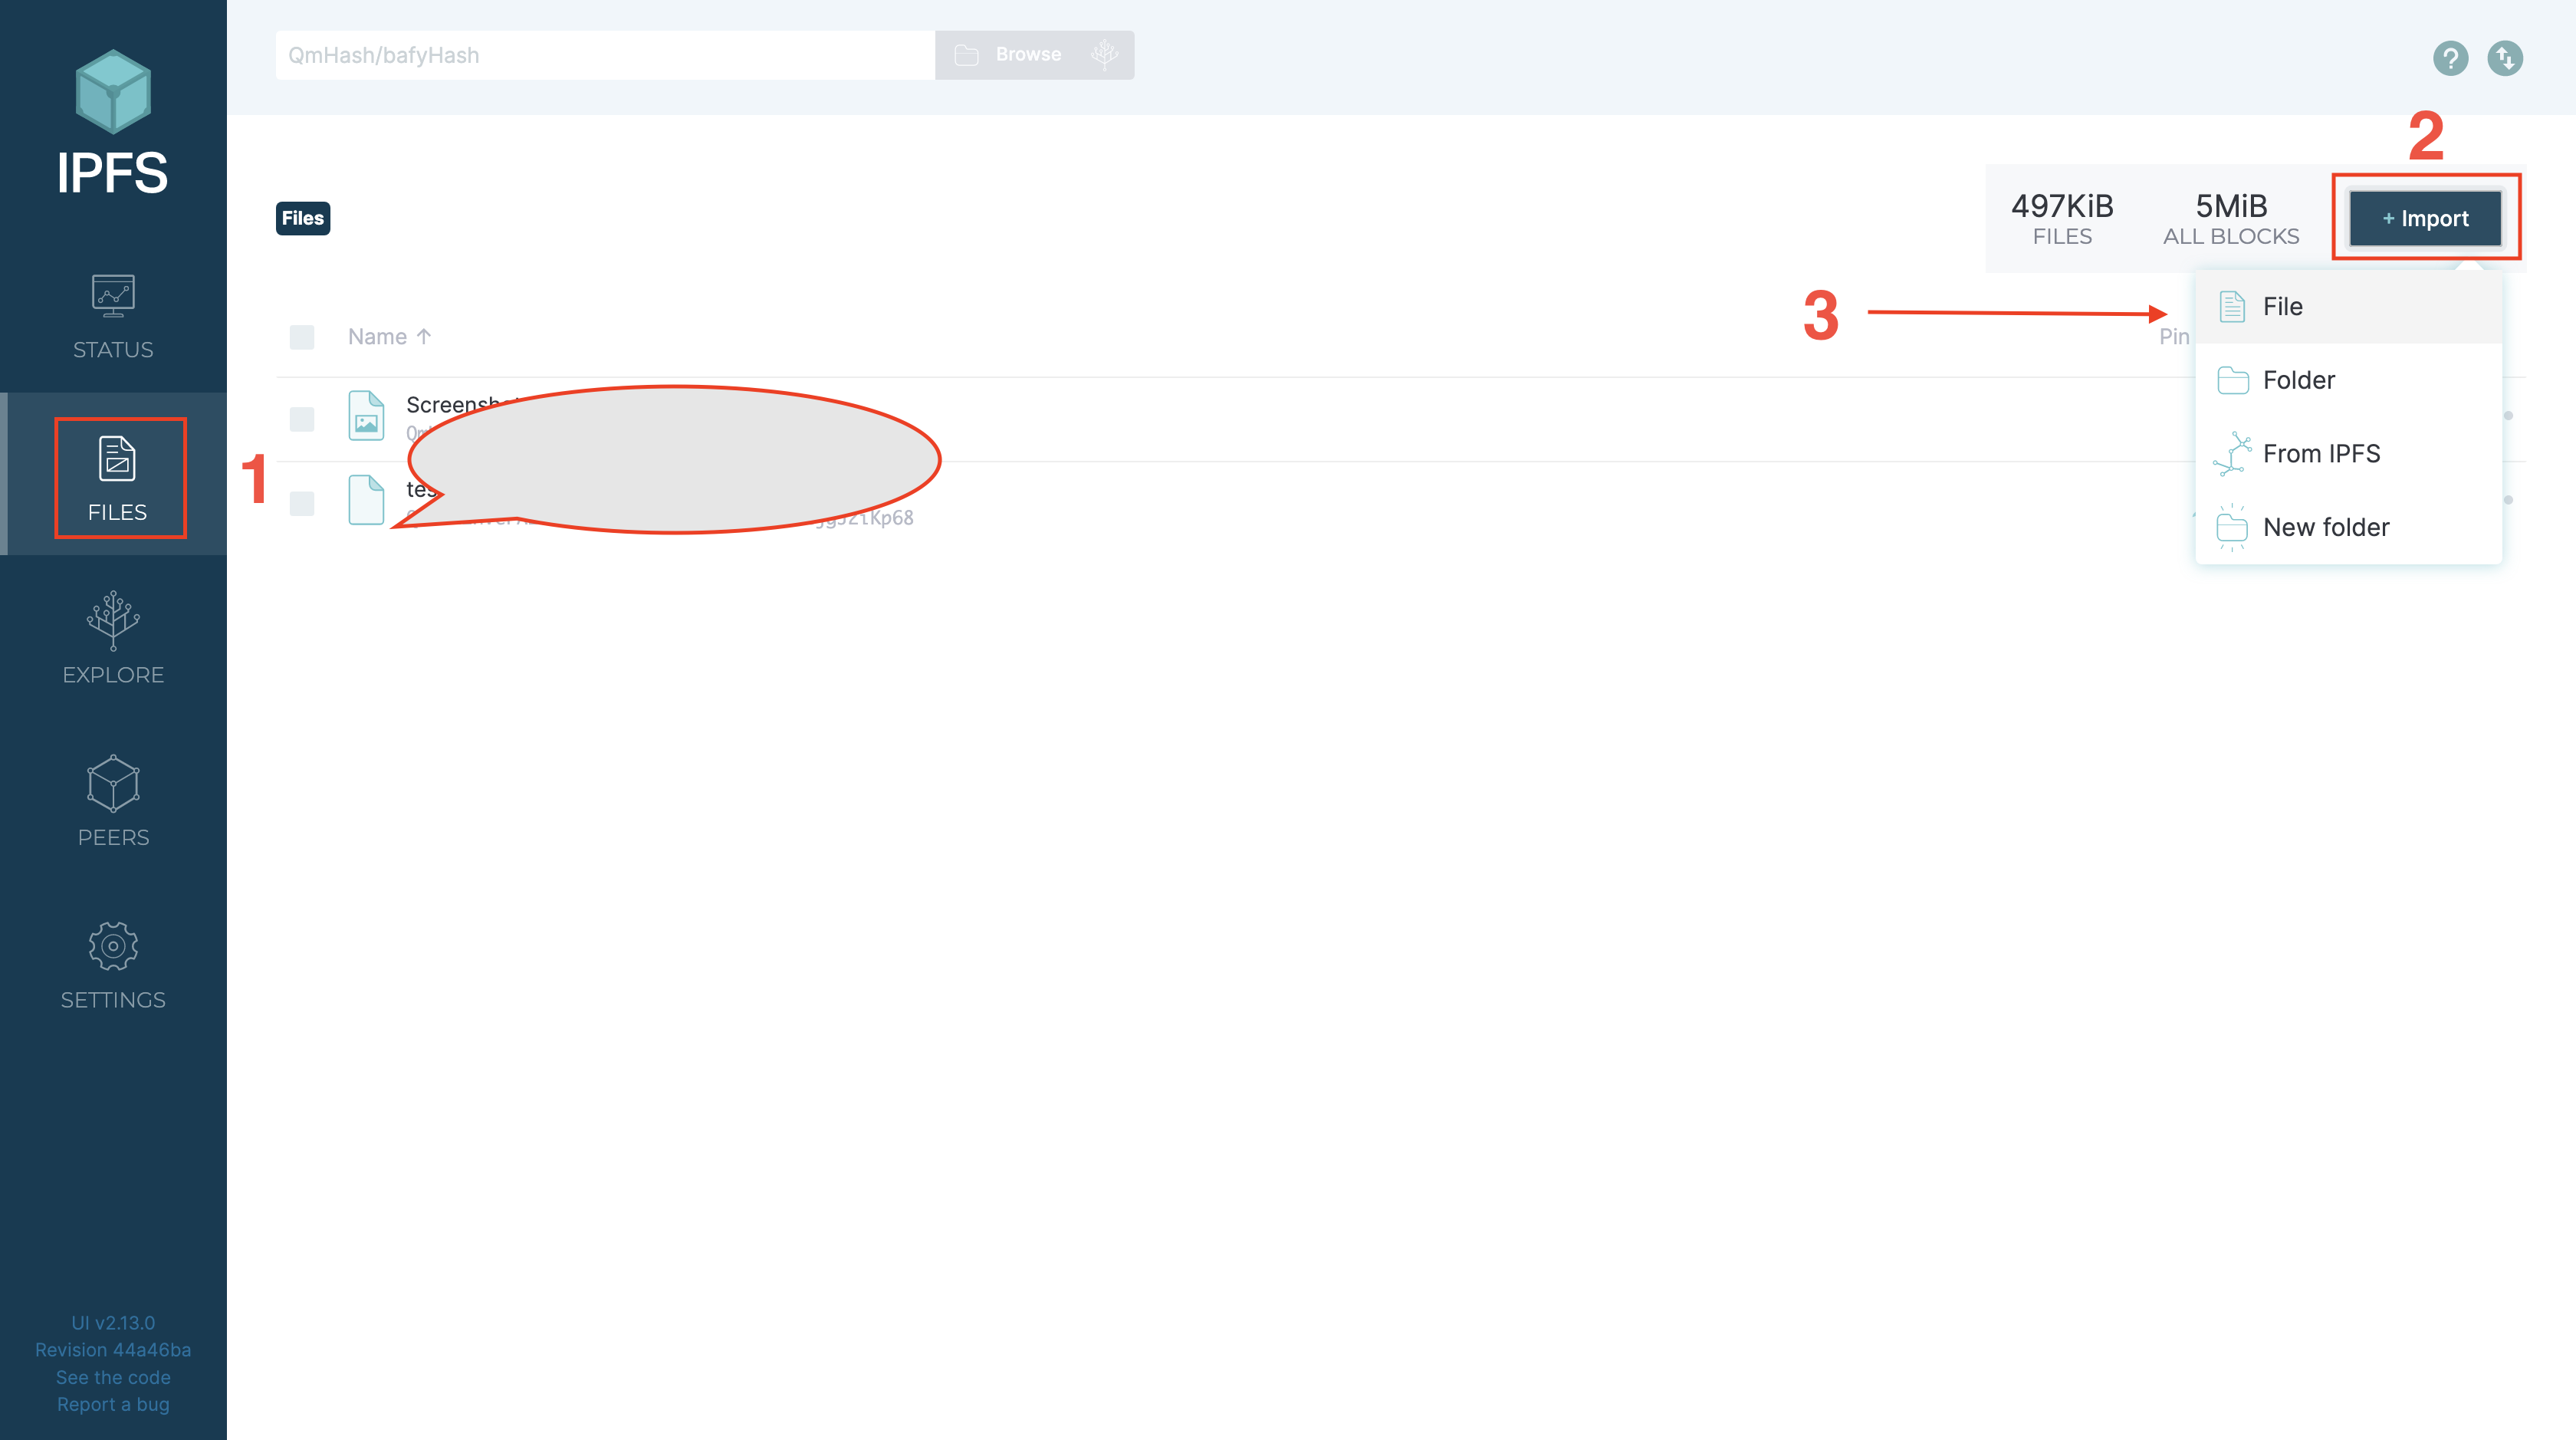
We navigate to the FILES tab in the image above to upload any image of our choice. After uploading we can copy the CID - QmbaYgLSYkFqvUJ6Dh393vkByAfJFwpxoUgWTDshQdV452 as shown below.

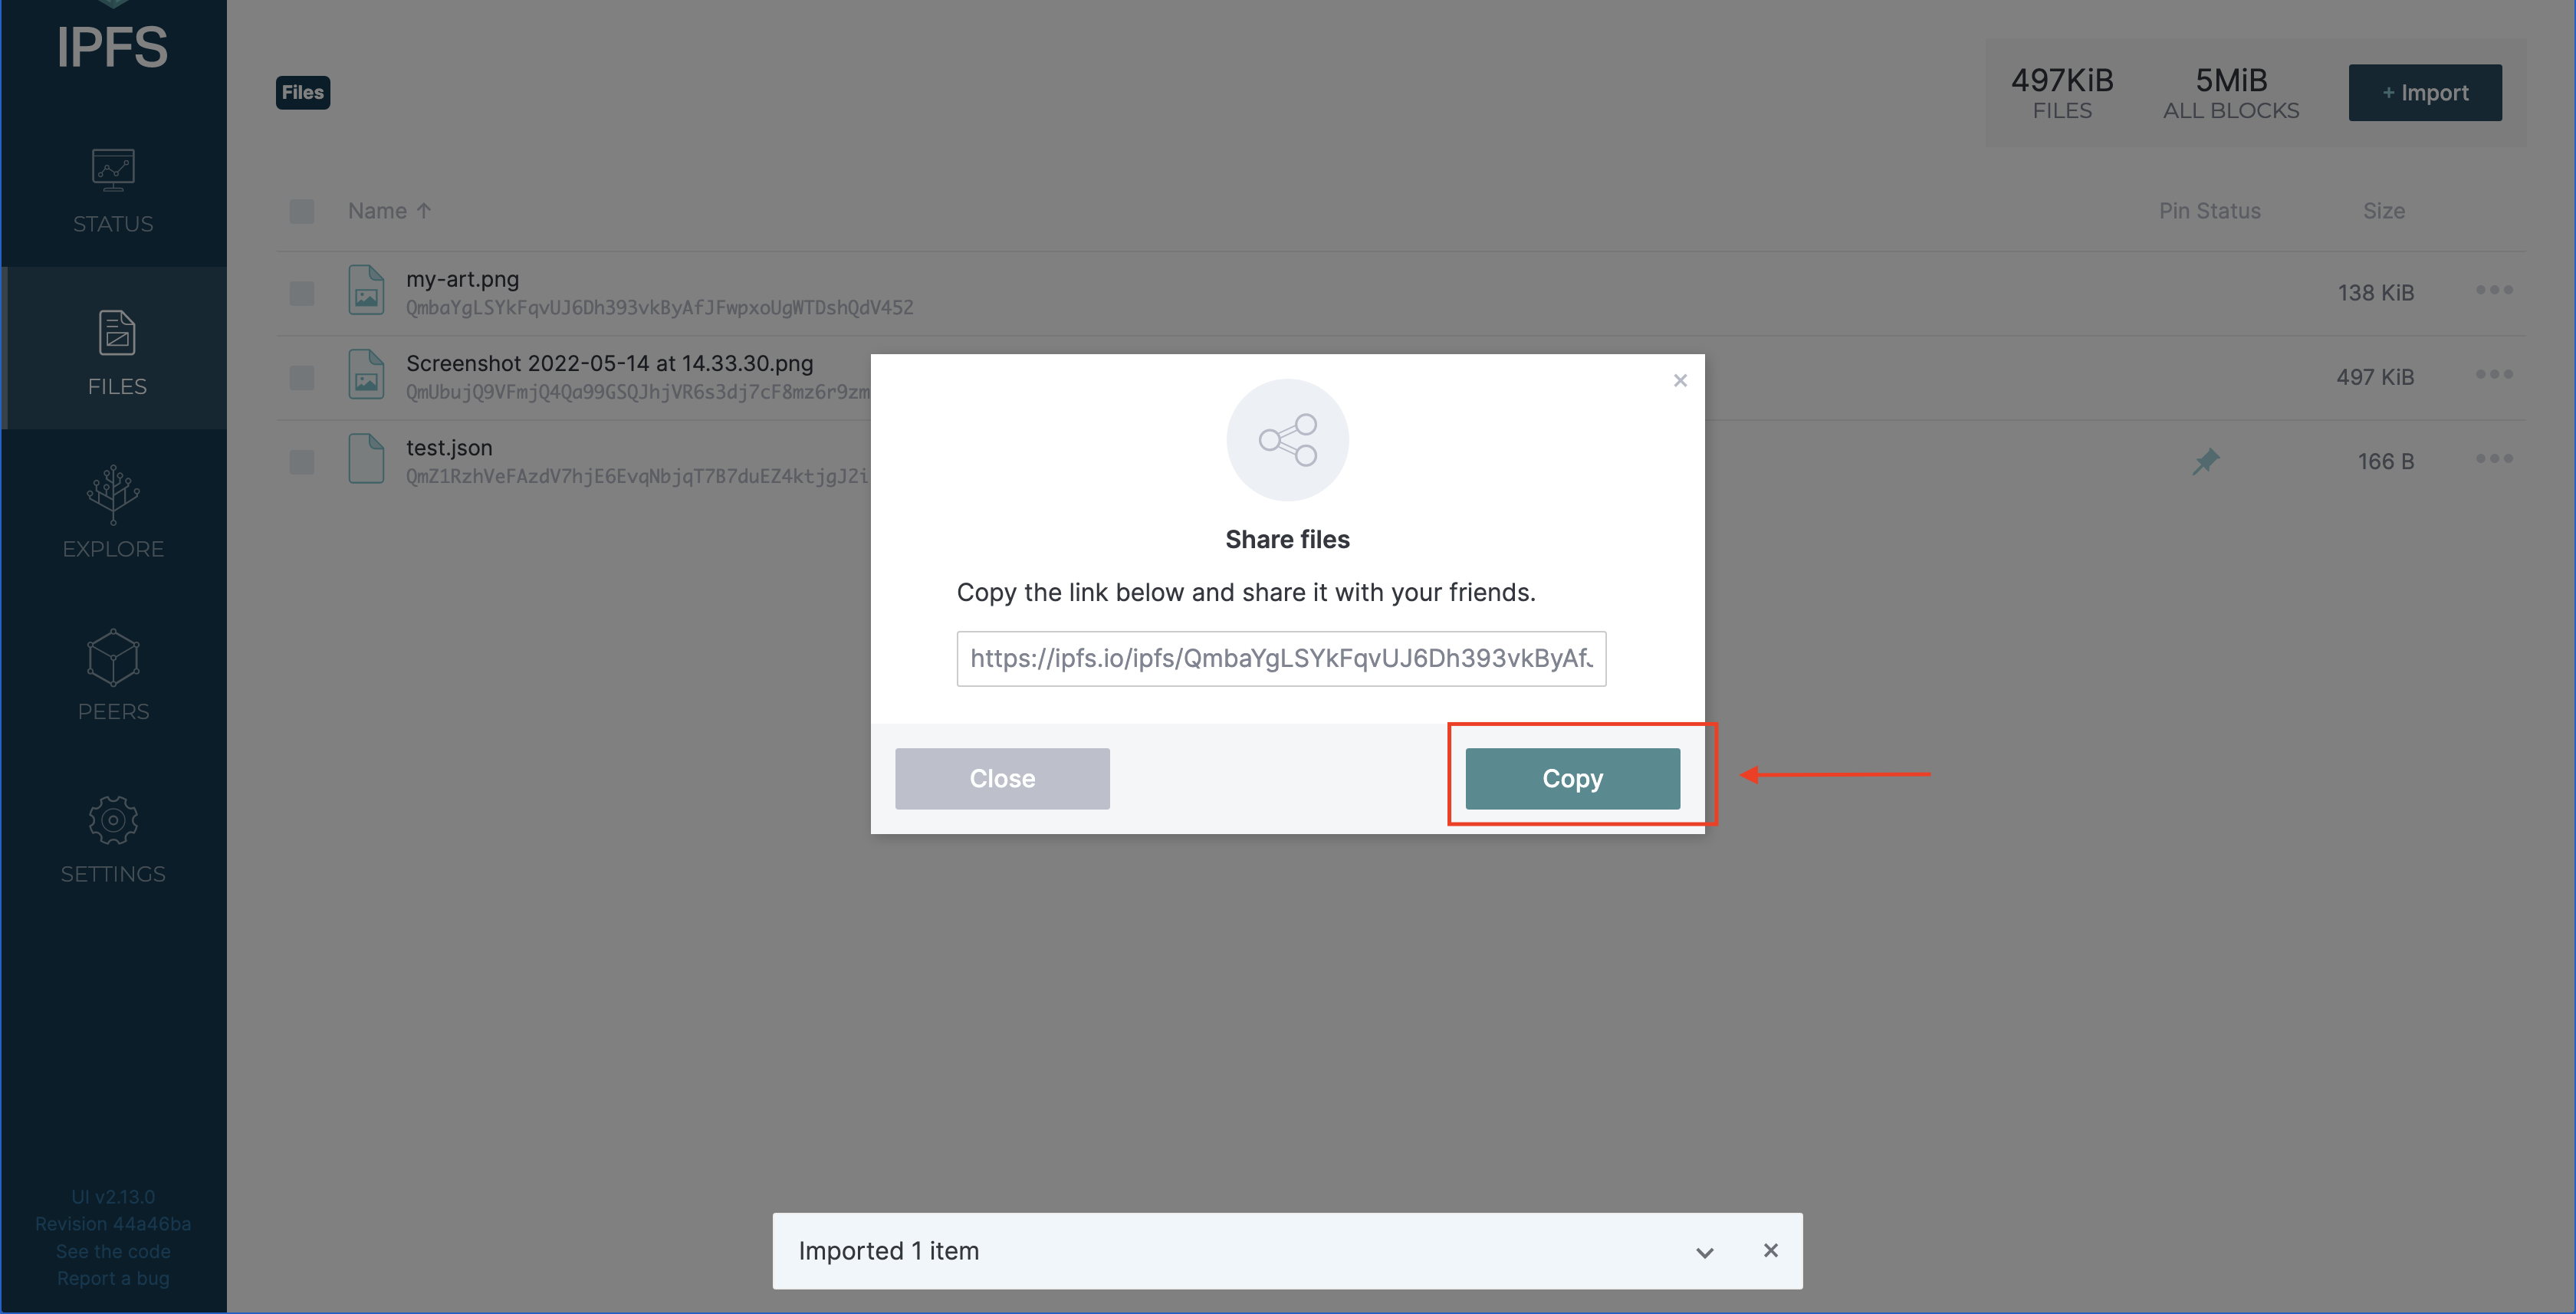
Let us copy the link(URL) provided by IPFS https://ipfs.io/ipfs/QmbaYgLSYkFqvUJ6Dh393vkByAfJFwpxoUgWTDshQdV452
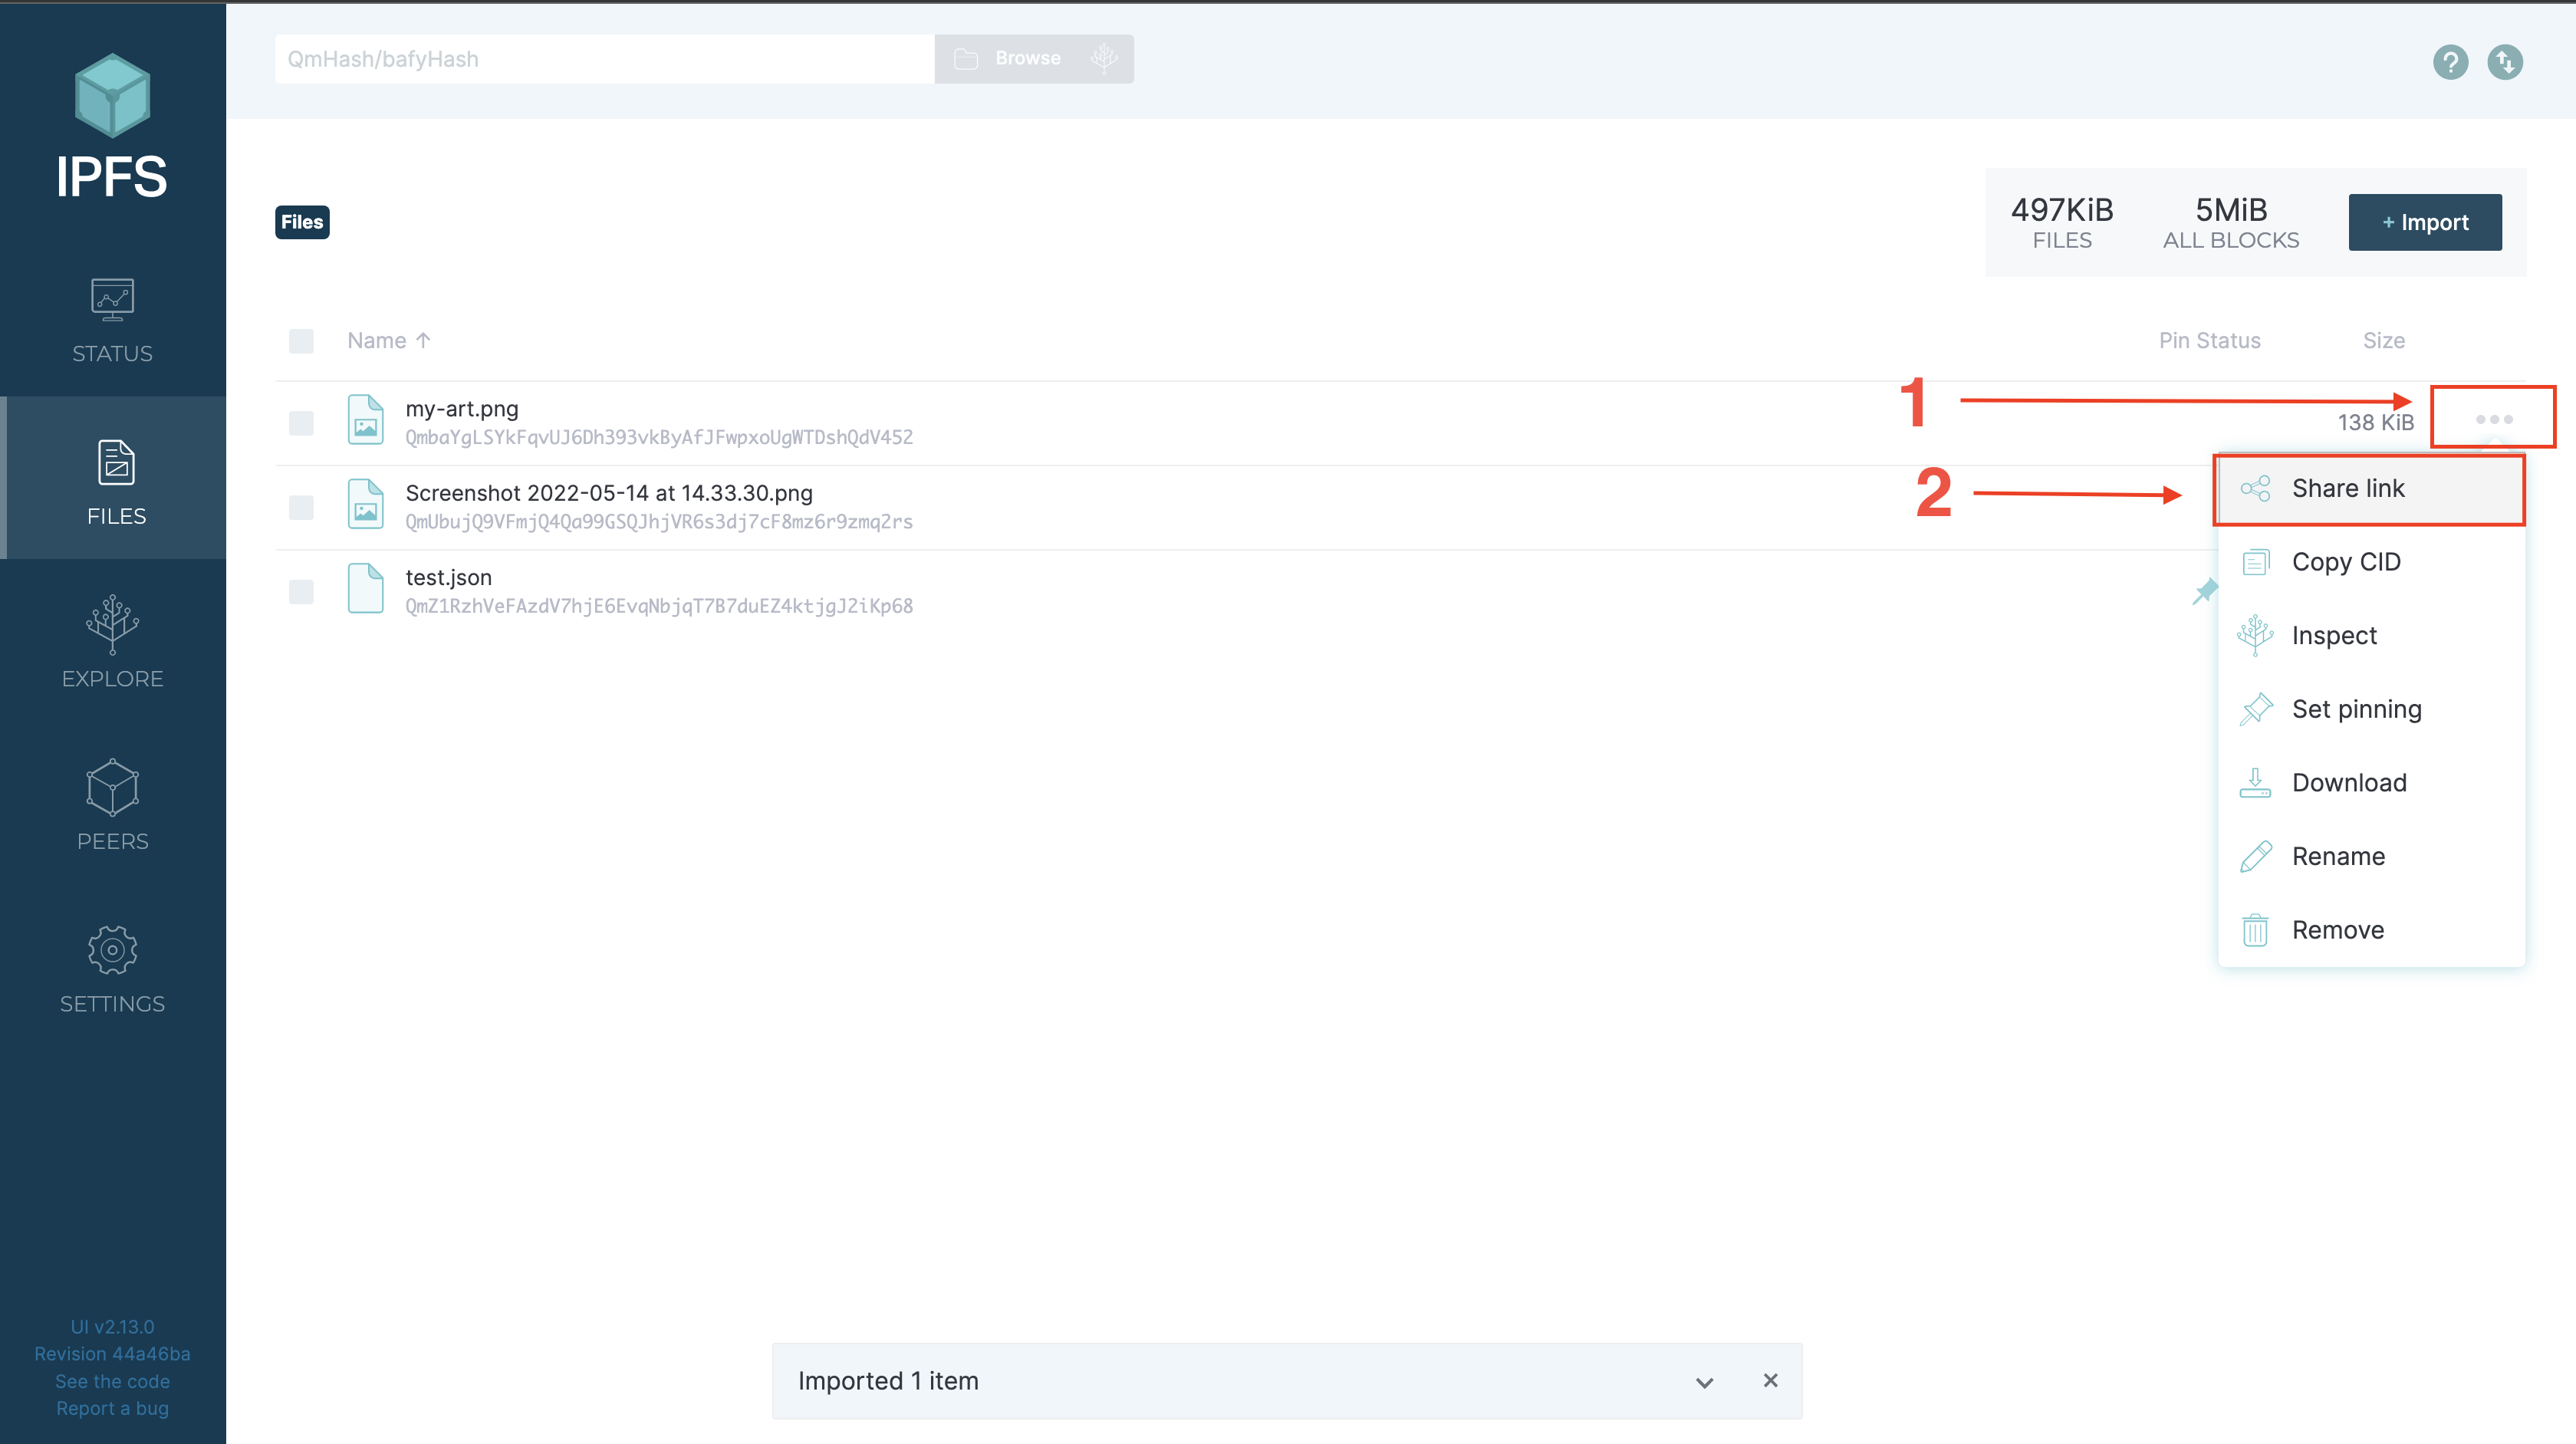
Copy the URL.
Opening the link provided in the browser, we should have our beautiful art displayed on our browser, as shown below.

Note: It may take several minutes(approx 20min or less) before our art gets rendered on the browser for the first time. Be patient :(
Other decentralized storage systems, such as Filebase, Pinata, and others, can be used to bypass the entire process of waiting for minutes.
Checkout these tutorials
- How to Use IPFS Desktop With Pinata
- Uploading your NFT content to IPFS leveraging Pinata
- Filebase: Building Web3 with Web3
Adding Metadata to IPFS
Create a JSON file my-art.json using the following command.
touch my-art.json
Let us update it with the following data.
{
     "name": "My Art",
     "description": "This image shows my cute art.",
     "image":
     "https://ipfs.io/ipfs/QmbaYgLSYkFqvUJ6Dh393vkByAfJFwpxoUgWTDshQdV452"
}
The image field should contain the art URL we created earlier.
Next, we will add it to IPFS by uploading it the way we uploaded the image in the previous step.
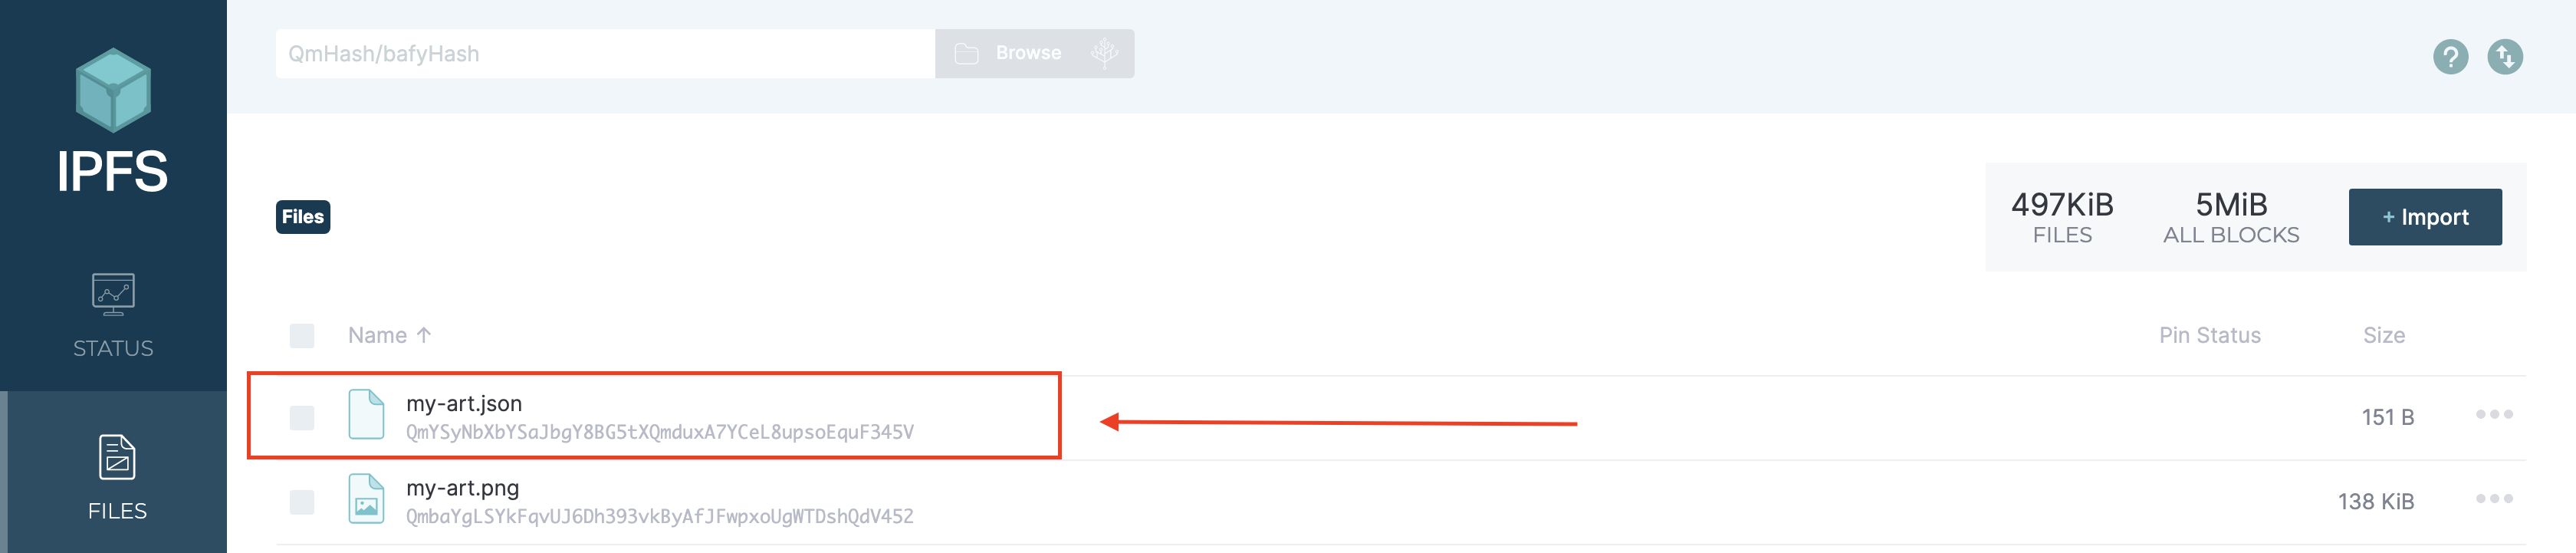
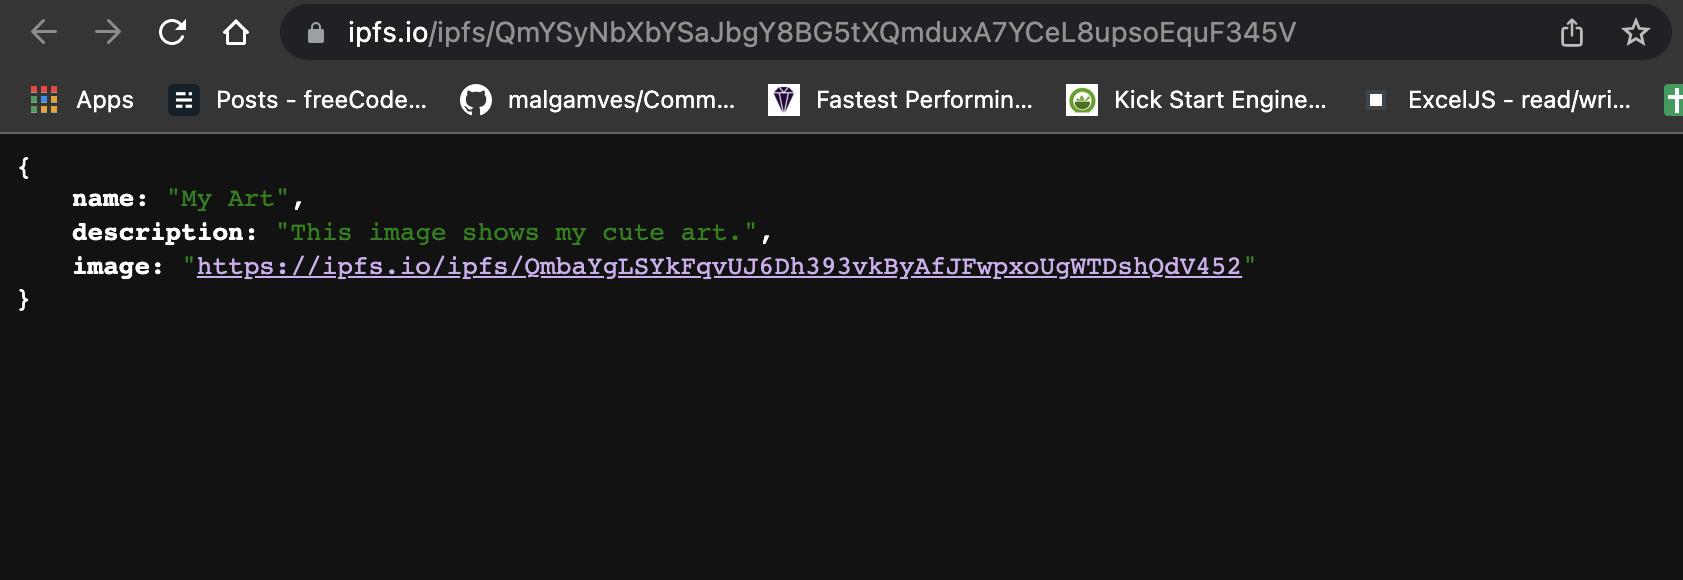
We need to wait some minutes(approx 20 min or less) for us to preview the URL on the browser via https://ipfs.io/ipfs/QmYSyNbXbYSaJbgY8BG5tXQmduxA7YCeL8upsoEquF345V
Once it's ready, we will have something similar to what we have below.
Build an ERC721 Token Smart Contract with Solidity using the remix IDE
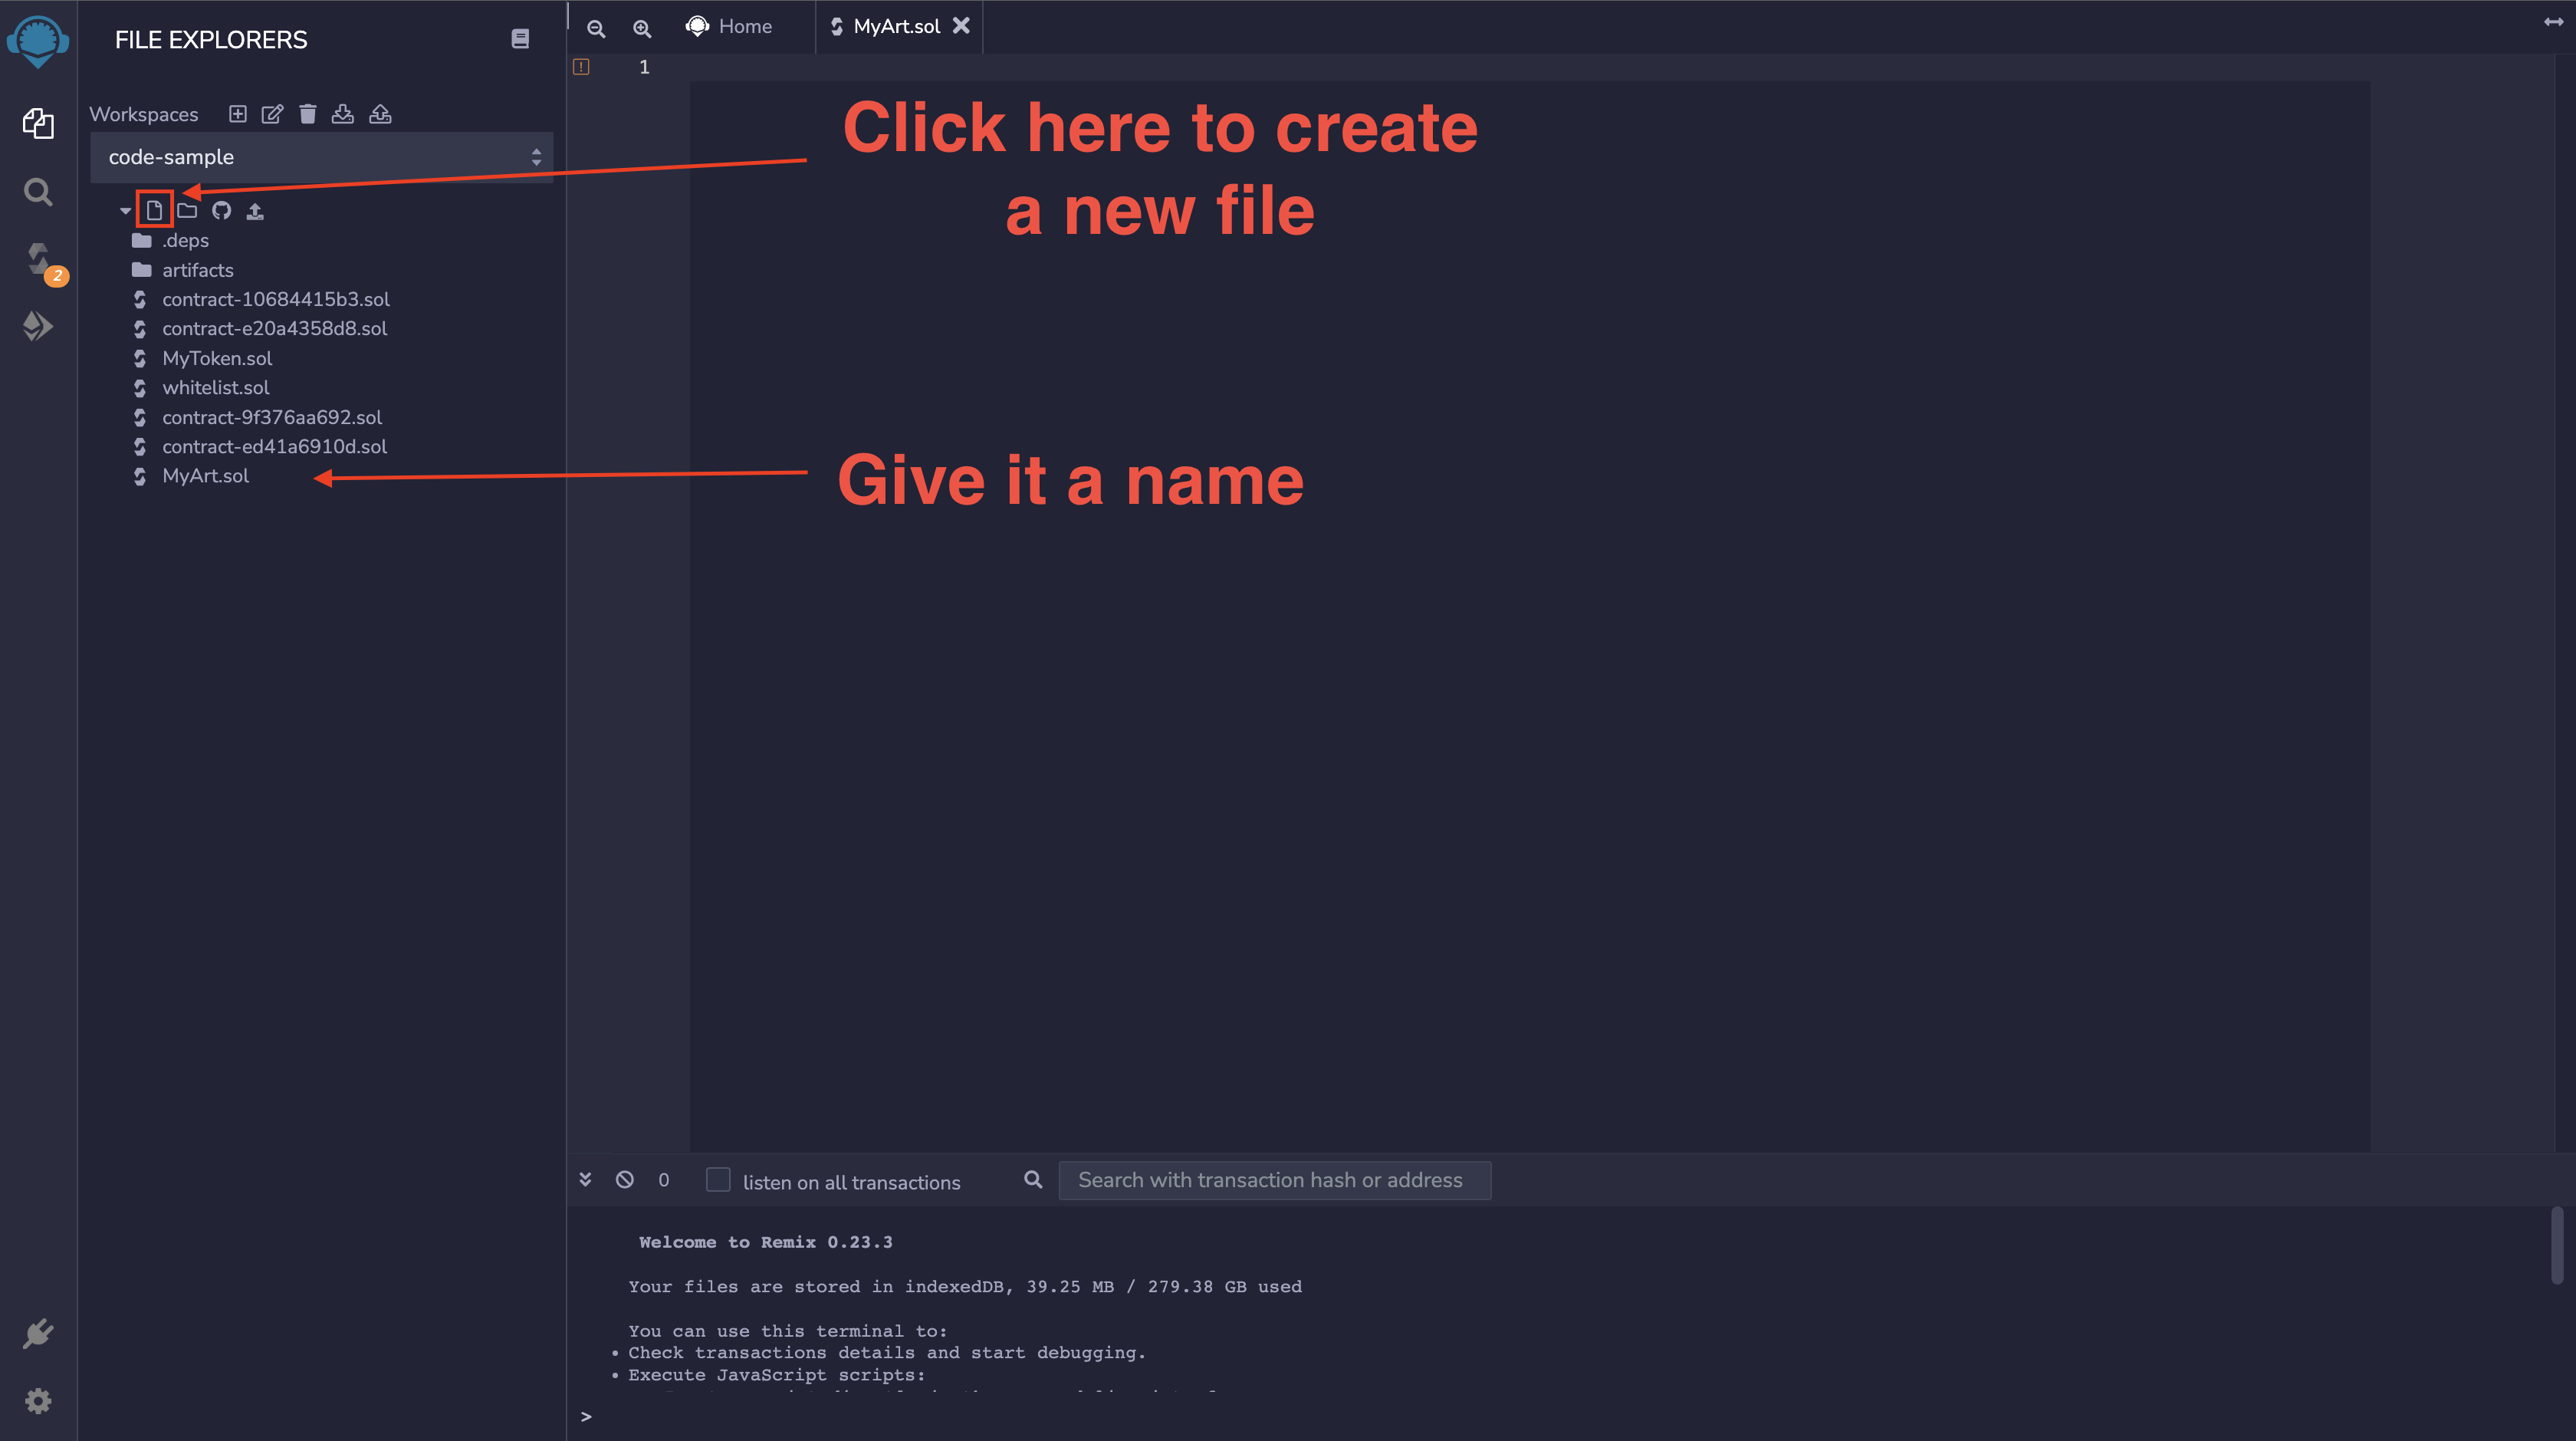
We'll learn how to utilize https://remix.ethereum.org/, a free, easy-to-use IDE with a solidity-compatible IntelliJ feature and decent compile-time errors, to build and deploy an ERC721 NFT Smart Contract.
Next, we will navigate to the Remix site and create a new file called MyArt.sol as shown below.
Let's update the MyArt.sol file with the following code snippet.
// SPDX-License-Identifier: MIT
pragma solidity ^0.8.4;

import "@openzeppelin/contracts@4.6.0/token/ERC721/ERC721.sol";
import "@openzeppelin/contracts@4.6.0/access/Ownable.sol";
import "@openzeppelin/contracts@4.6.0/utils/Counters.sol";

contract Wizard is ERC721, Ownable {
    using Counters for Counters.Counter;

    Counters.Counter private _tokenIdCounter;

    constructor() ERC721("MyArt", "MAT") {}

    function _baseURI() internal pure override returns (string memory) {
        return "<Add the metadata URL here>";
    }

    function safeMint(address to) public onlyOwner {
        uint256 tokenId = _tokenIdCounter.current();
        _tokenIdCounter.increment();
        _safeMint(to, tokenId);
    }
}
In the code snippet above, we:
- Imported the OpenZeppelin ERC721 contract, Ownable, and Counter
- Initialize the Token, inheriting from the ERC721.sol contract
- Declared a new contract called
MyArt,using the Solidity keyword contract, while inheriting the ERC721 OpenZeppelin's contract using theiskeyword. - Created a function that returns our
_baseURI - Created a function
safeMintthat allows users to mintNFT safely.
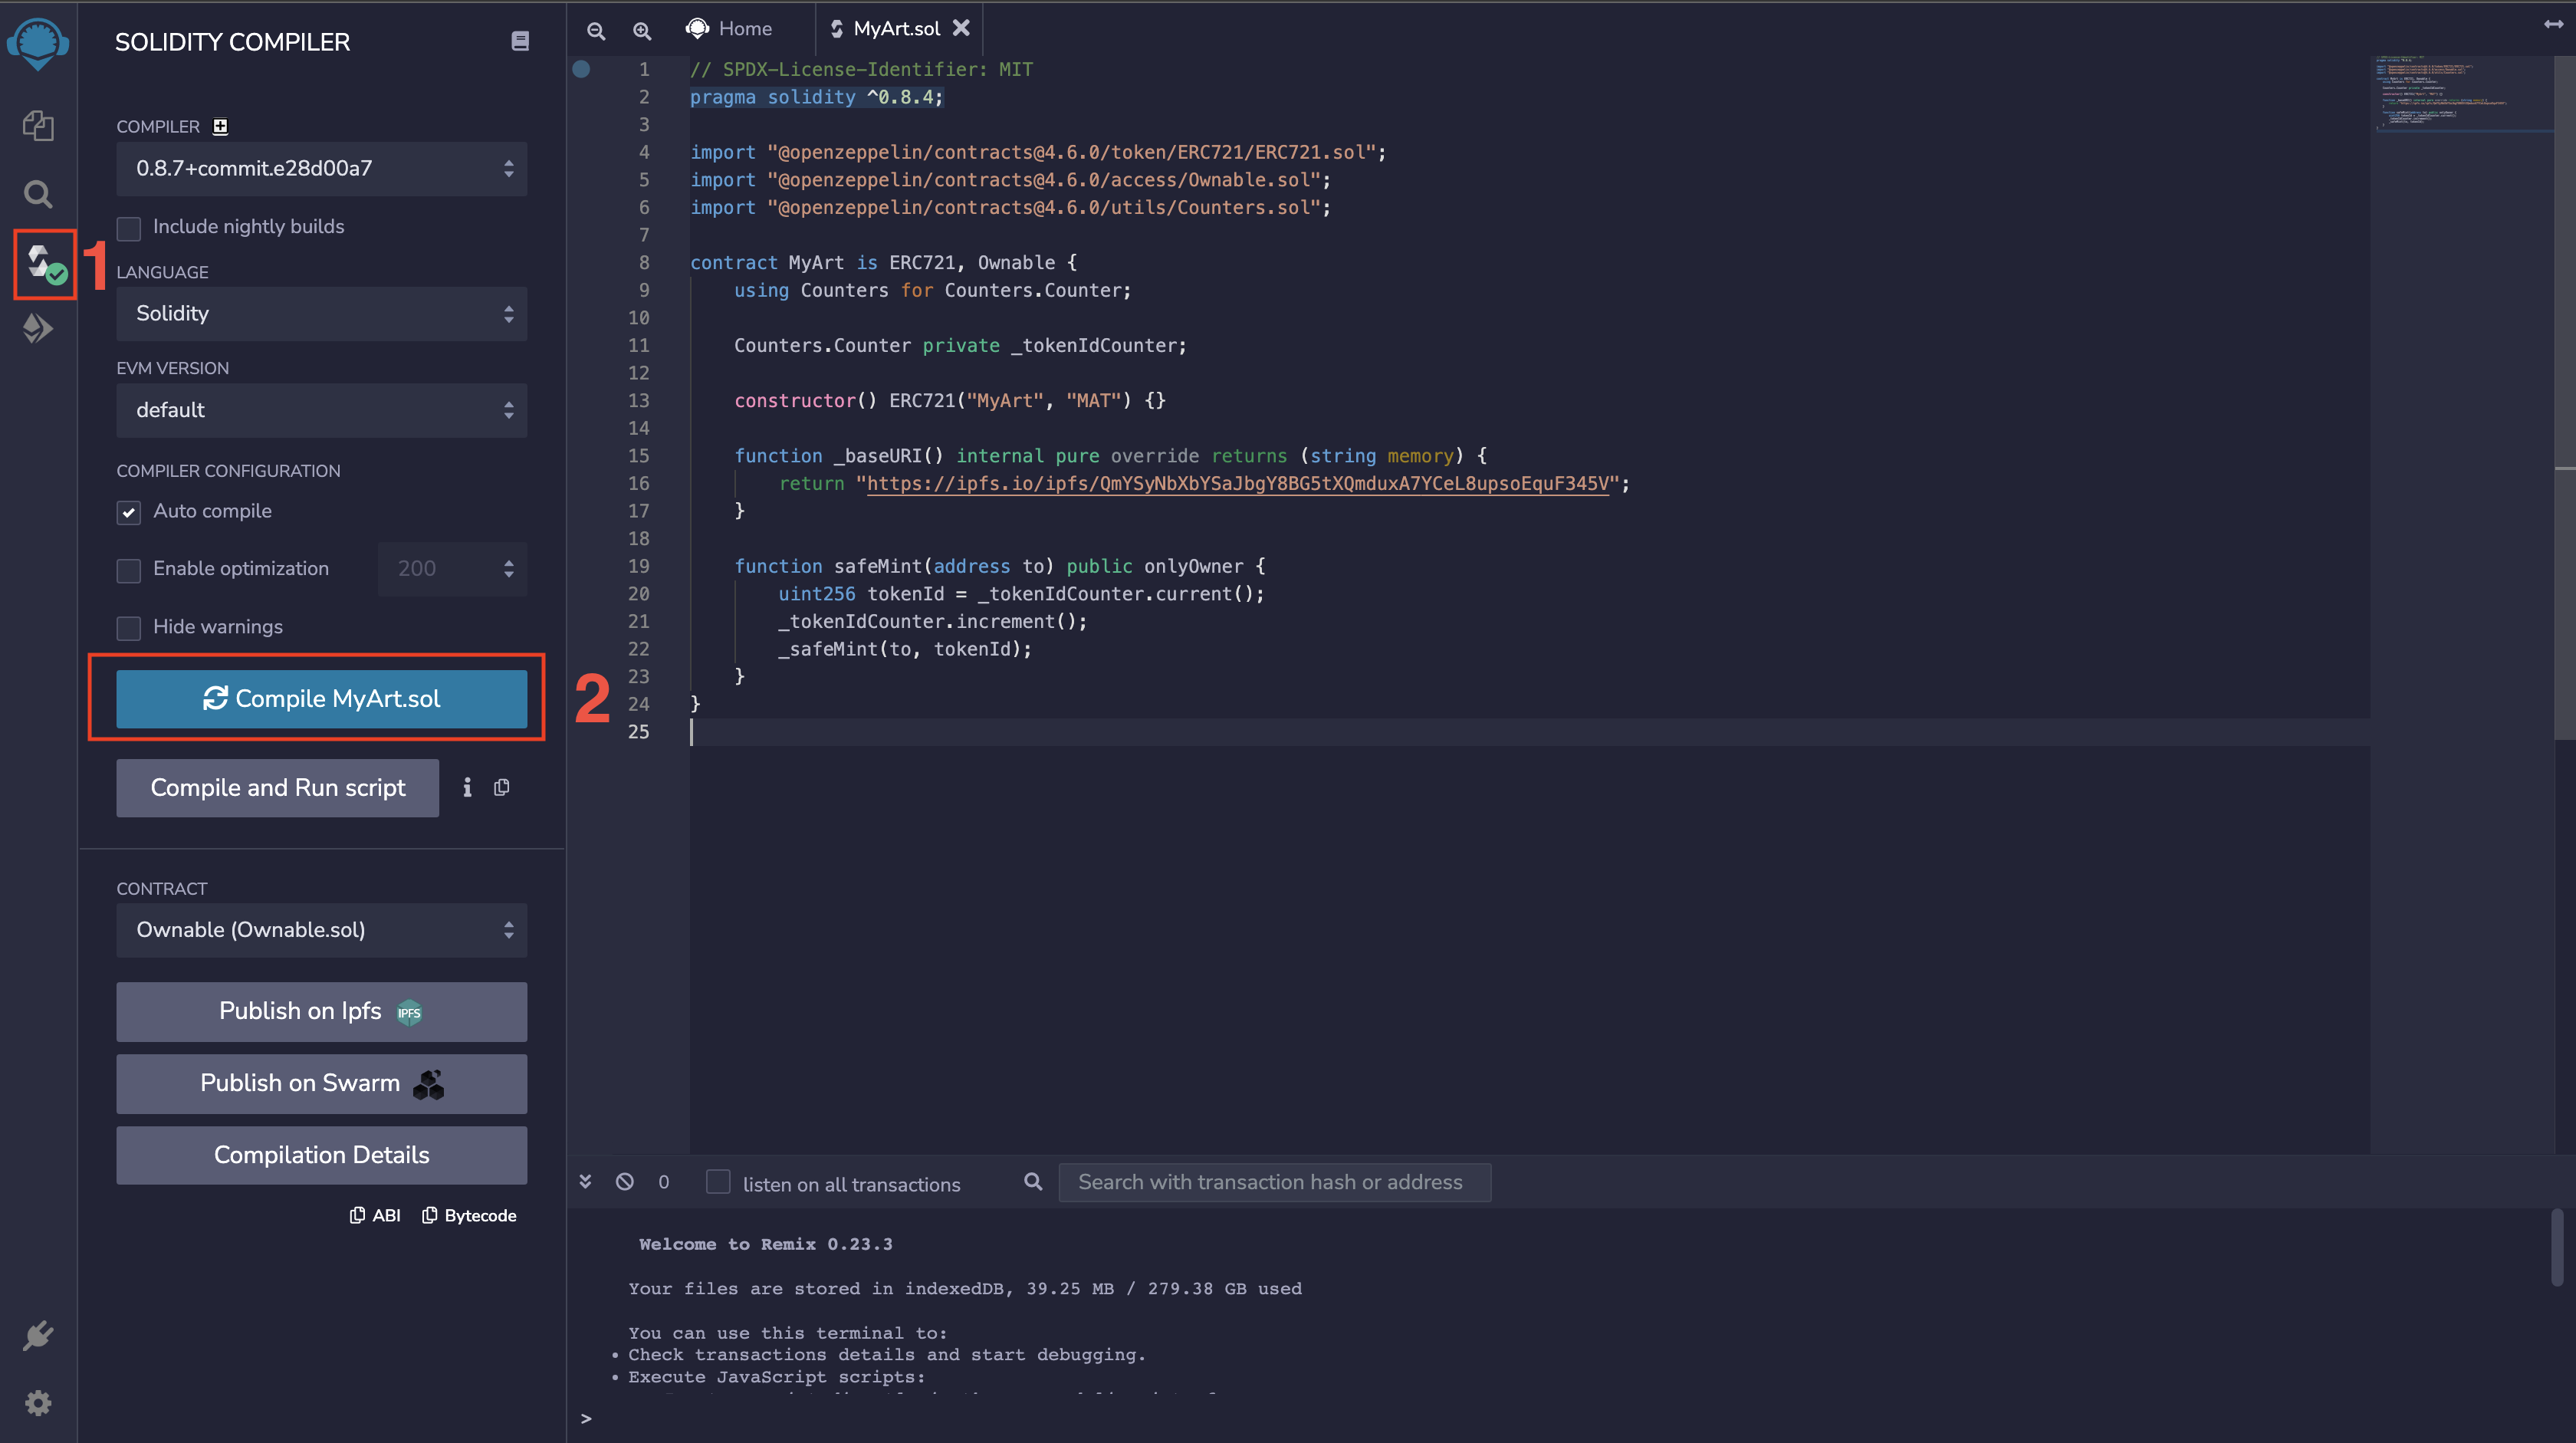
Next, we will compile our contract and get it ready for deployment.
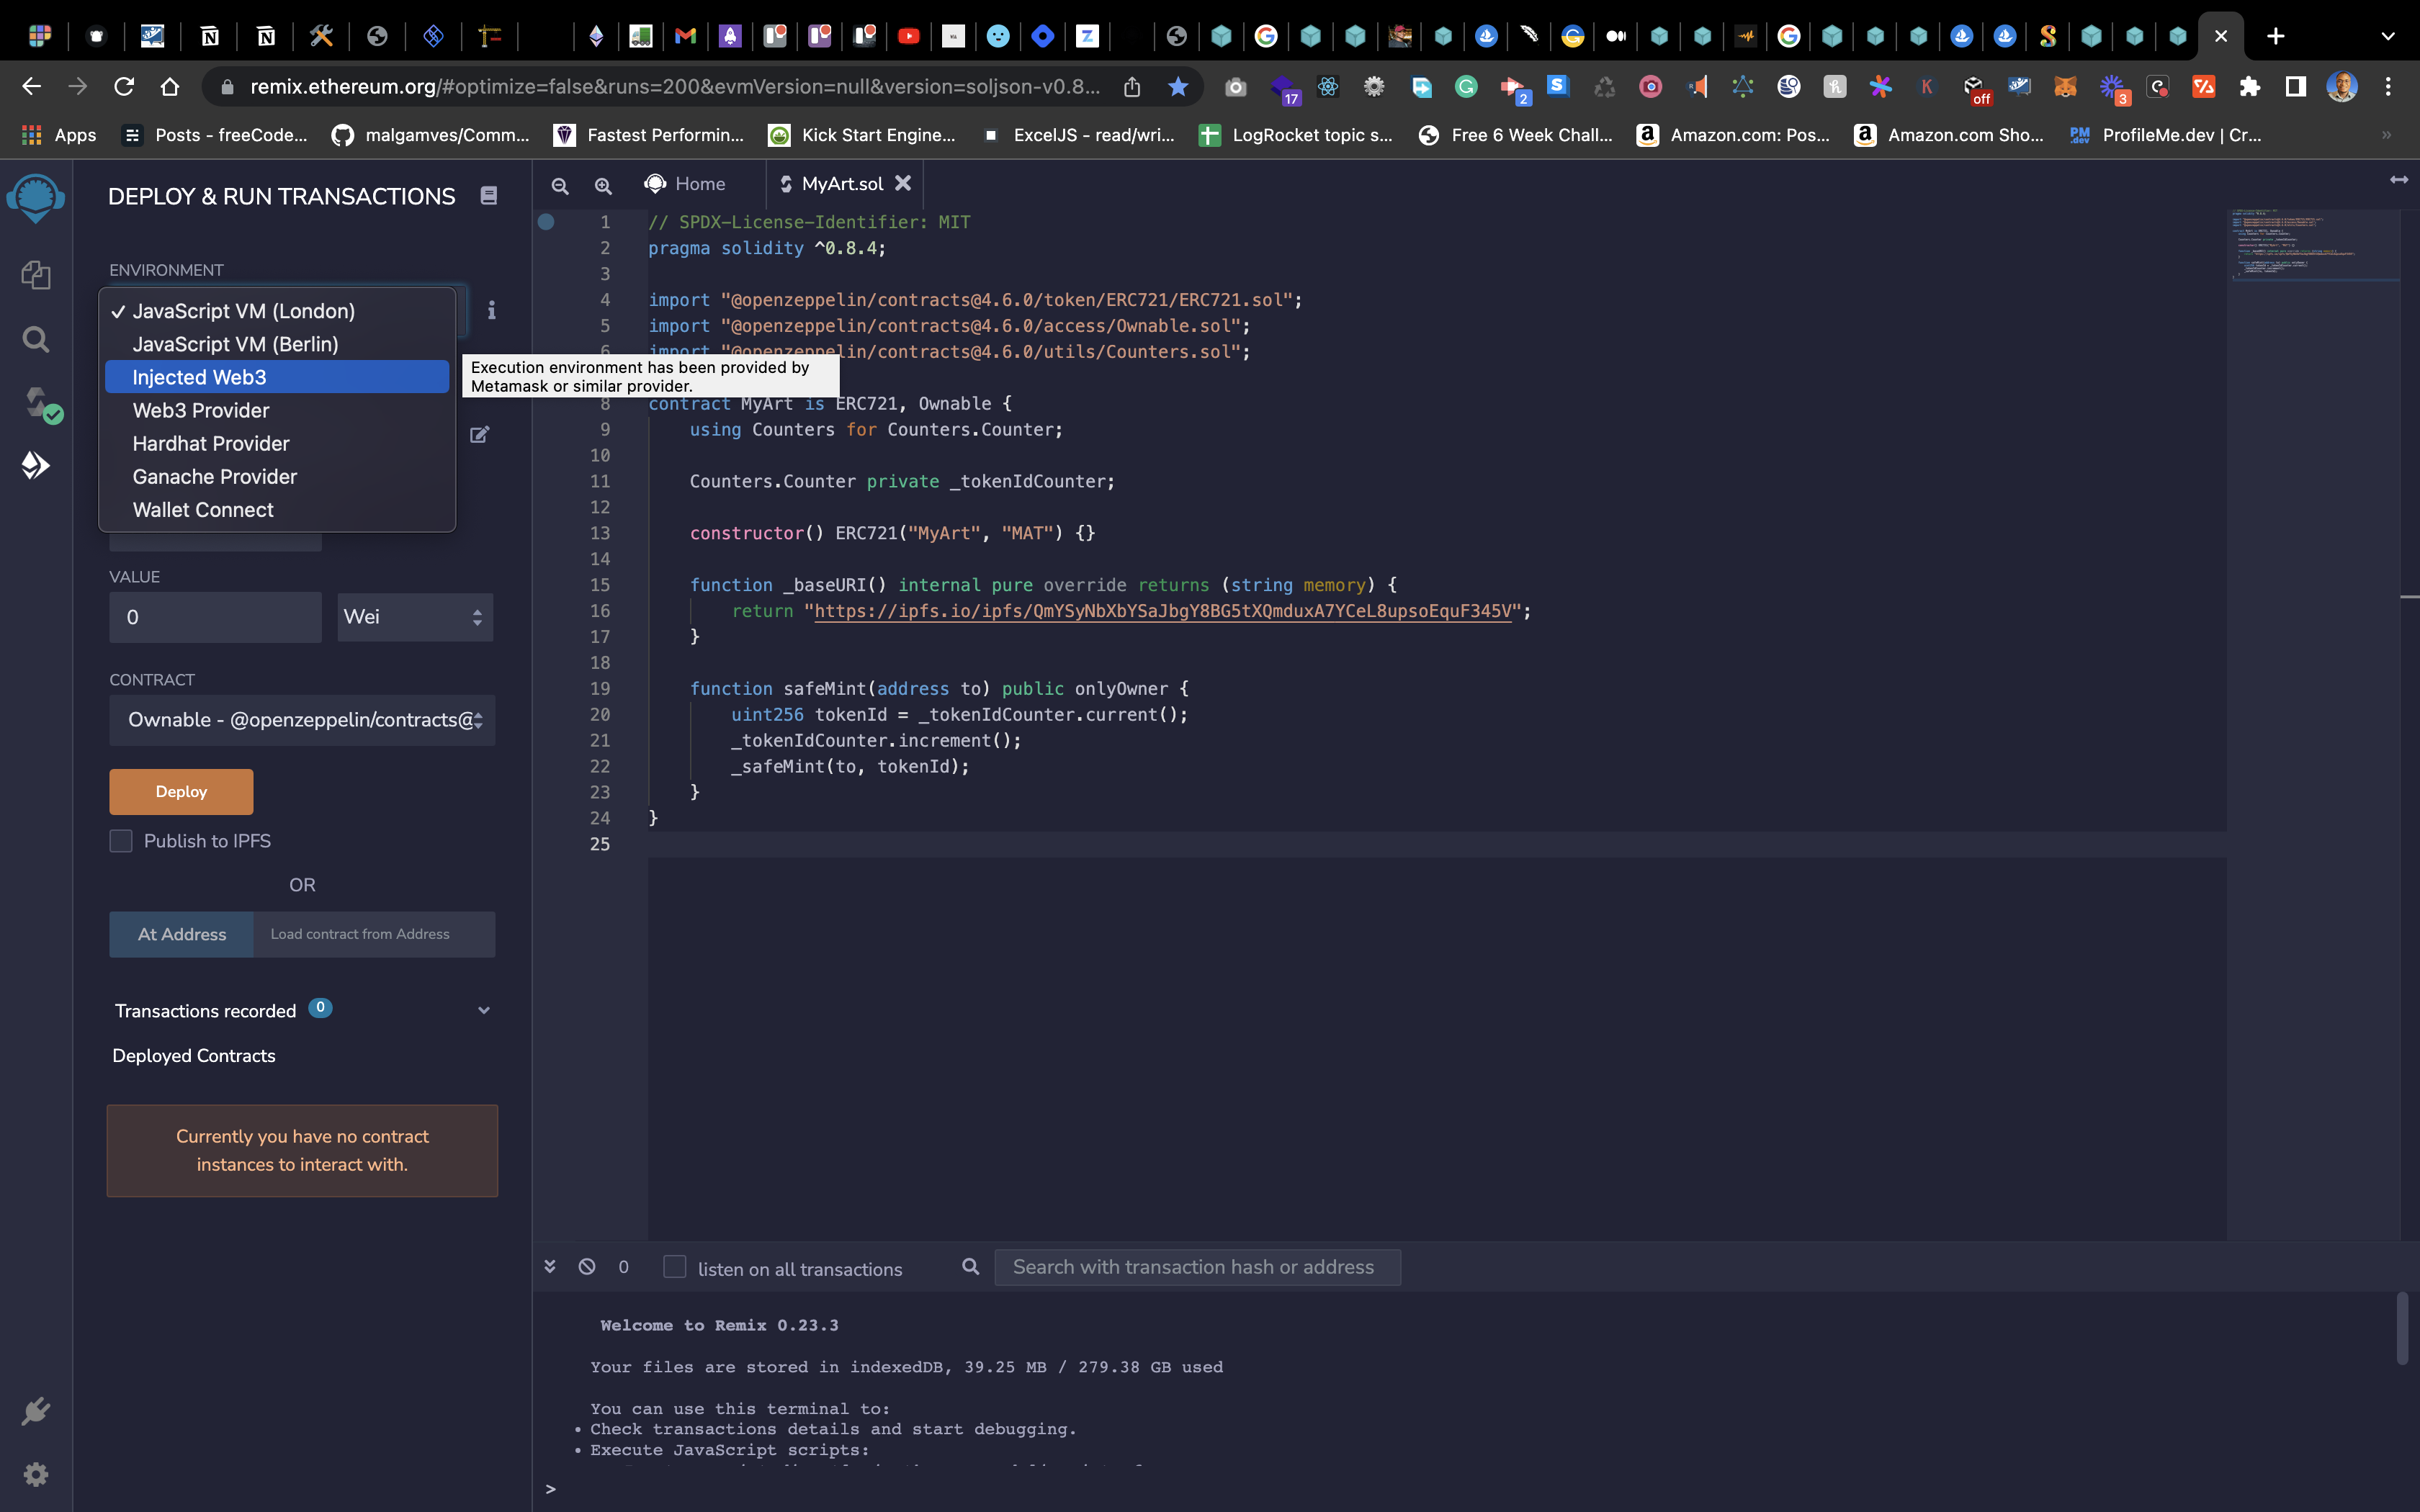
Deploy ERC721 Token (NFT) Smart Contract
We will deploy our smart contract to the Polygon Mumbai testnet in this step. We may deploy to any of our chosen chains and are not limited to the Mumbai testnet.
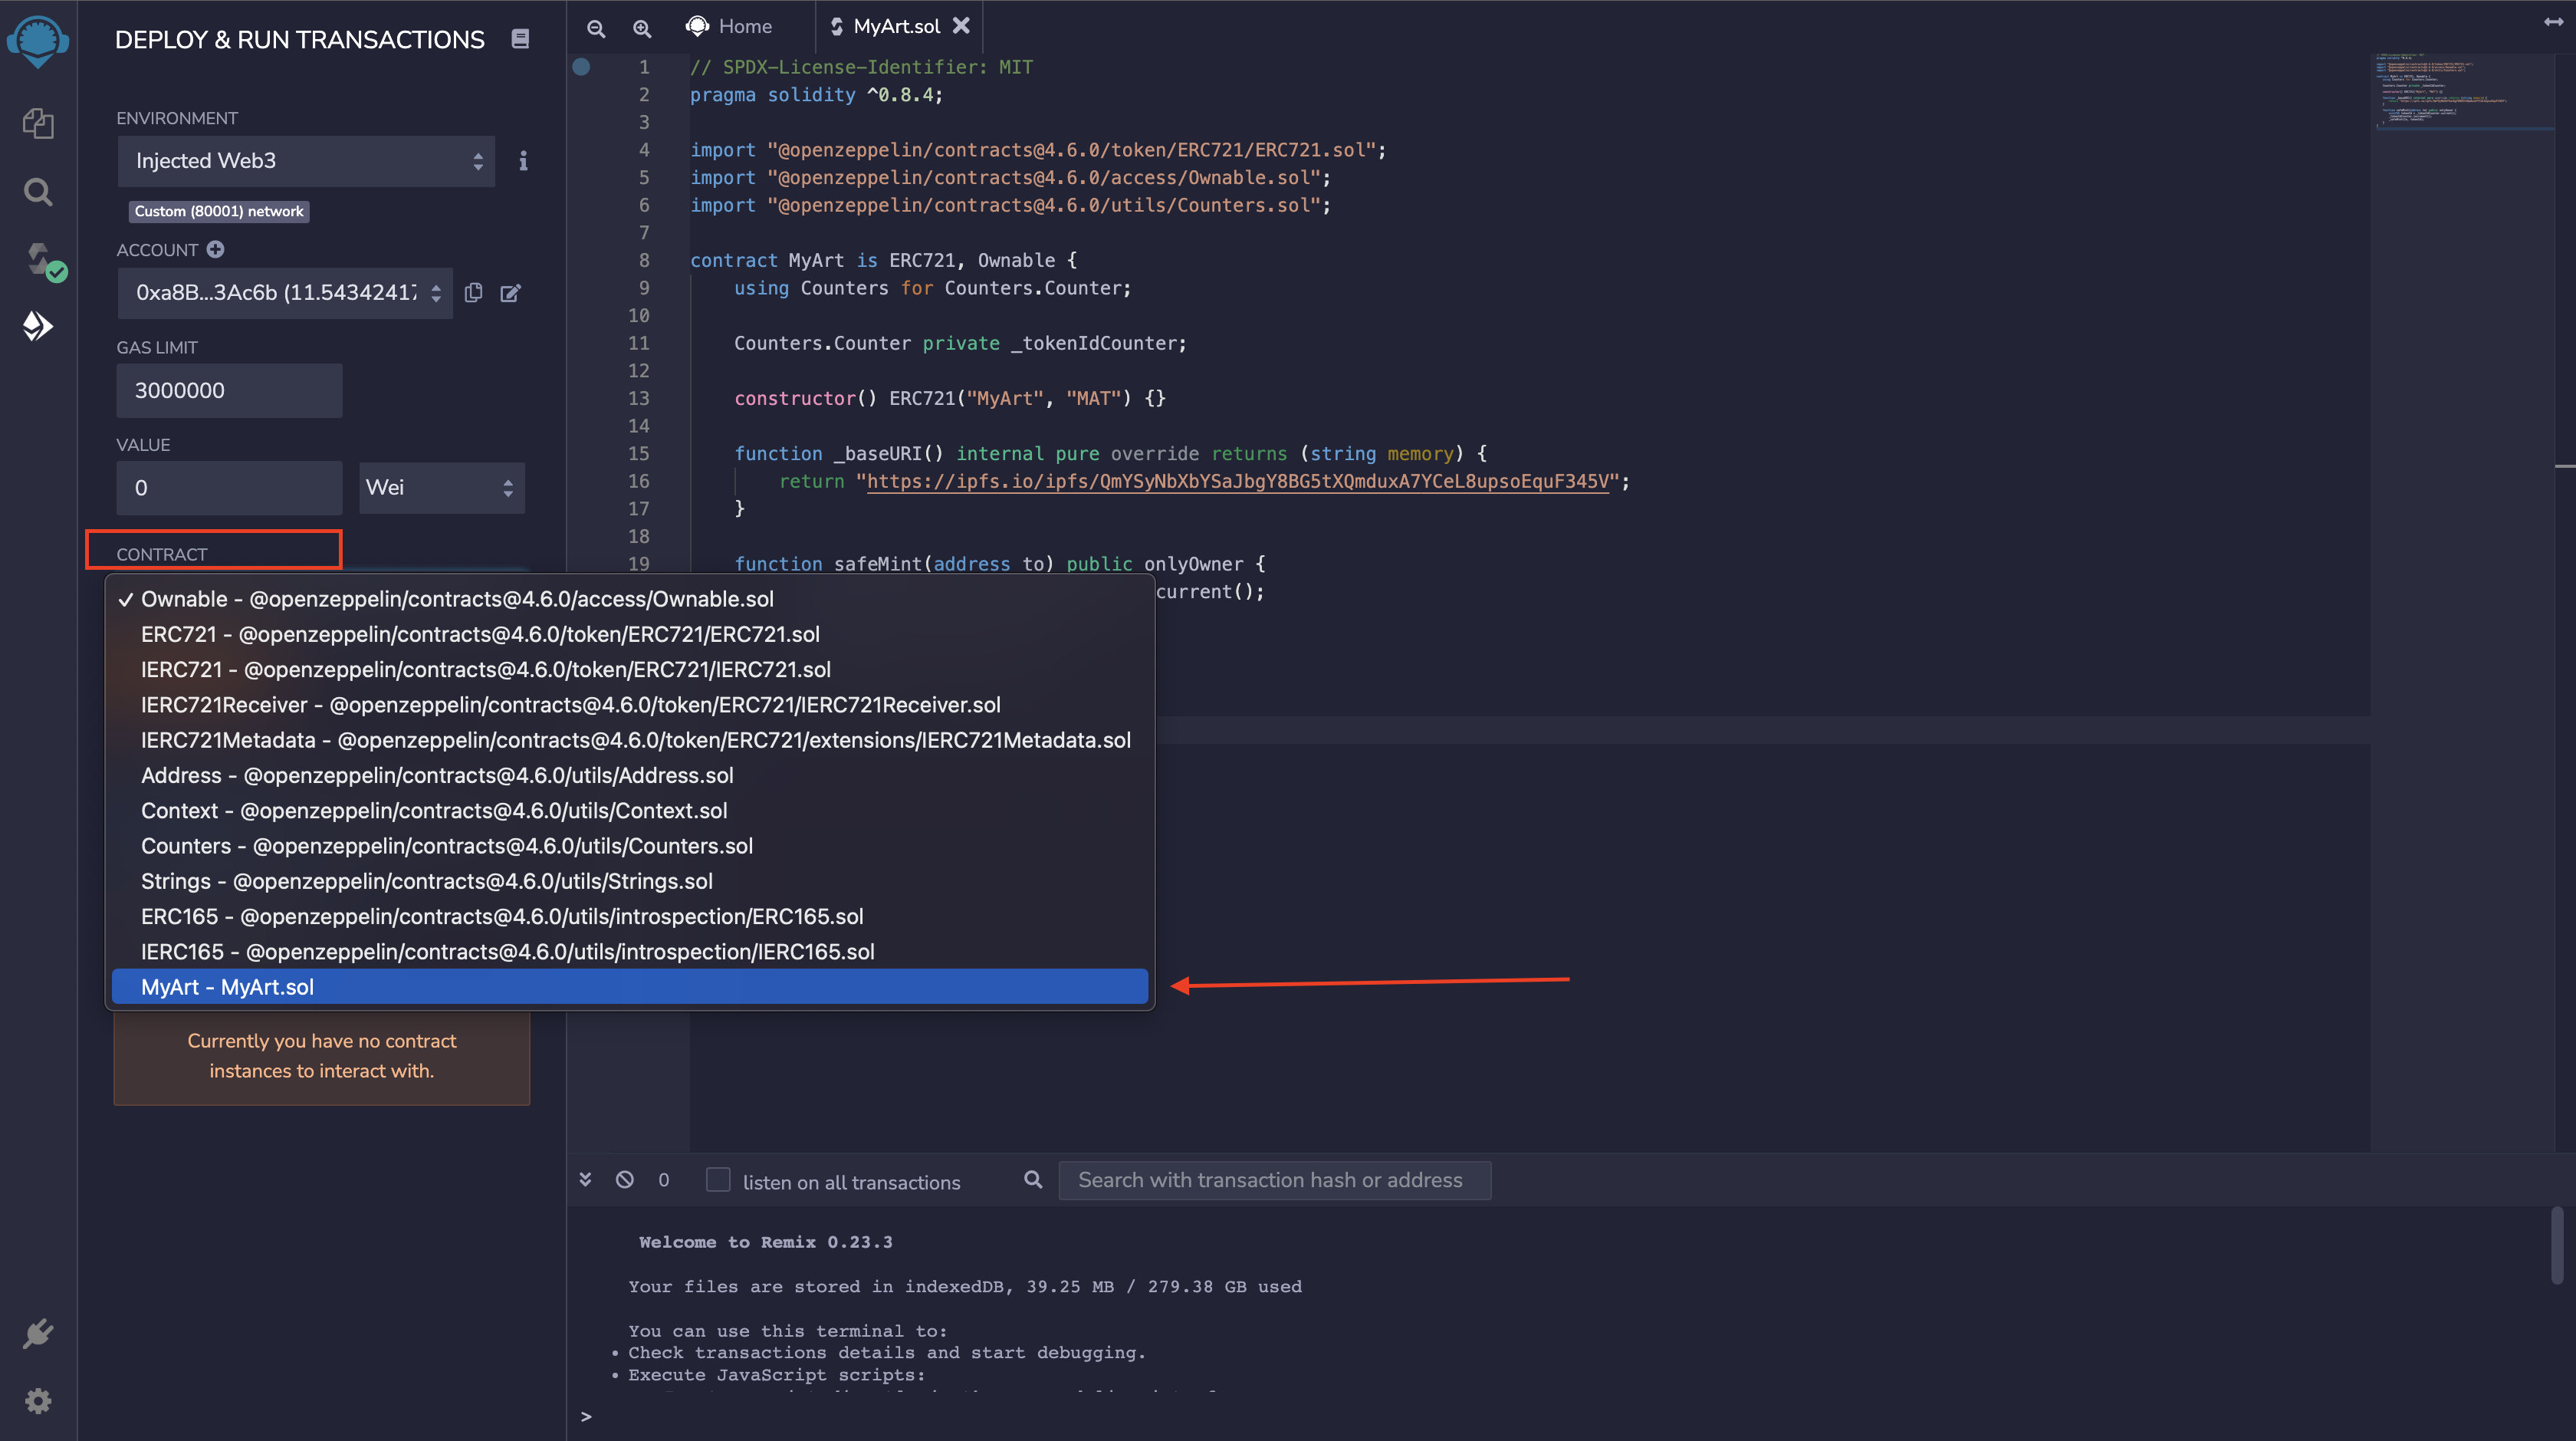
Next, we will select the contract to deploy.
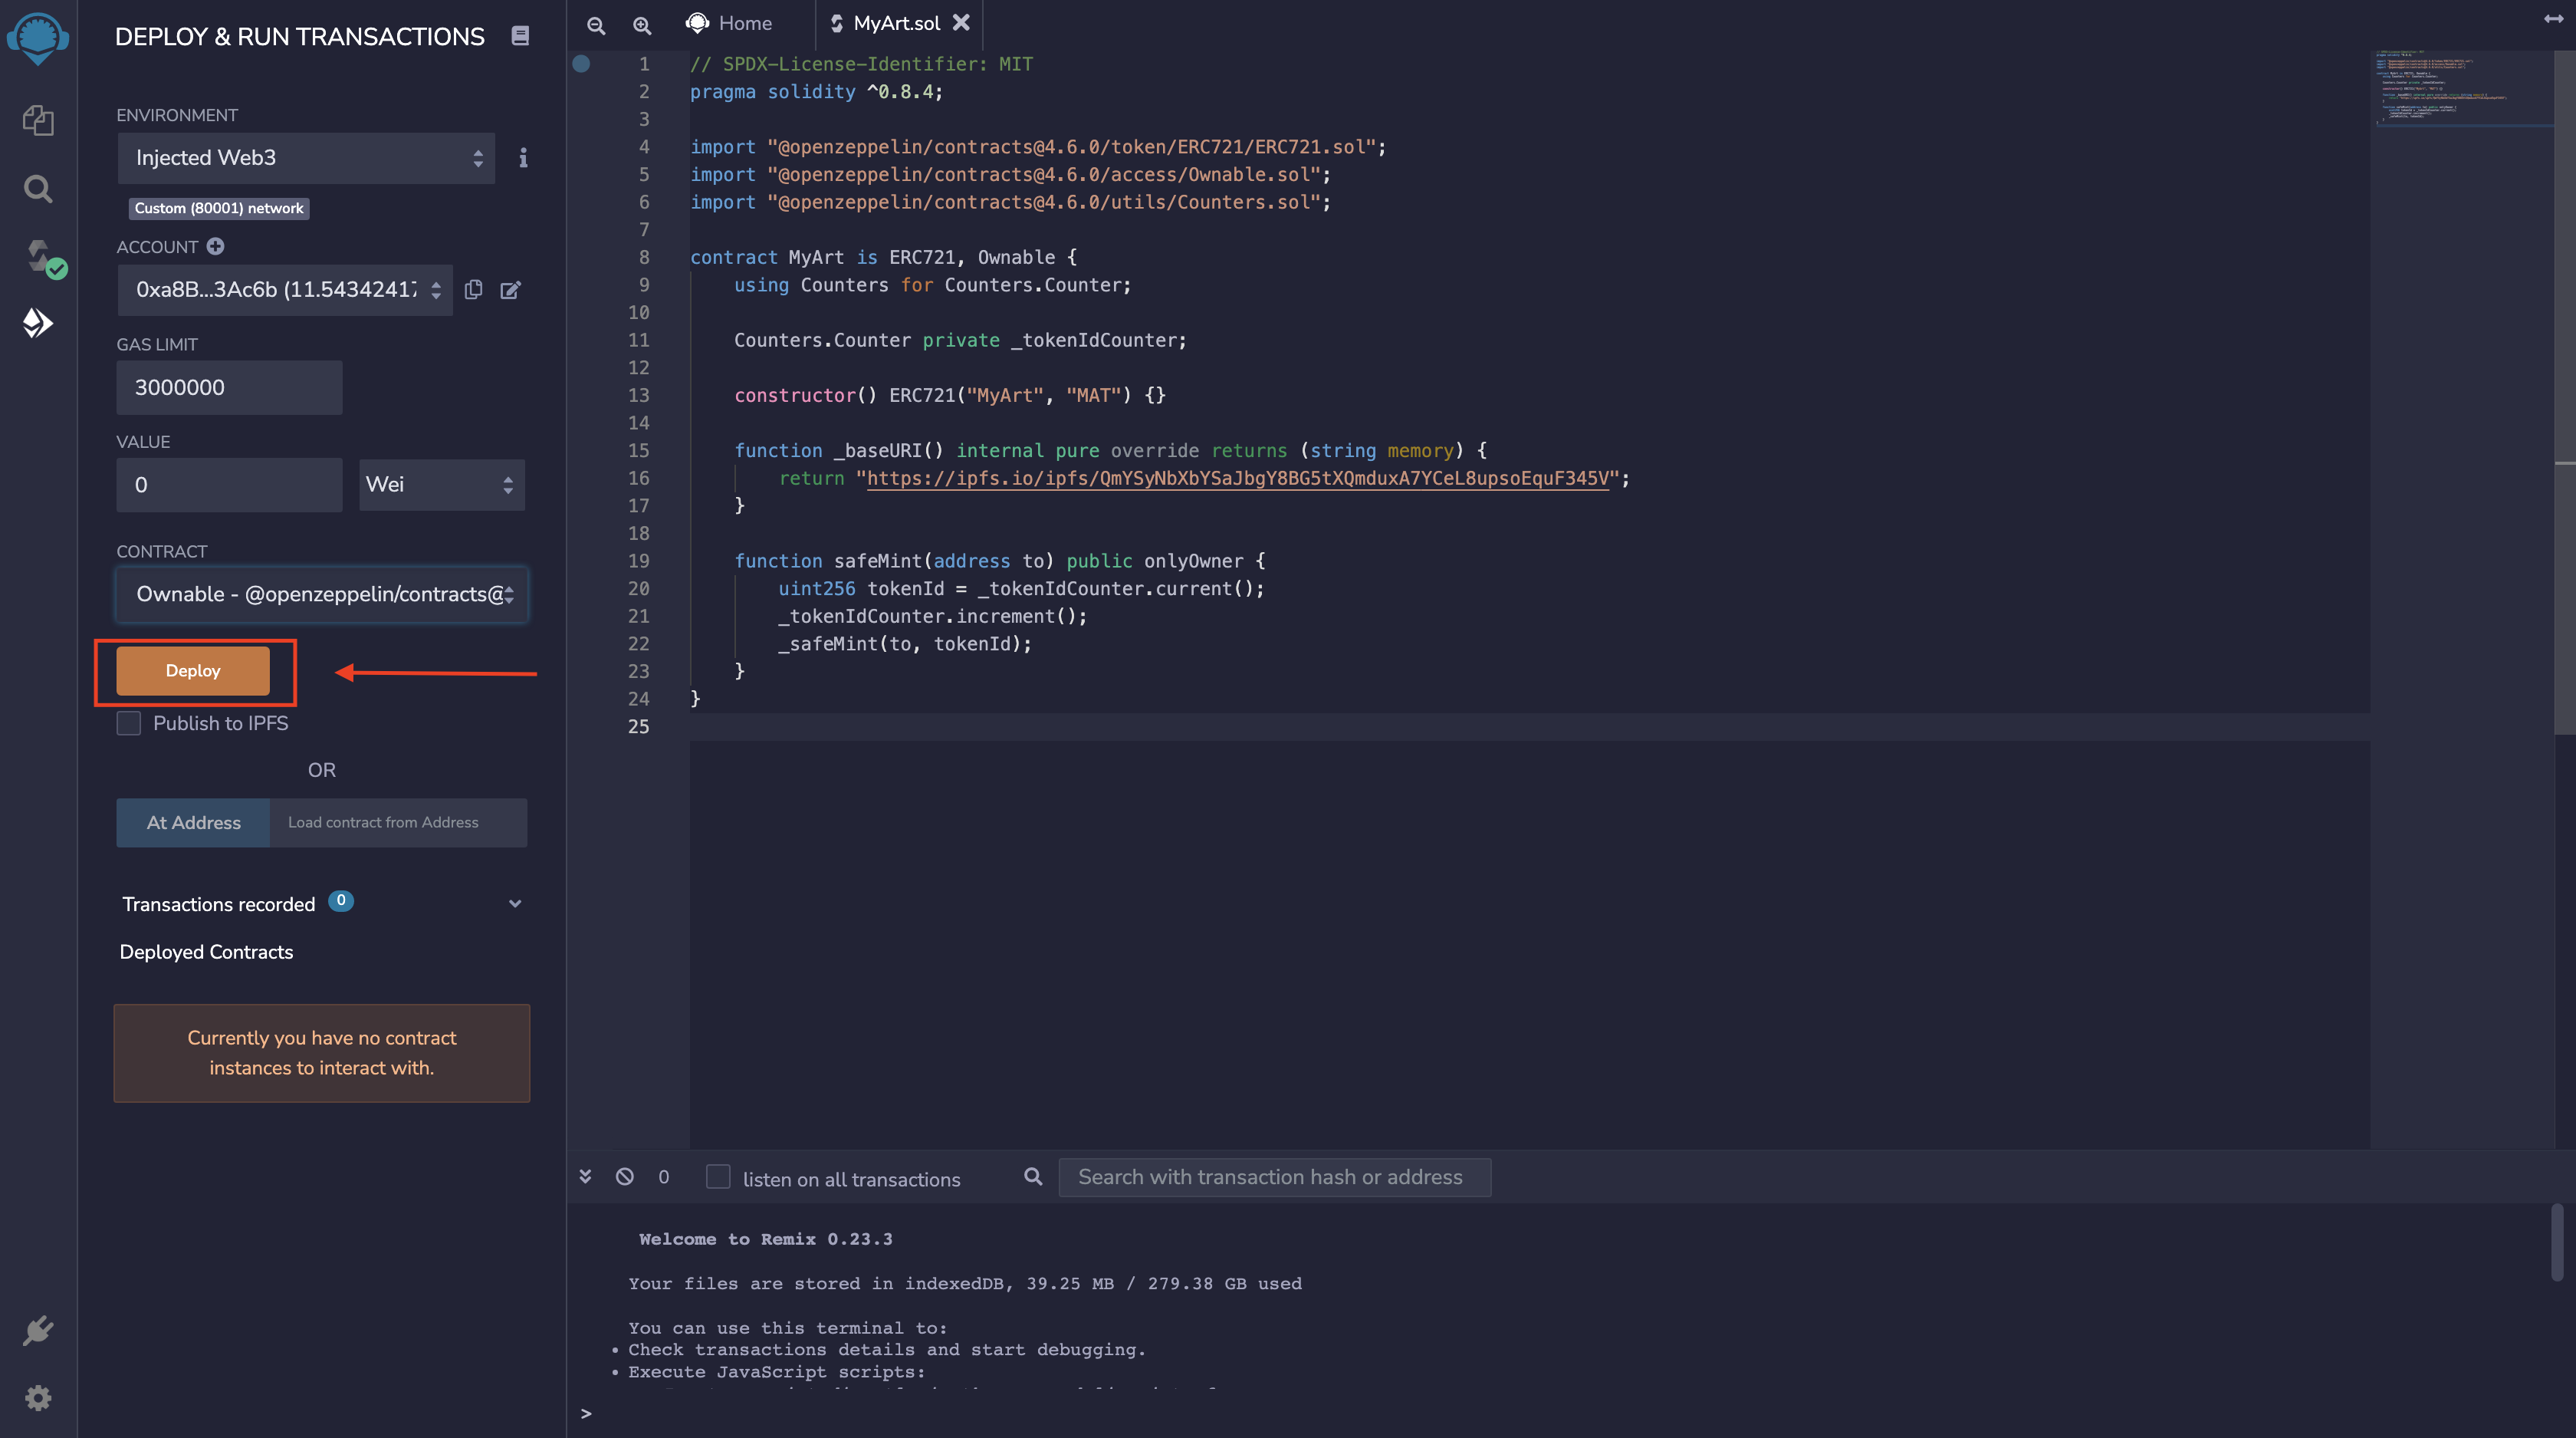
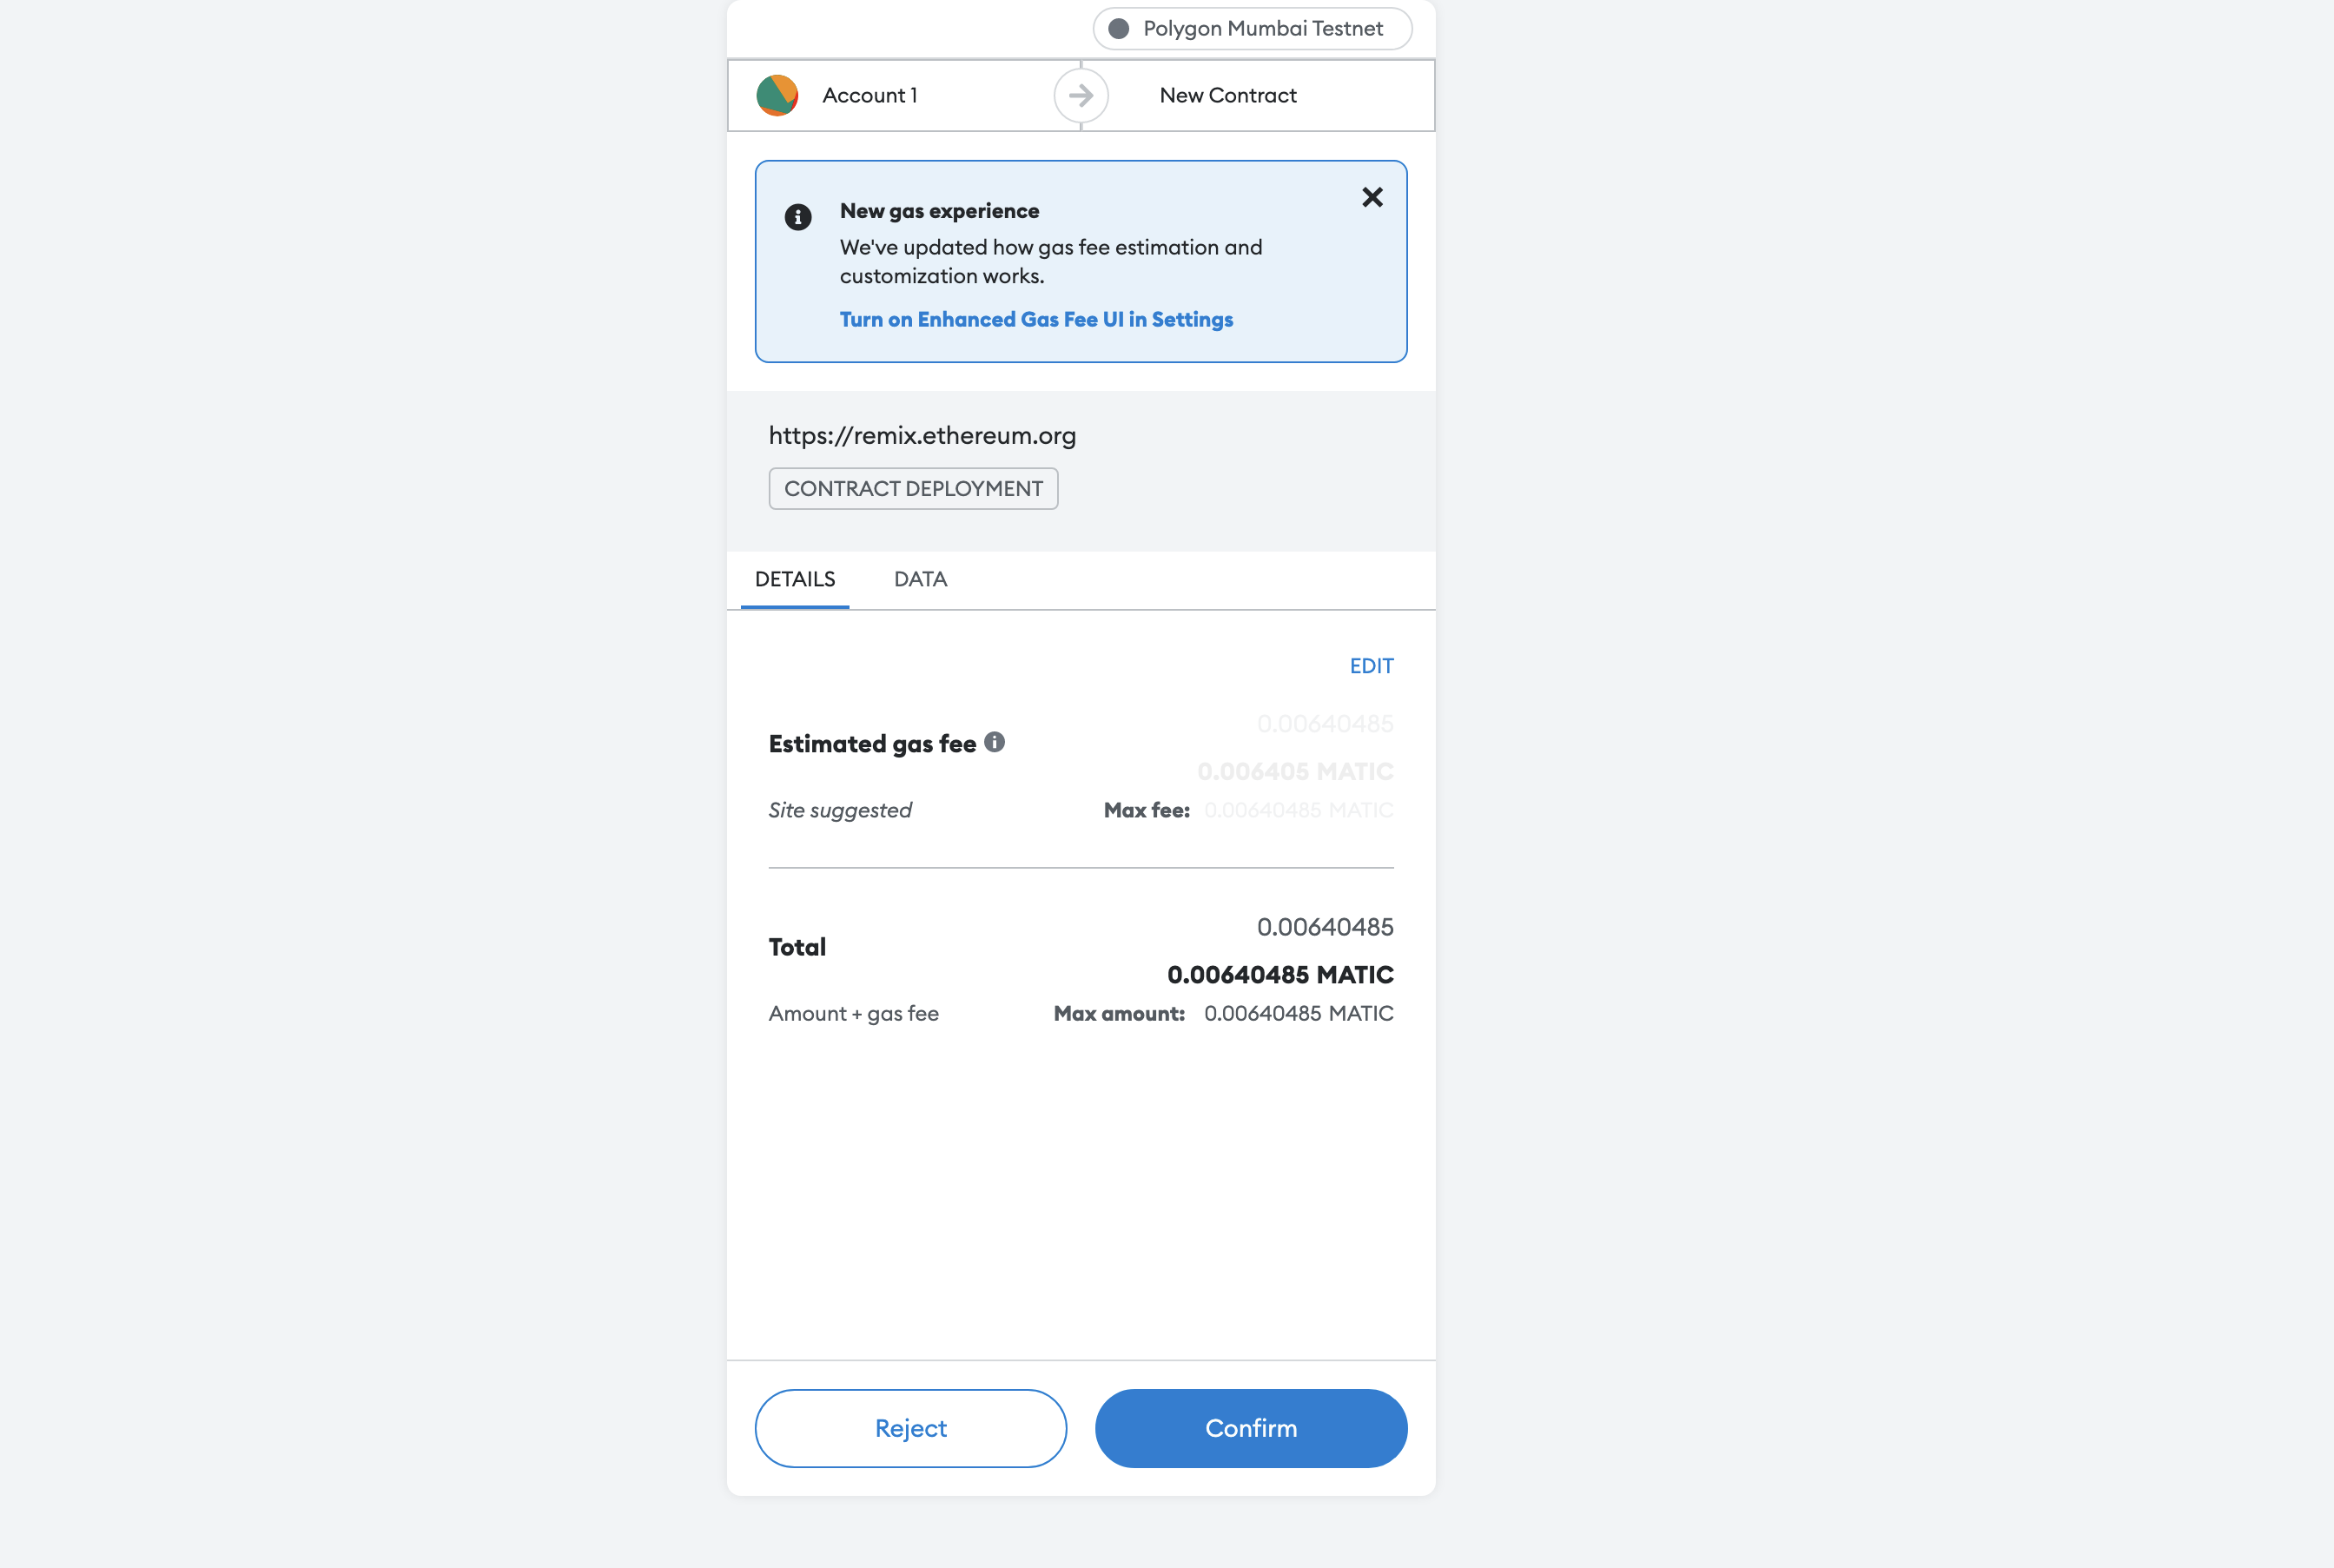
We will see a prompt to approve the transaction.
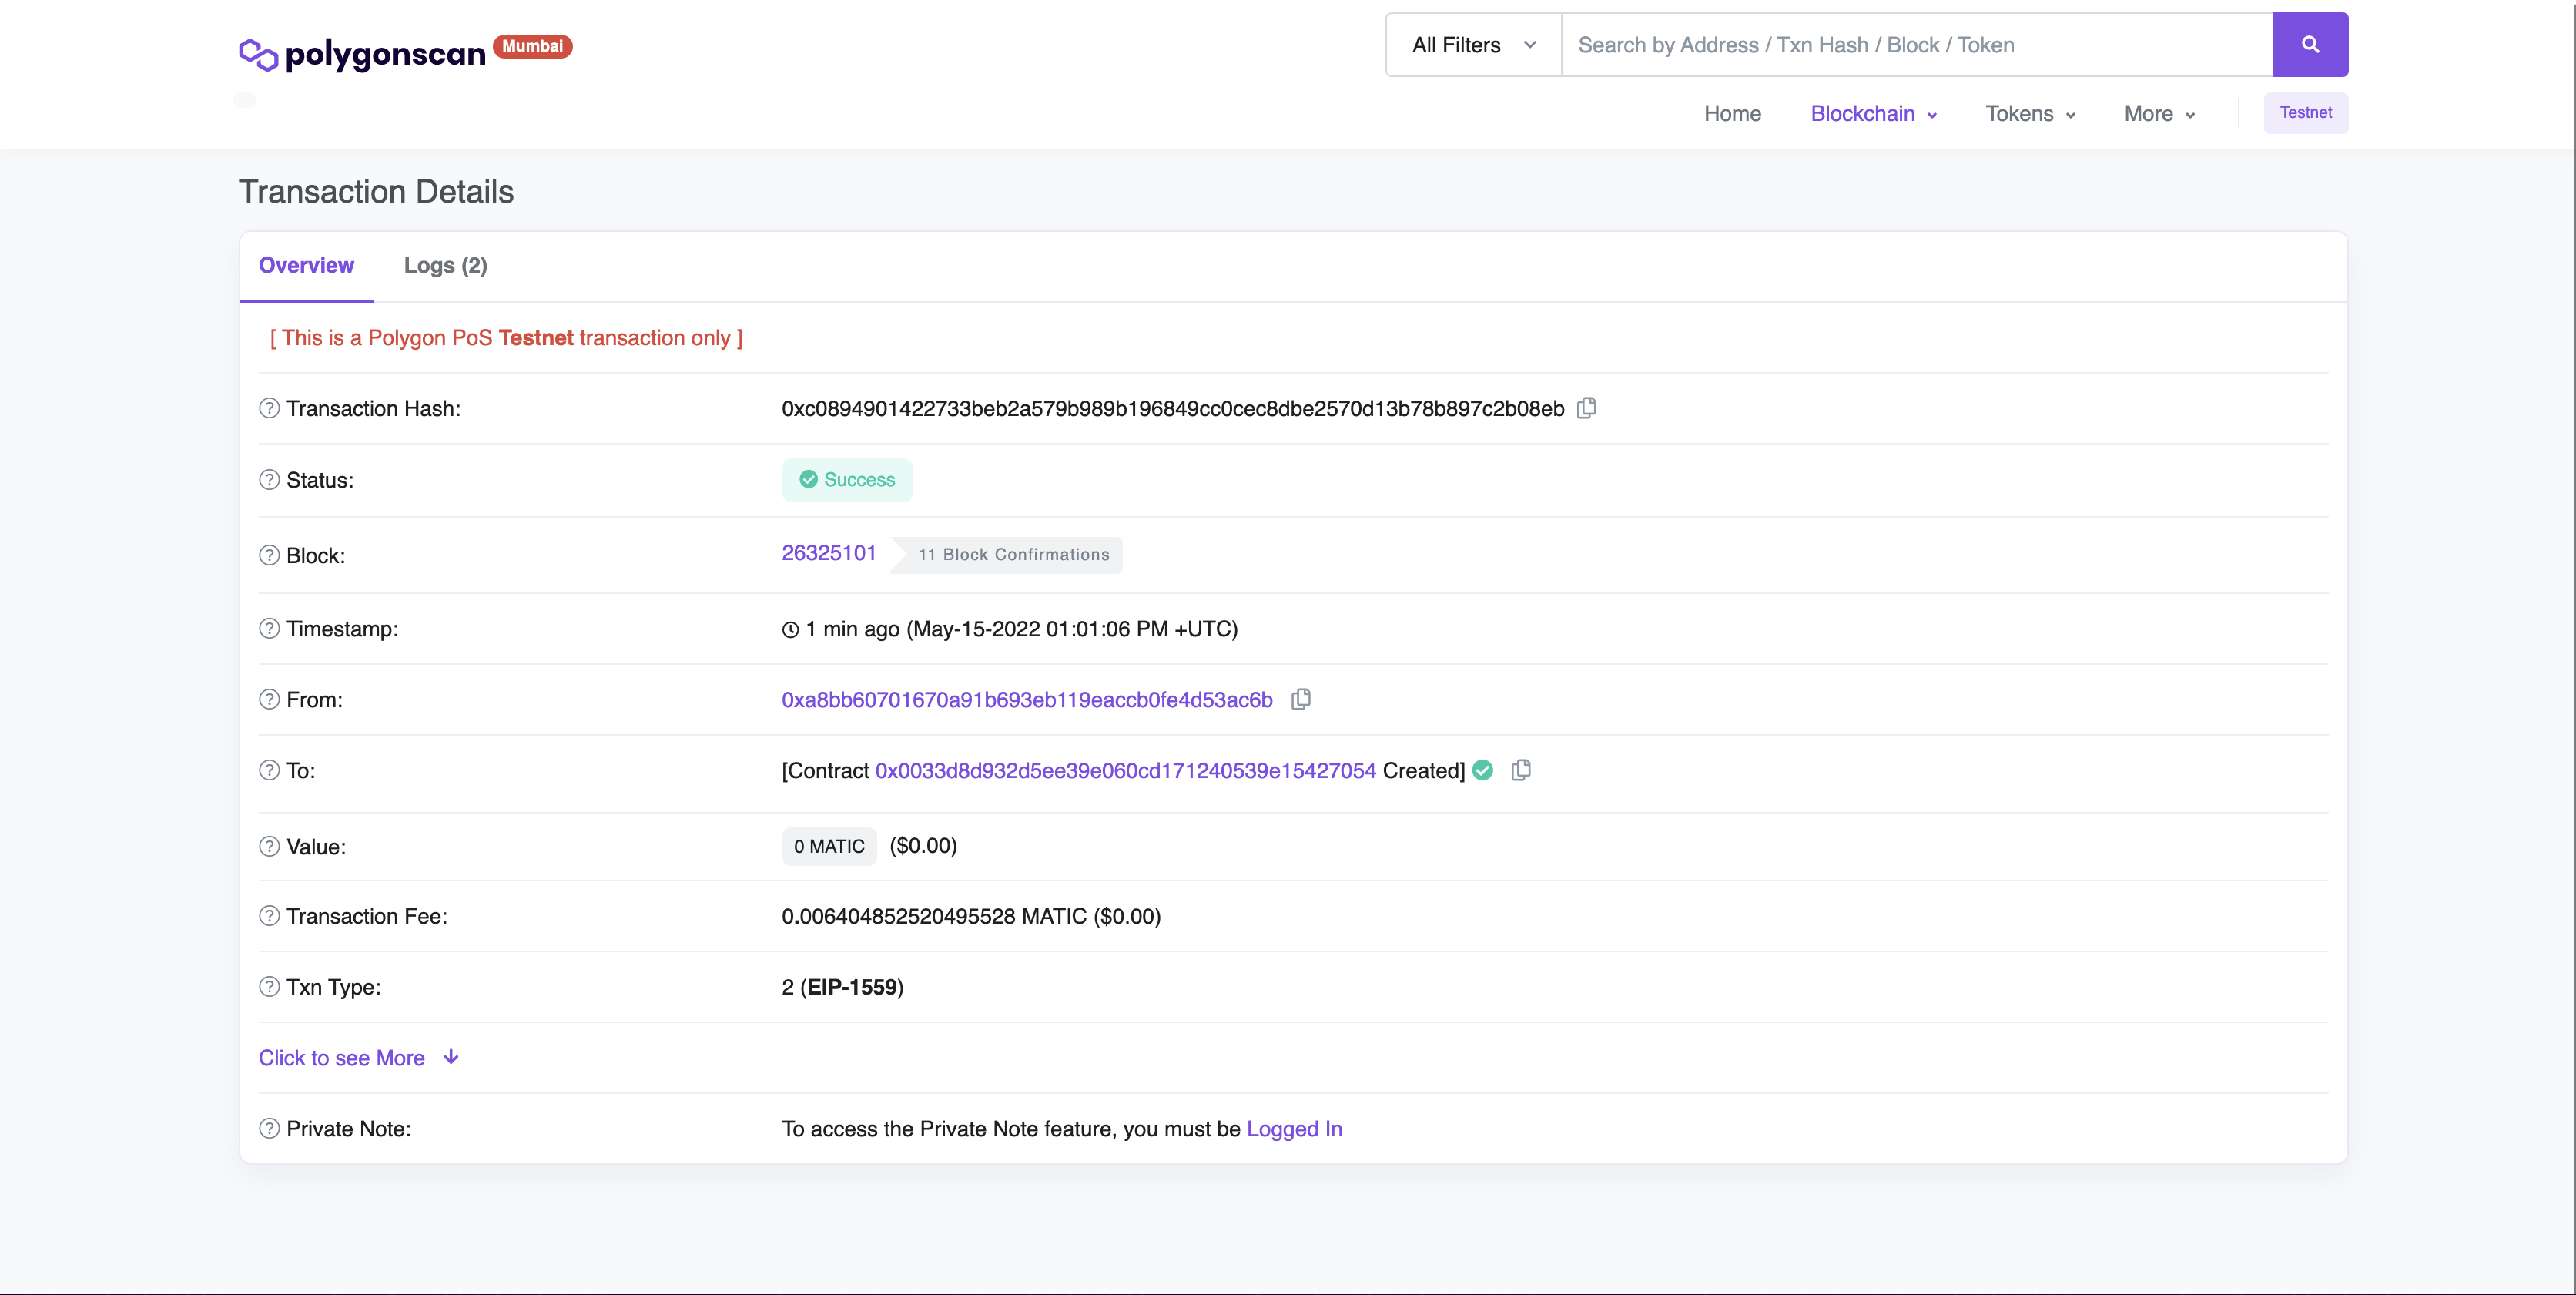
Verifying on Polygon scan here
After deploying, let us mint a copy of the NFT.
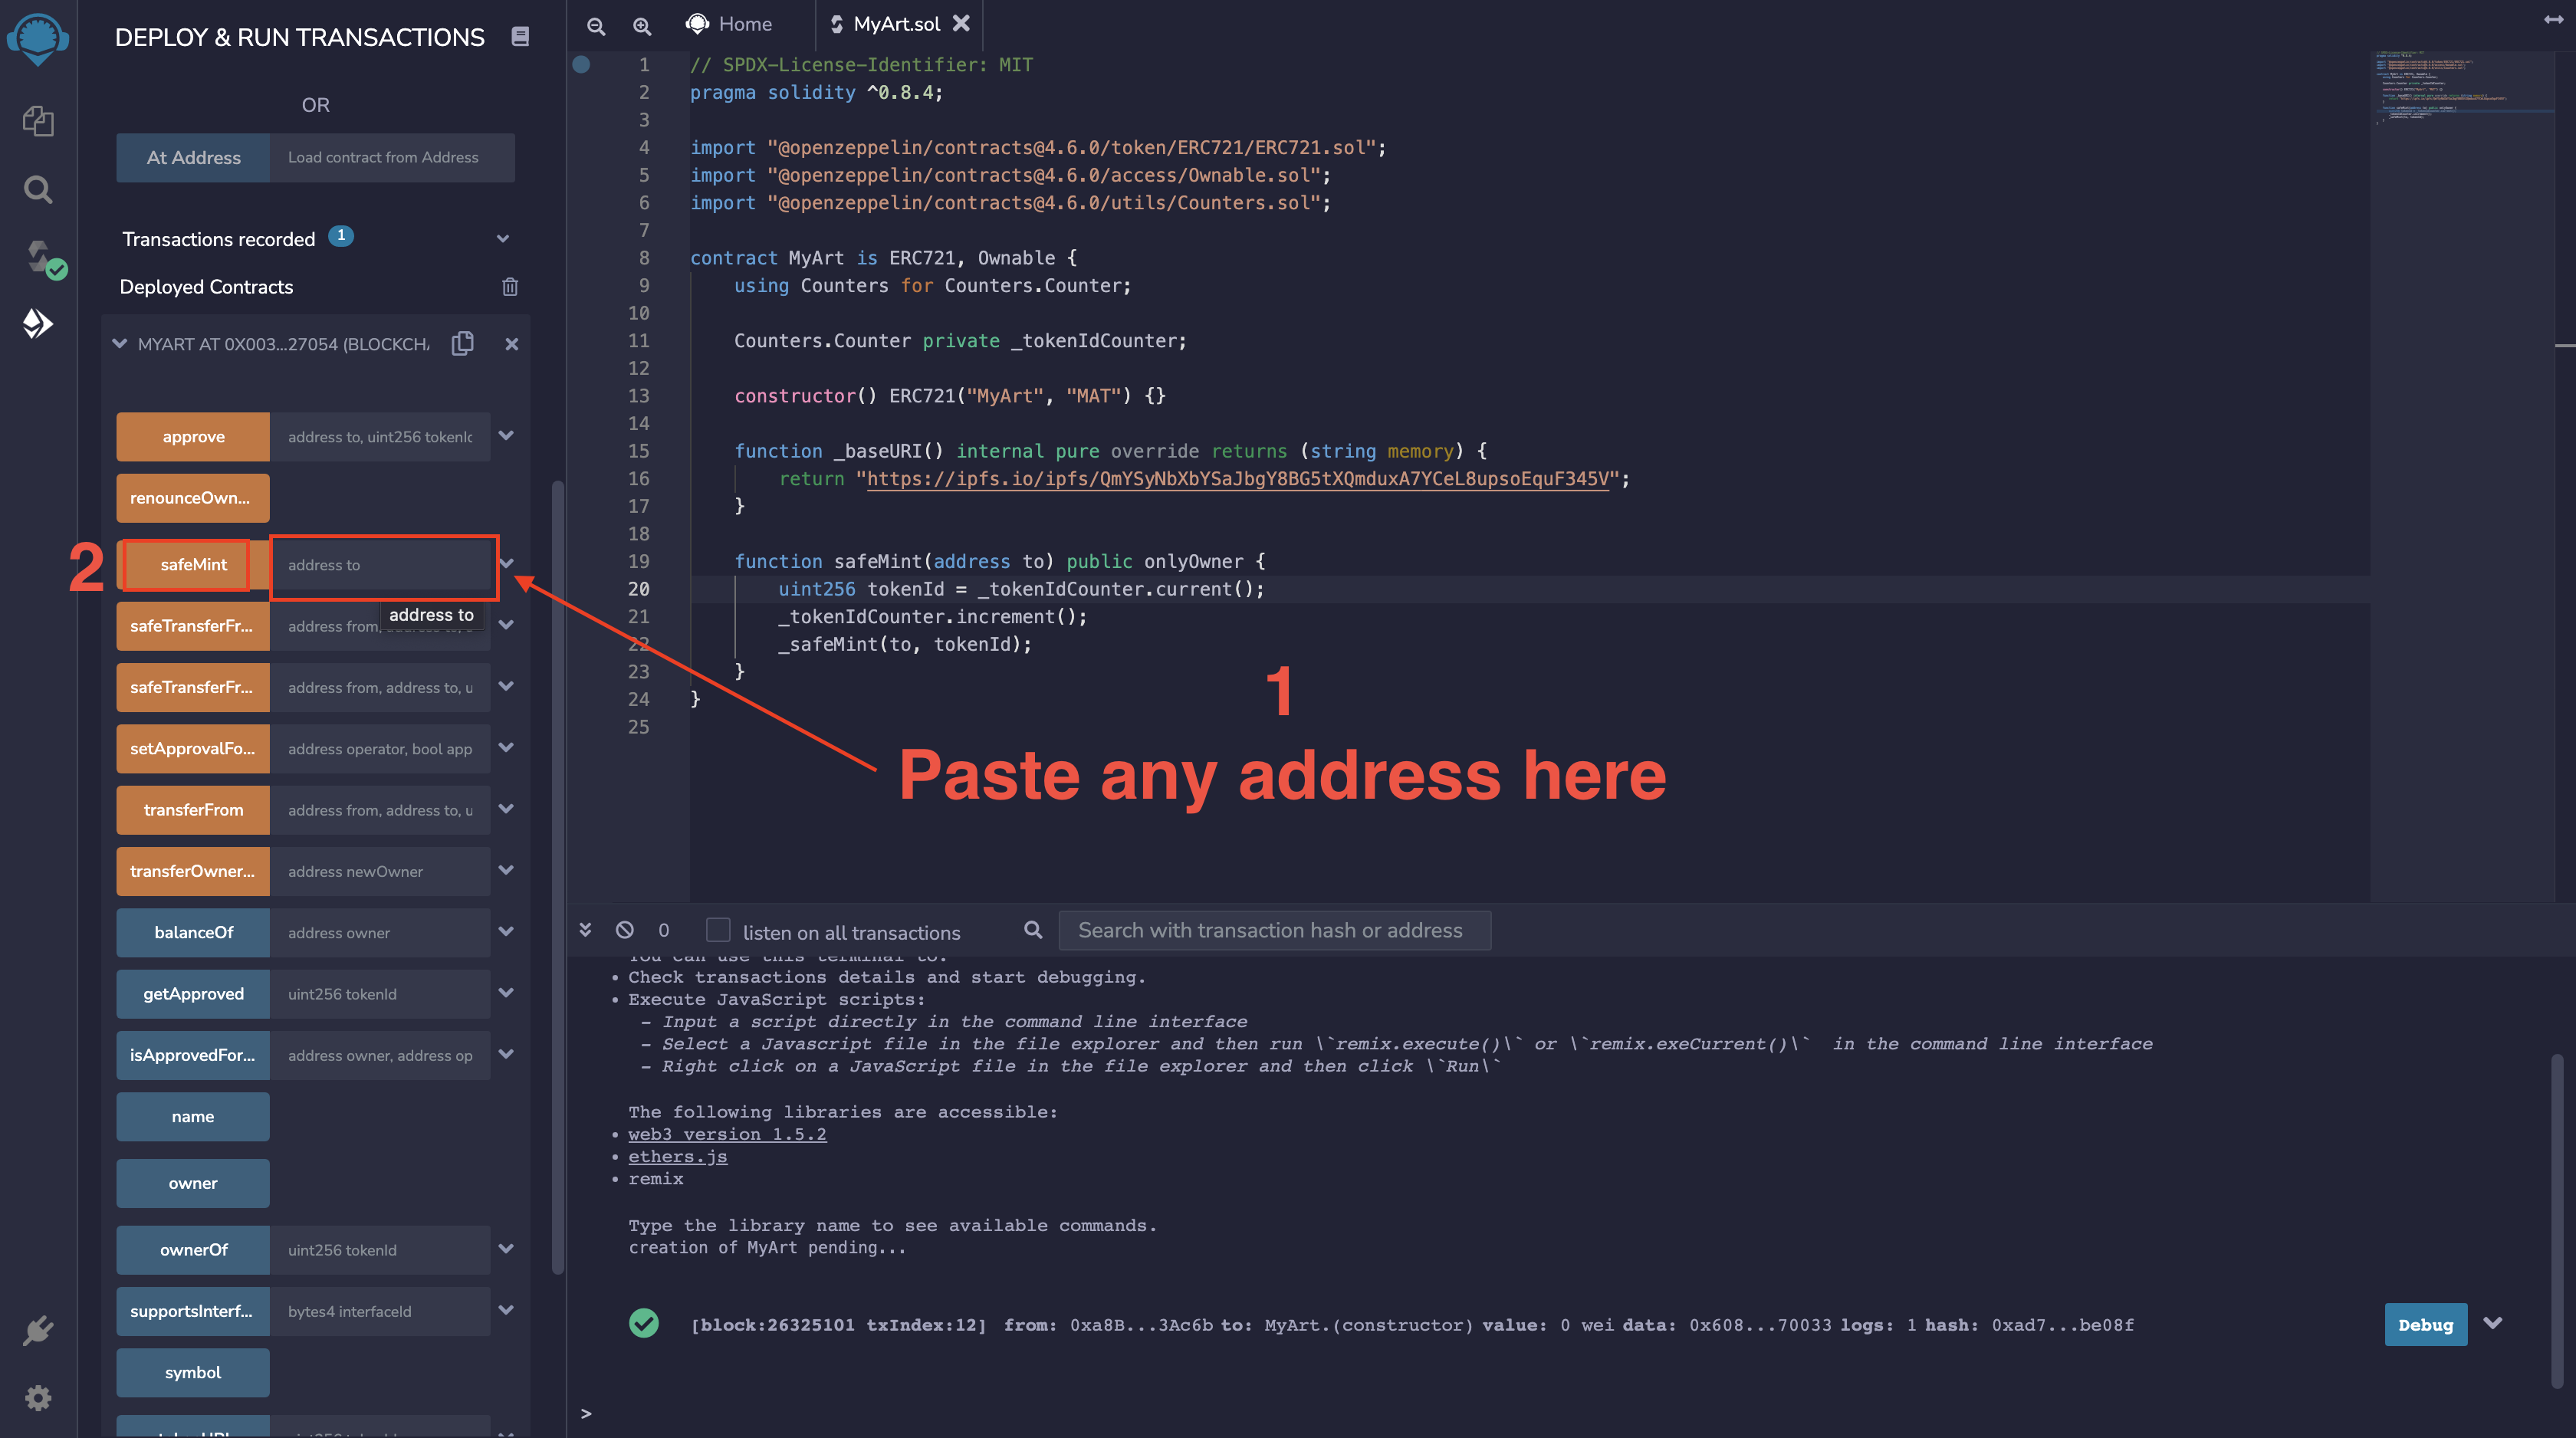
Approve the transaction via the Metamask pop-up.
Next, we can check the token balance of the address that just minted the NFT.
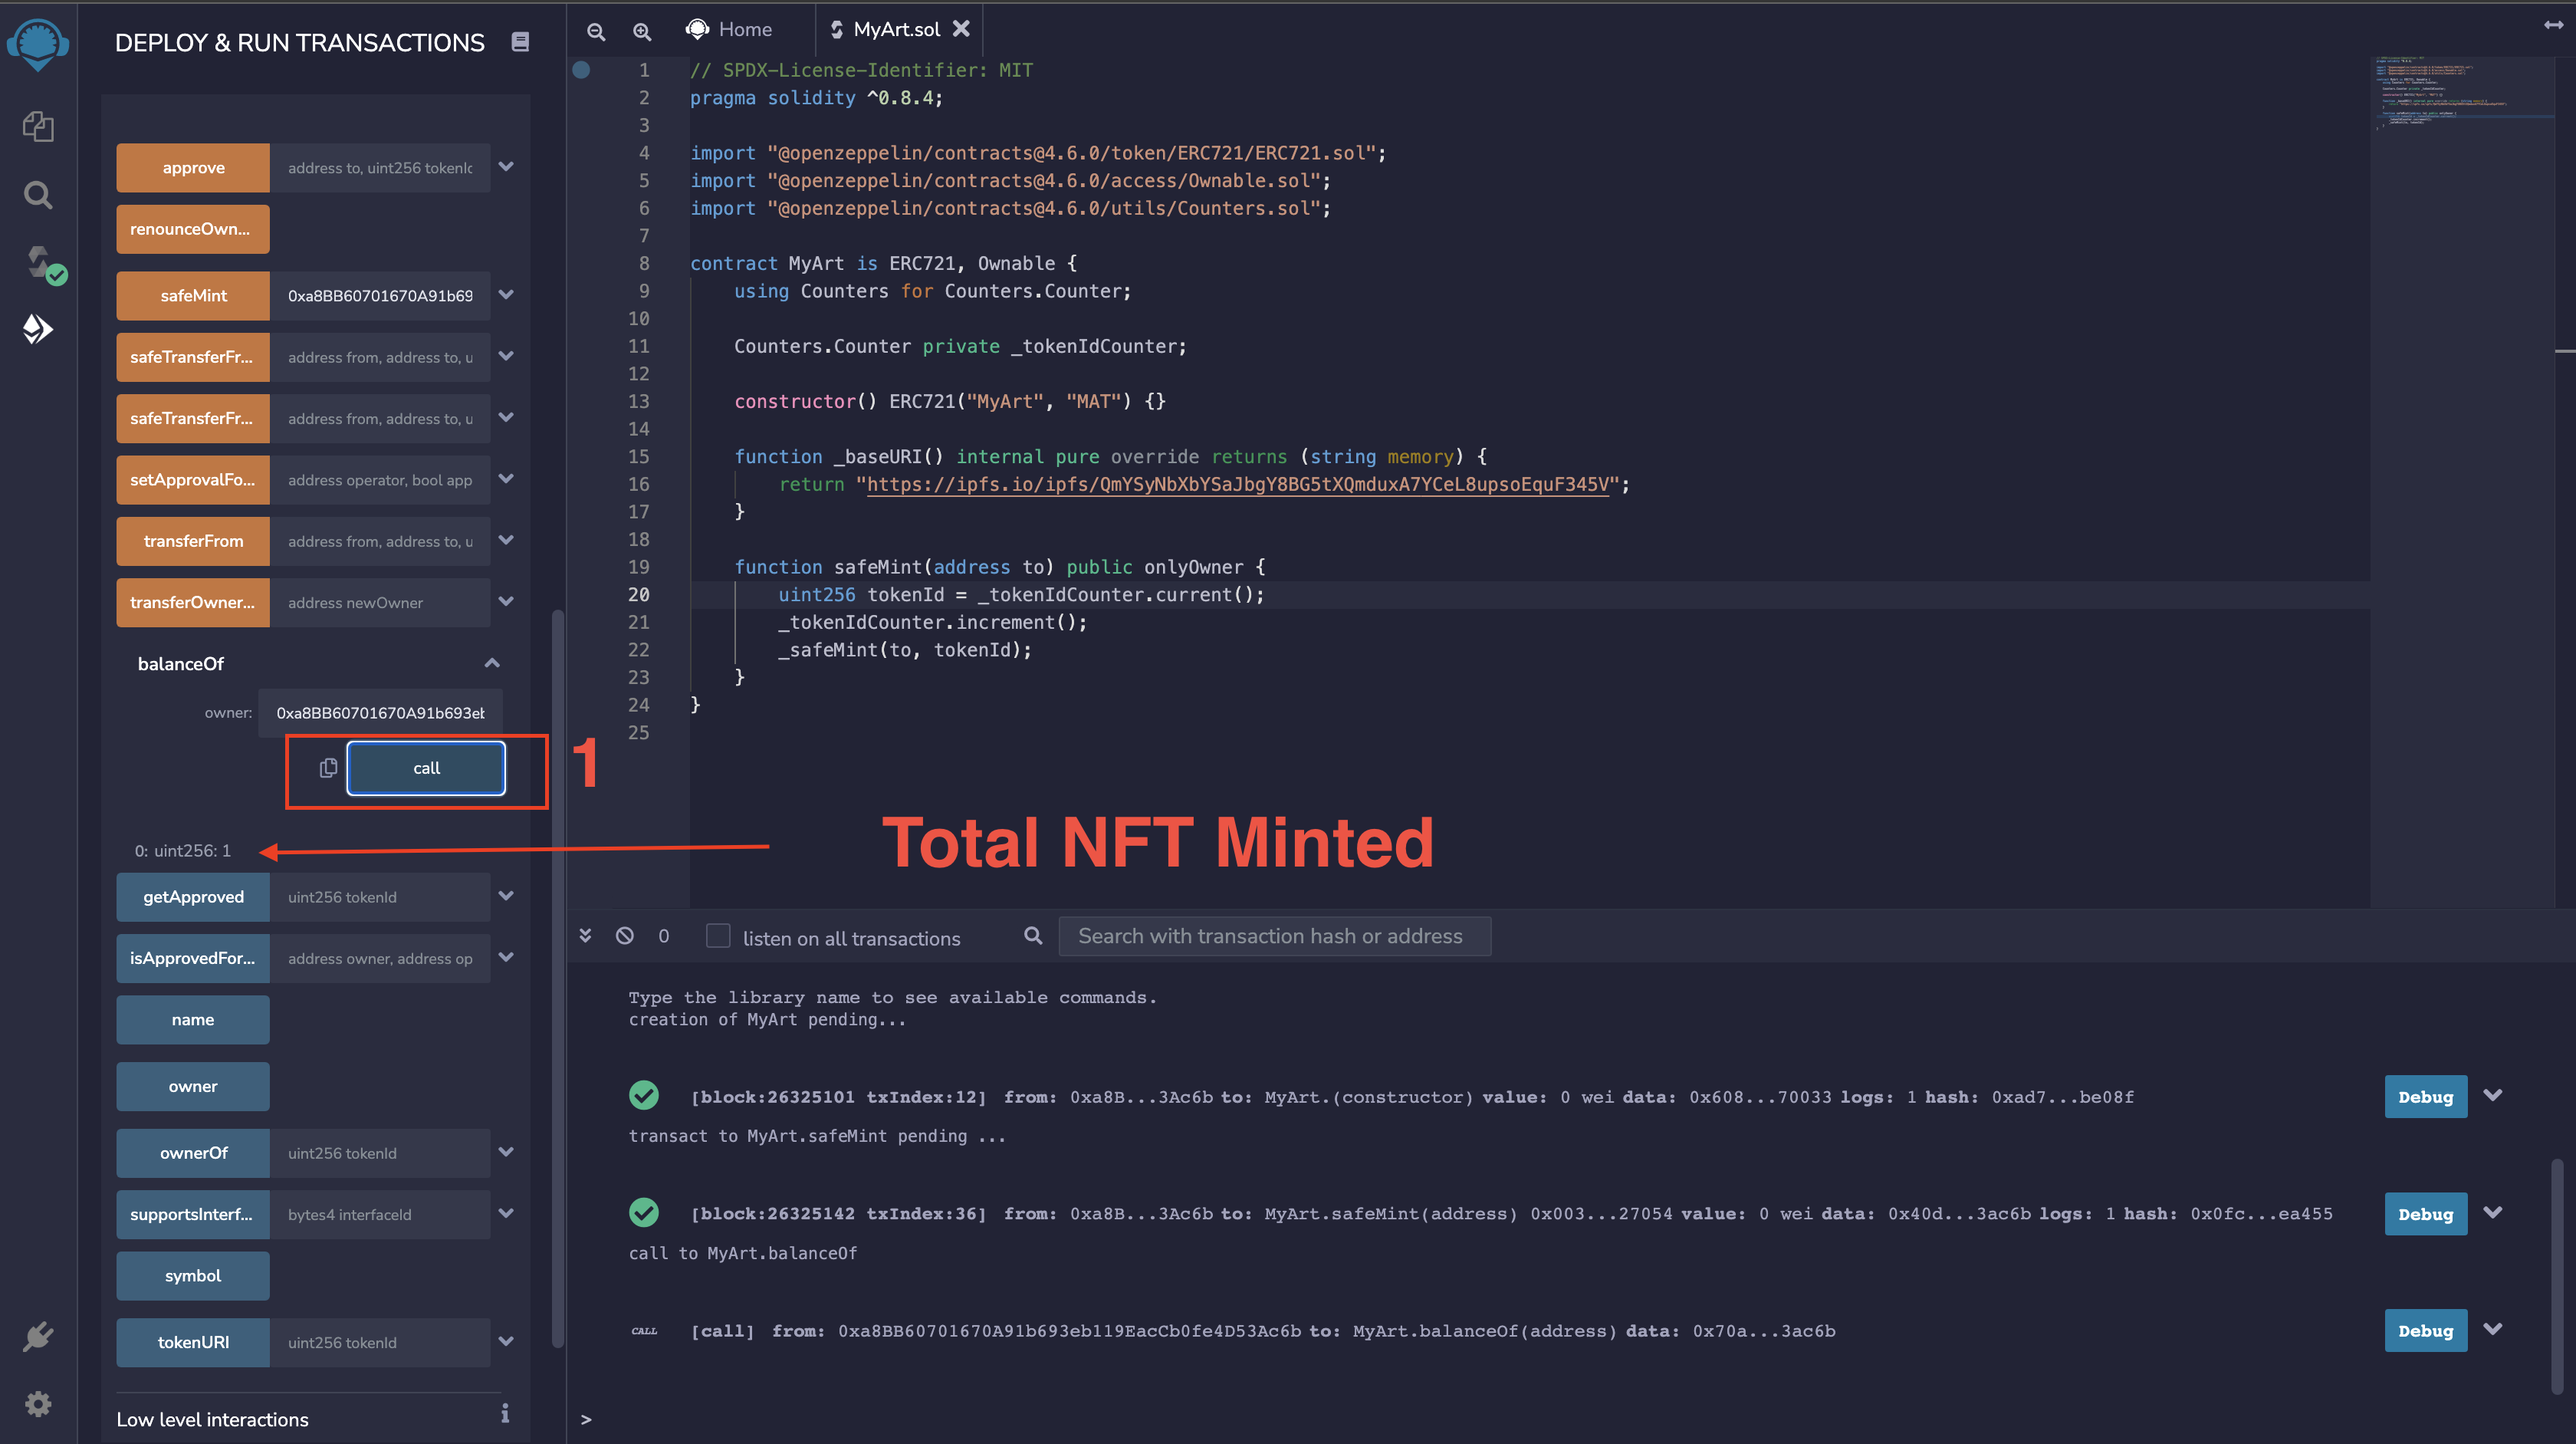
Voila 🥳
Verify / List ERC721 Token on OpenSea
Super excited we made it to this section.
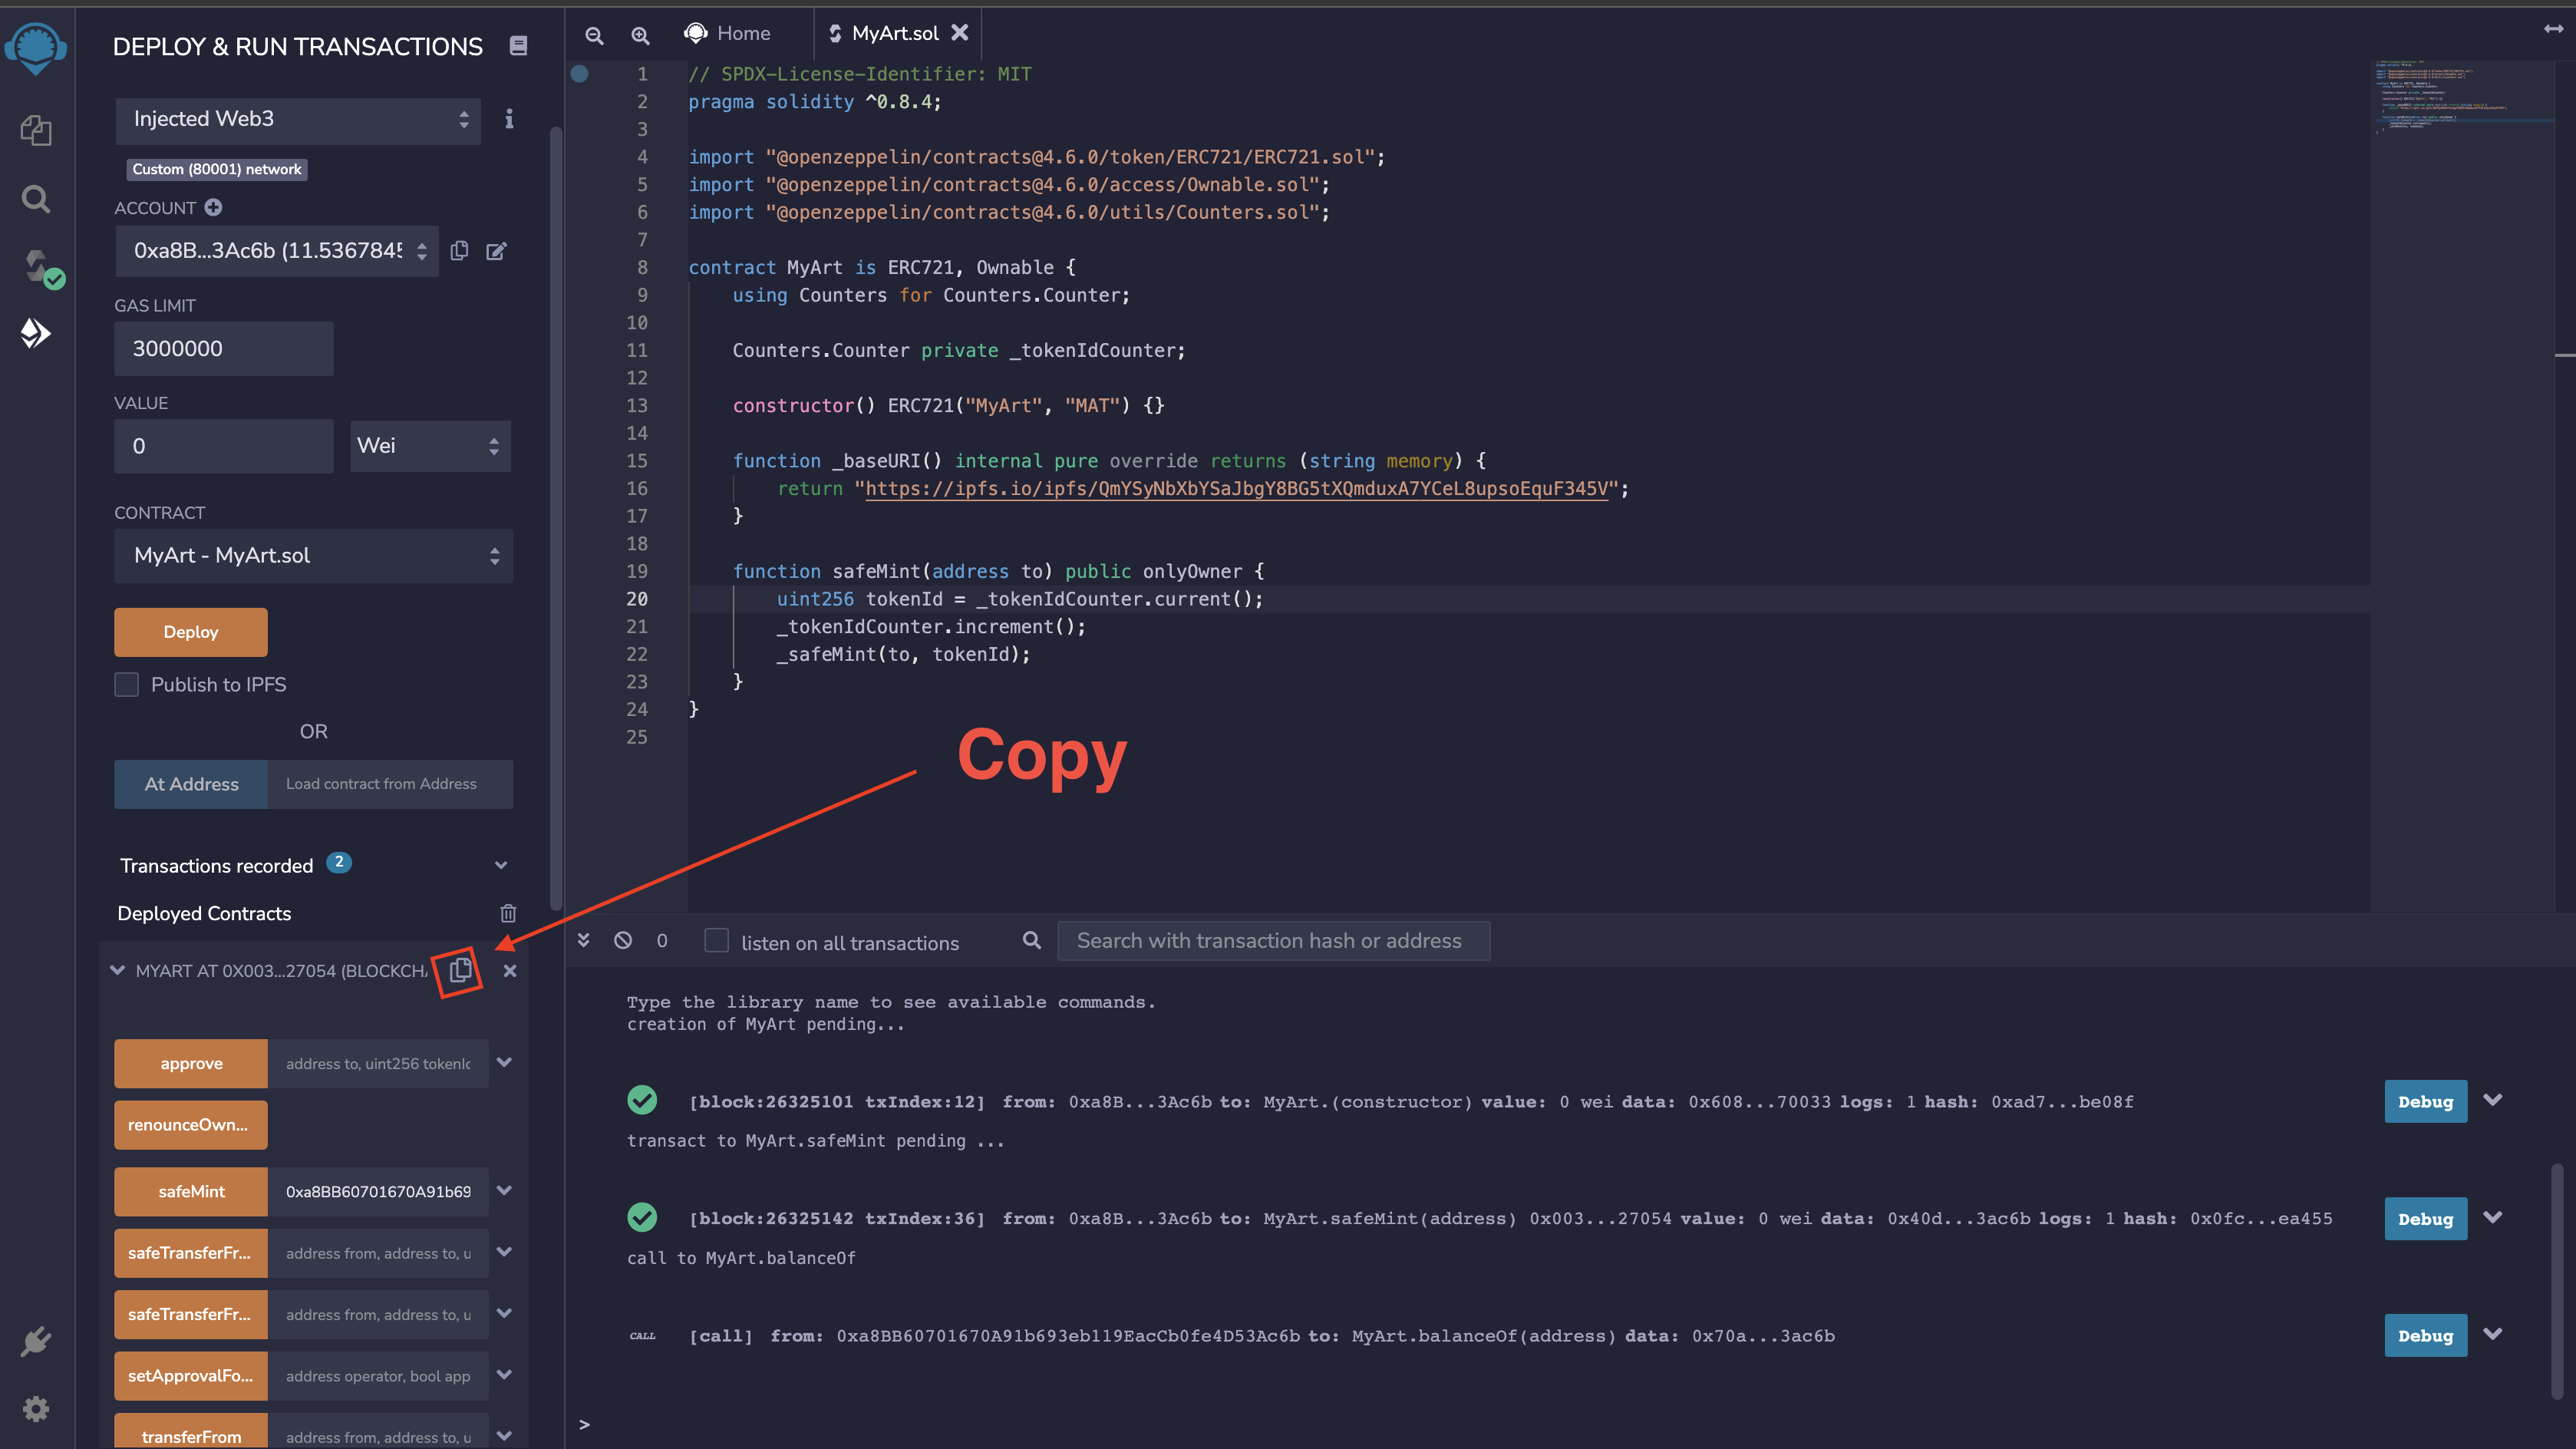
Next, we will copy the contract hash.
We can now list our NFT on the OpenSea testnet using the Mumbai chain. Let's head over to https://testnets.opensea.io/get-listed.

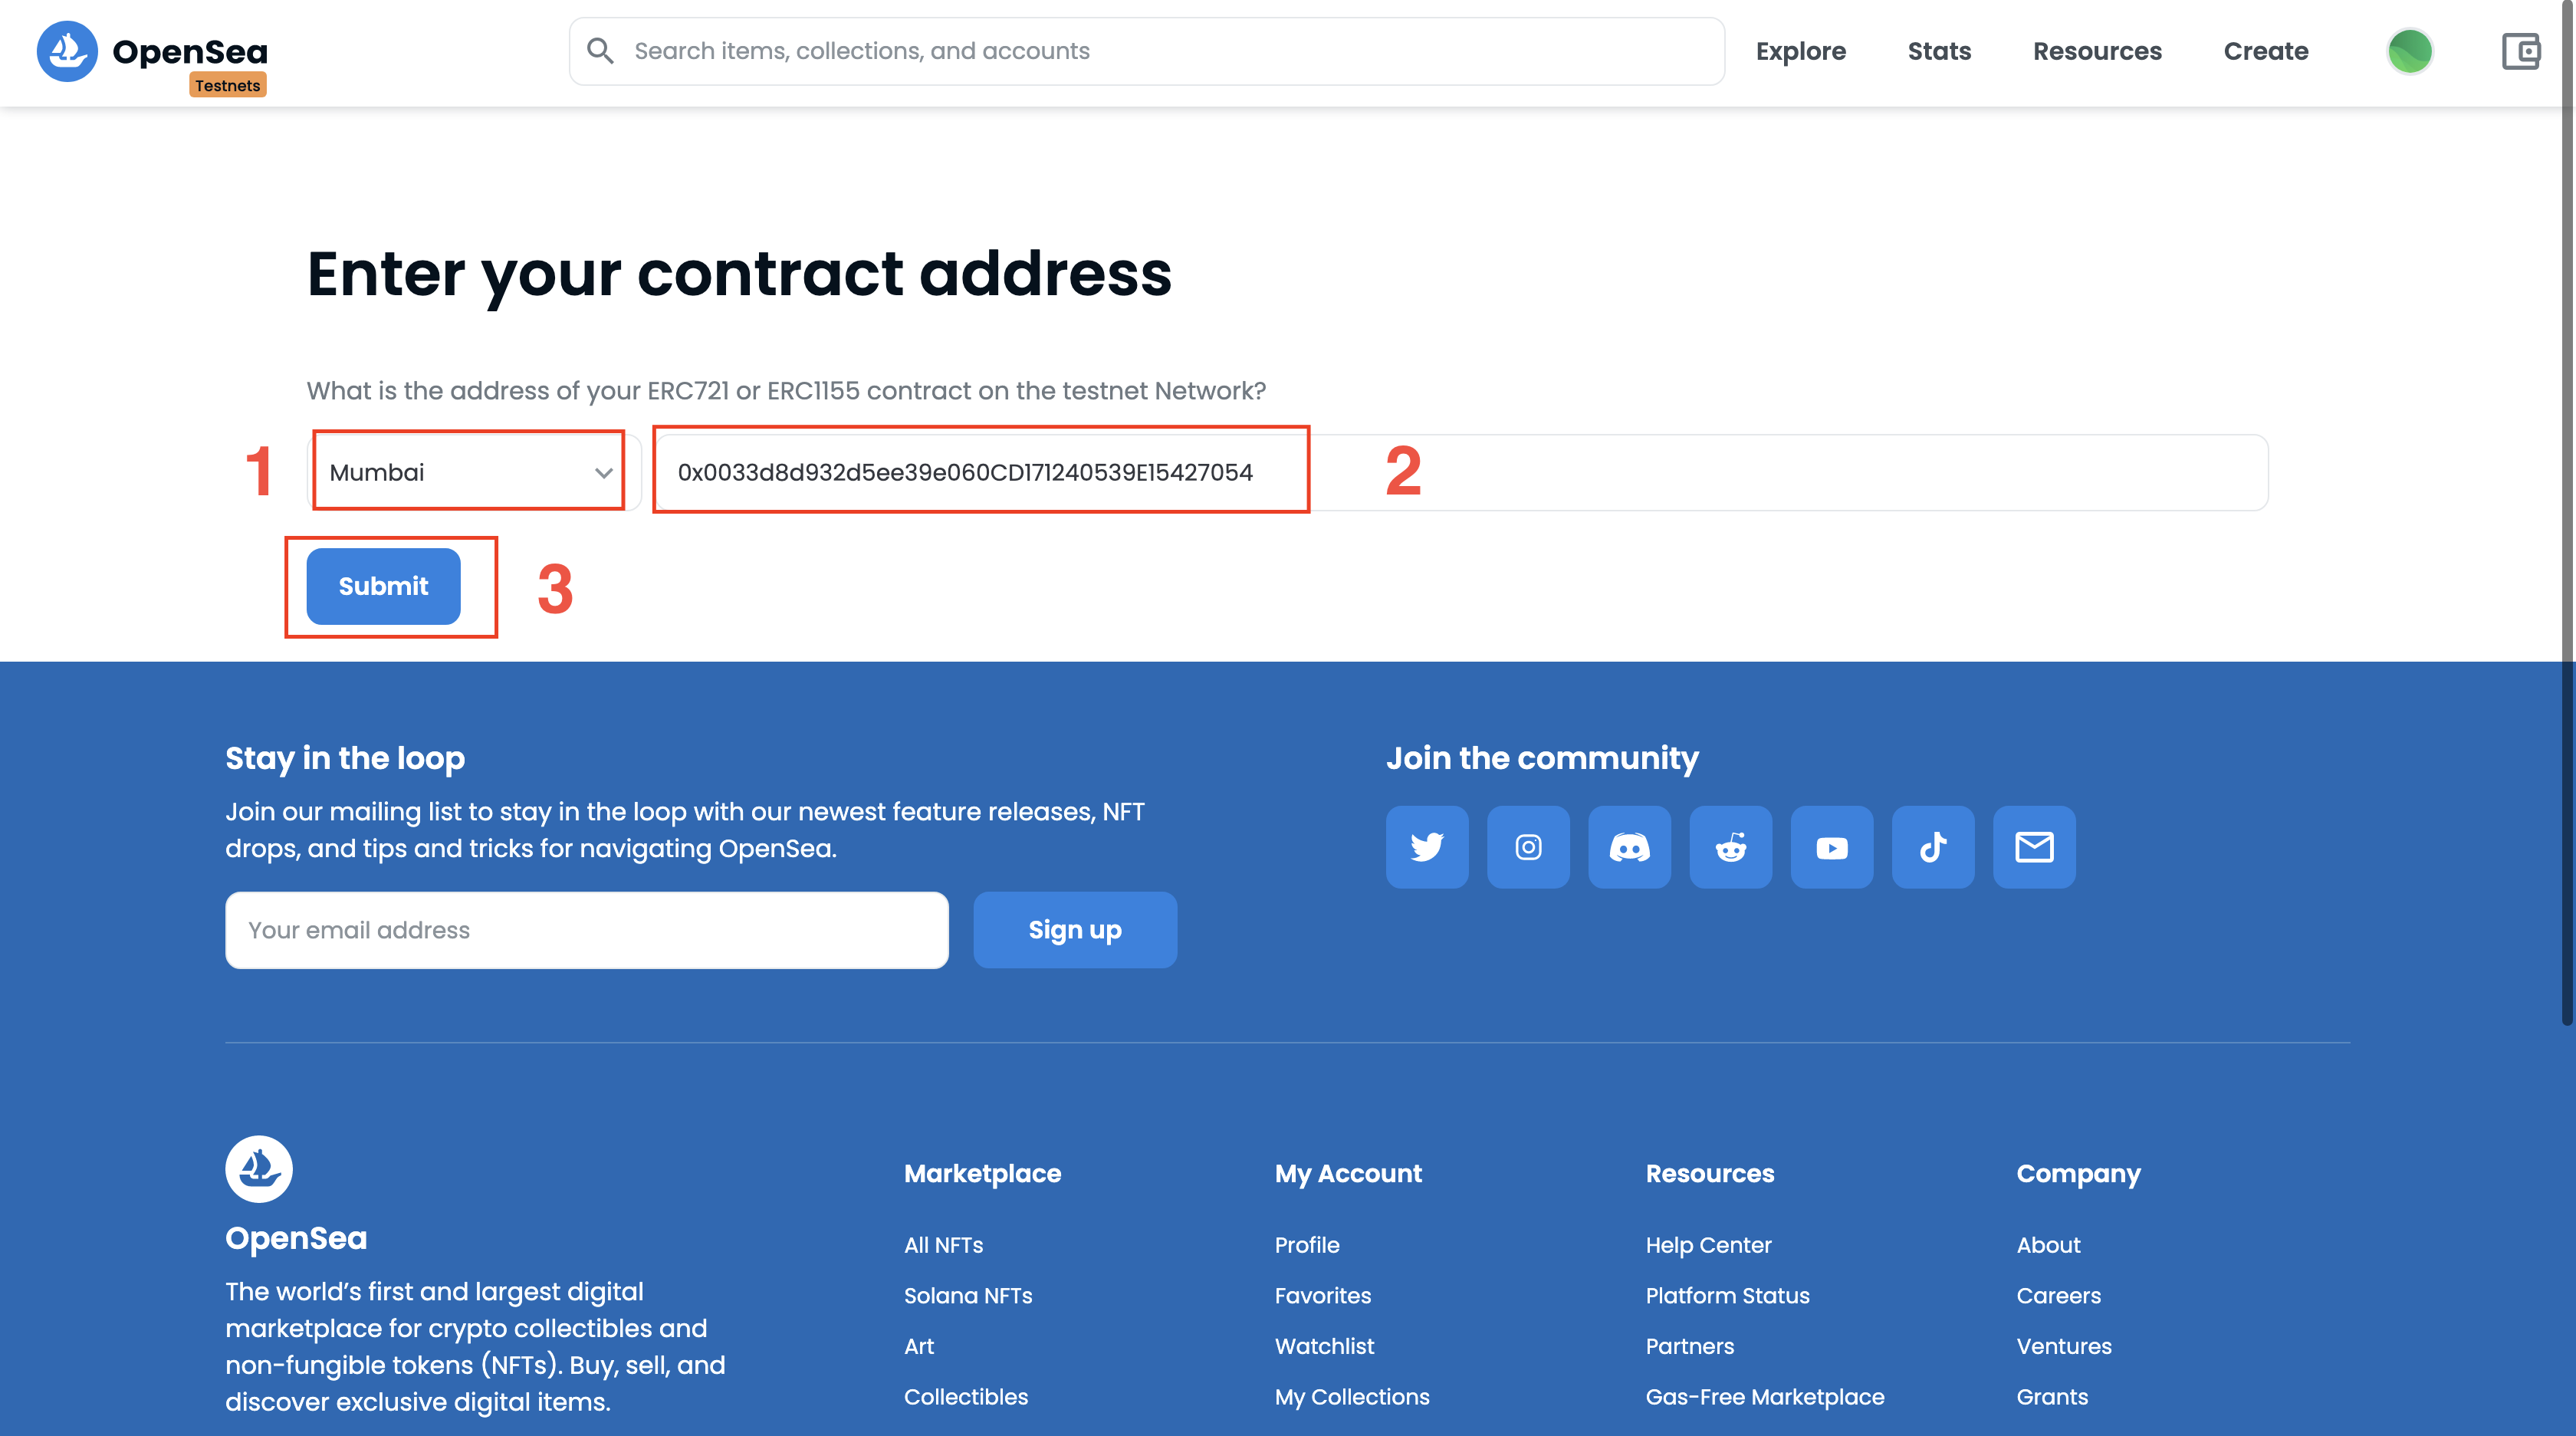
We will be redirected to the collection page to view our NFT.
For some reason, OpenSea takes reasonable time for the NFT to display on their platform, but the project is complete. ;)
Conclusion
This post addresses how to build, deploy, and list the ERC721 on OpenSea step by step as part of the token series I started earlier. Watch this space for the upcoming ones.
I'd love to connect with you at Twitter | LinkedIn | GitHub | Portfolio
See you in my next blog article. Take care!!!