How to Build and Deploy a USDC-based Smart Contract
Software Engineer | Developer Advocate | Technical Writer | Content Creator
For thousands of projects running on the top blockchains in the world, USDC acts as a reliable, interoperable, and highly liquid digital dollar. It is a vital component of the crypto economy.
This tutorial will teach us how to build and deploy USDC-based smart contracts to the Goerli Ethereum network and integrate with frontend React applications using EthersJs, ReactJs, and tailwind CSS.
Prerequisite
- Make sure to have Node/NPM installed on your computer. To install, click here for a guide.
- Verify we have Node.js installed by using the following terminal command:
node -v && npm -v
- Verify we have Node.js installed by using the following terminal command:
- Basic understanding of JavaScript / ReactJs
What is a Stablecoin?
A stablecoin is a digital currency pegged to a "stable" reserve asset like the U.S. dollar or gold. Stablecoins are designed to reduce volatility relative to unpegged cryptocurrencies like Bitcoin. ~ Coinbase
Stablecoins aim to offer a substitute for the most widely used cryptocurrencies' significant volatility, such as Bitcoin (BTC), which has made crypto investments less suitable for everyday transactions.
Types of Stablecoins
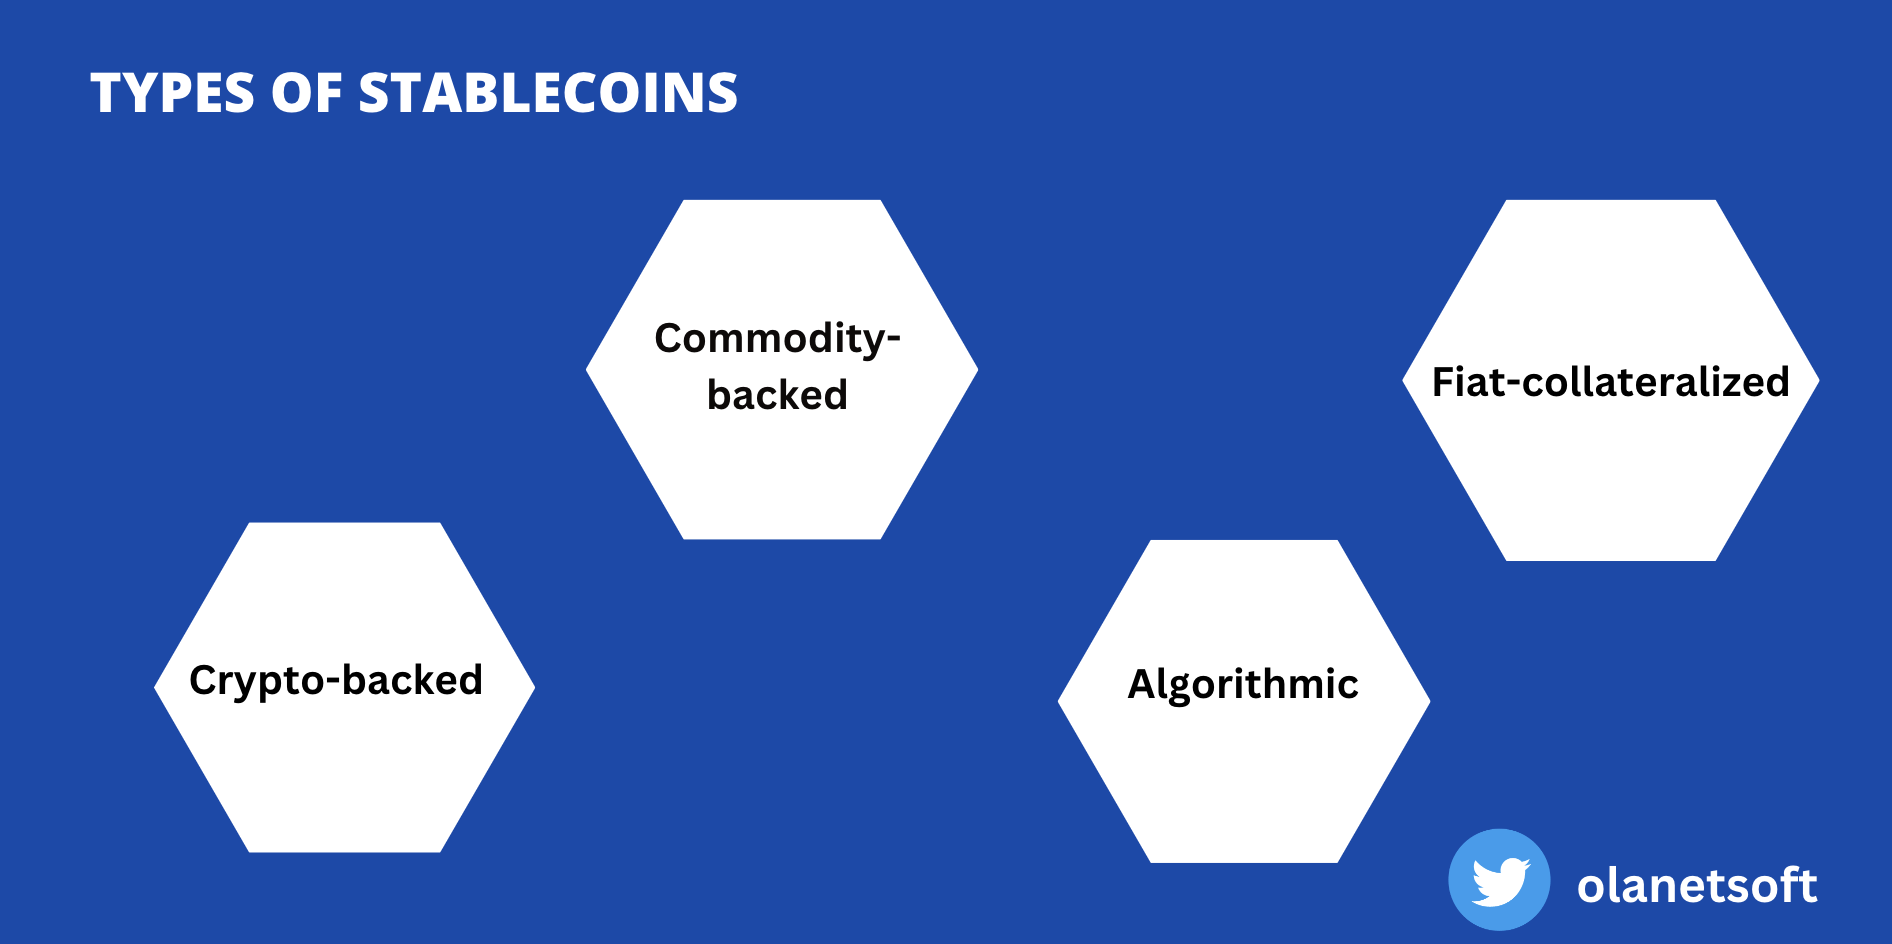
Commodity-backed Stablecoins
Commodity-backed stablecoins are stablecoins pegged to the value of a commodity like industrial metal, oil, or real estate, e.g., Tether Gold (XAUT).
Crypto-backed Stablecoins
Multiple cryptocurrencies support stablecoins to ensure effective risk allocation. Crypto-backed are stablecoins pegged to the value of another, more established cryptocurrency. e.g., DAI, BUSD.
Stablecoins backed by crypto have the benefit of better liquidity. But among the stablecoin variants already in use, crypto-collateralized stablecoins are among the most sophisticated.
Fiat-collateralized Stablecoins
Stablecoins that are "fiat-collateralized" keep a reserve of a fiat currency (or currencies), such as the dollar, as security for the stablecoin's value.
Commodities like crude oil or pricey metals like gold or silver can be used as collateral, such as USDC, USDT, etc.
However, the majority of fiat-collateralized stablecoins have U.S. dollar reserves.
Algorithmic Stablecoins
Algorithmic stablecoins are stablecoins that are not backed by real-world commodities but use algorithms to modulate supply based on their market supply.
Their main difference is how a stablecoin maintains its value by using an algorithm to restrict its supply, a computer program that follows a predetermined formula.
Building USDC-based Smart Contract
In this section, we will build, compile, and deploy the USDC-based smart contract to the Goerli Ethereum testnet.
Write a USDC-based Smart Contract Logic
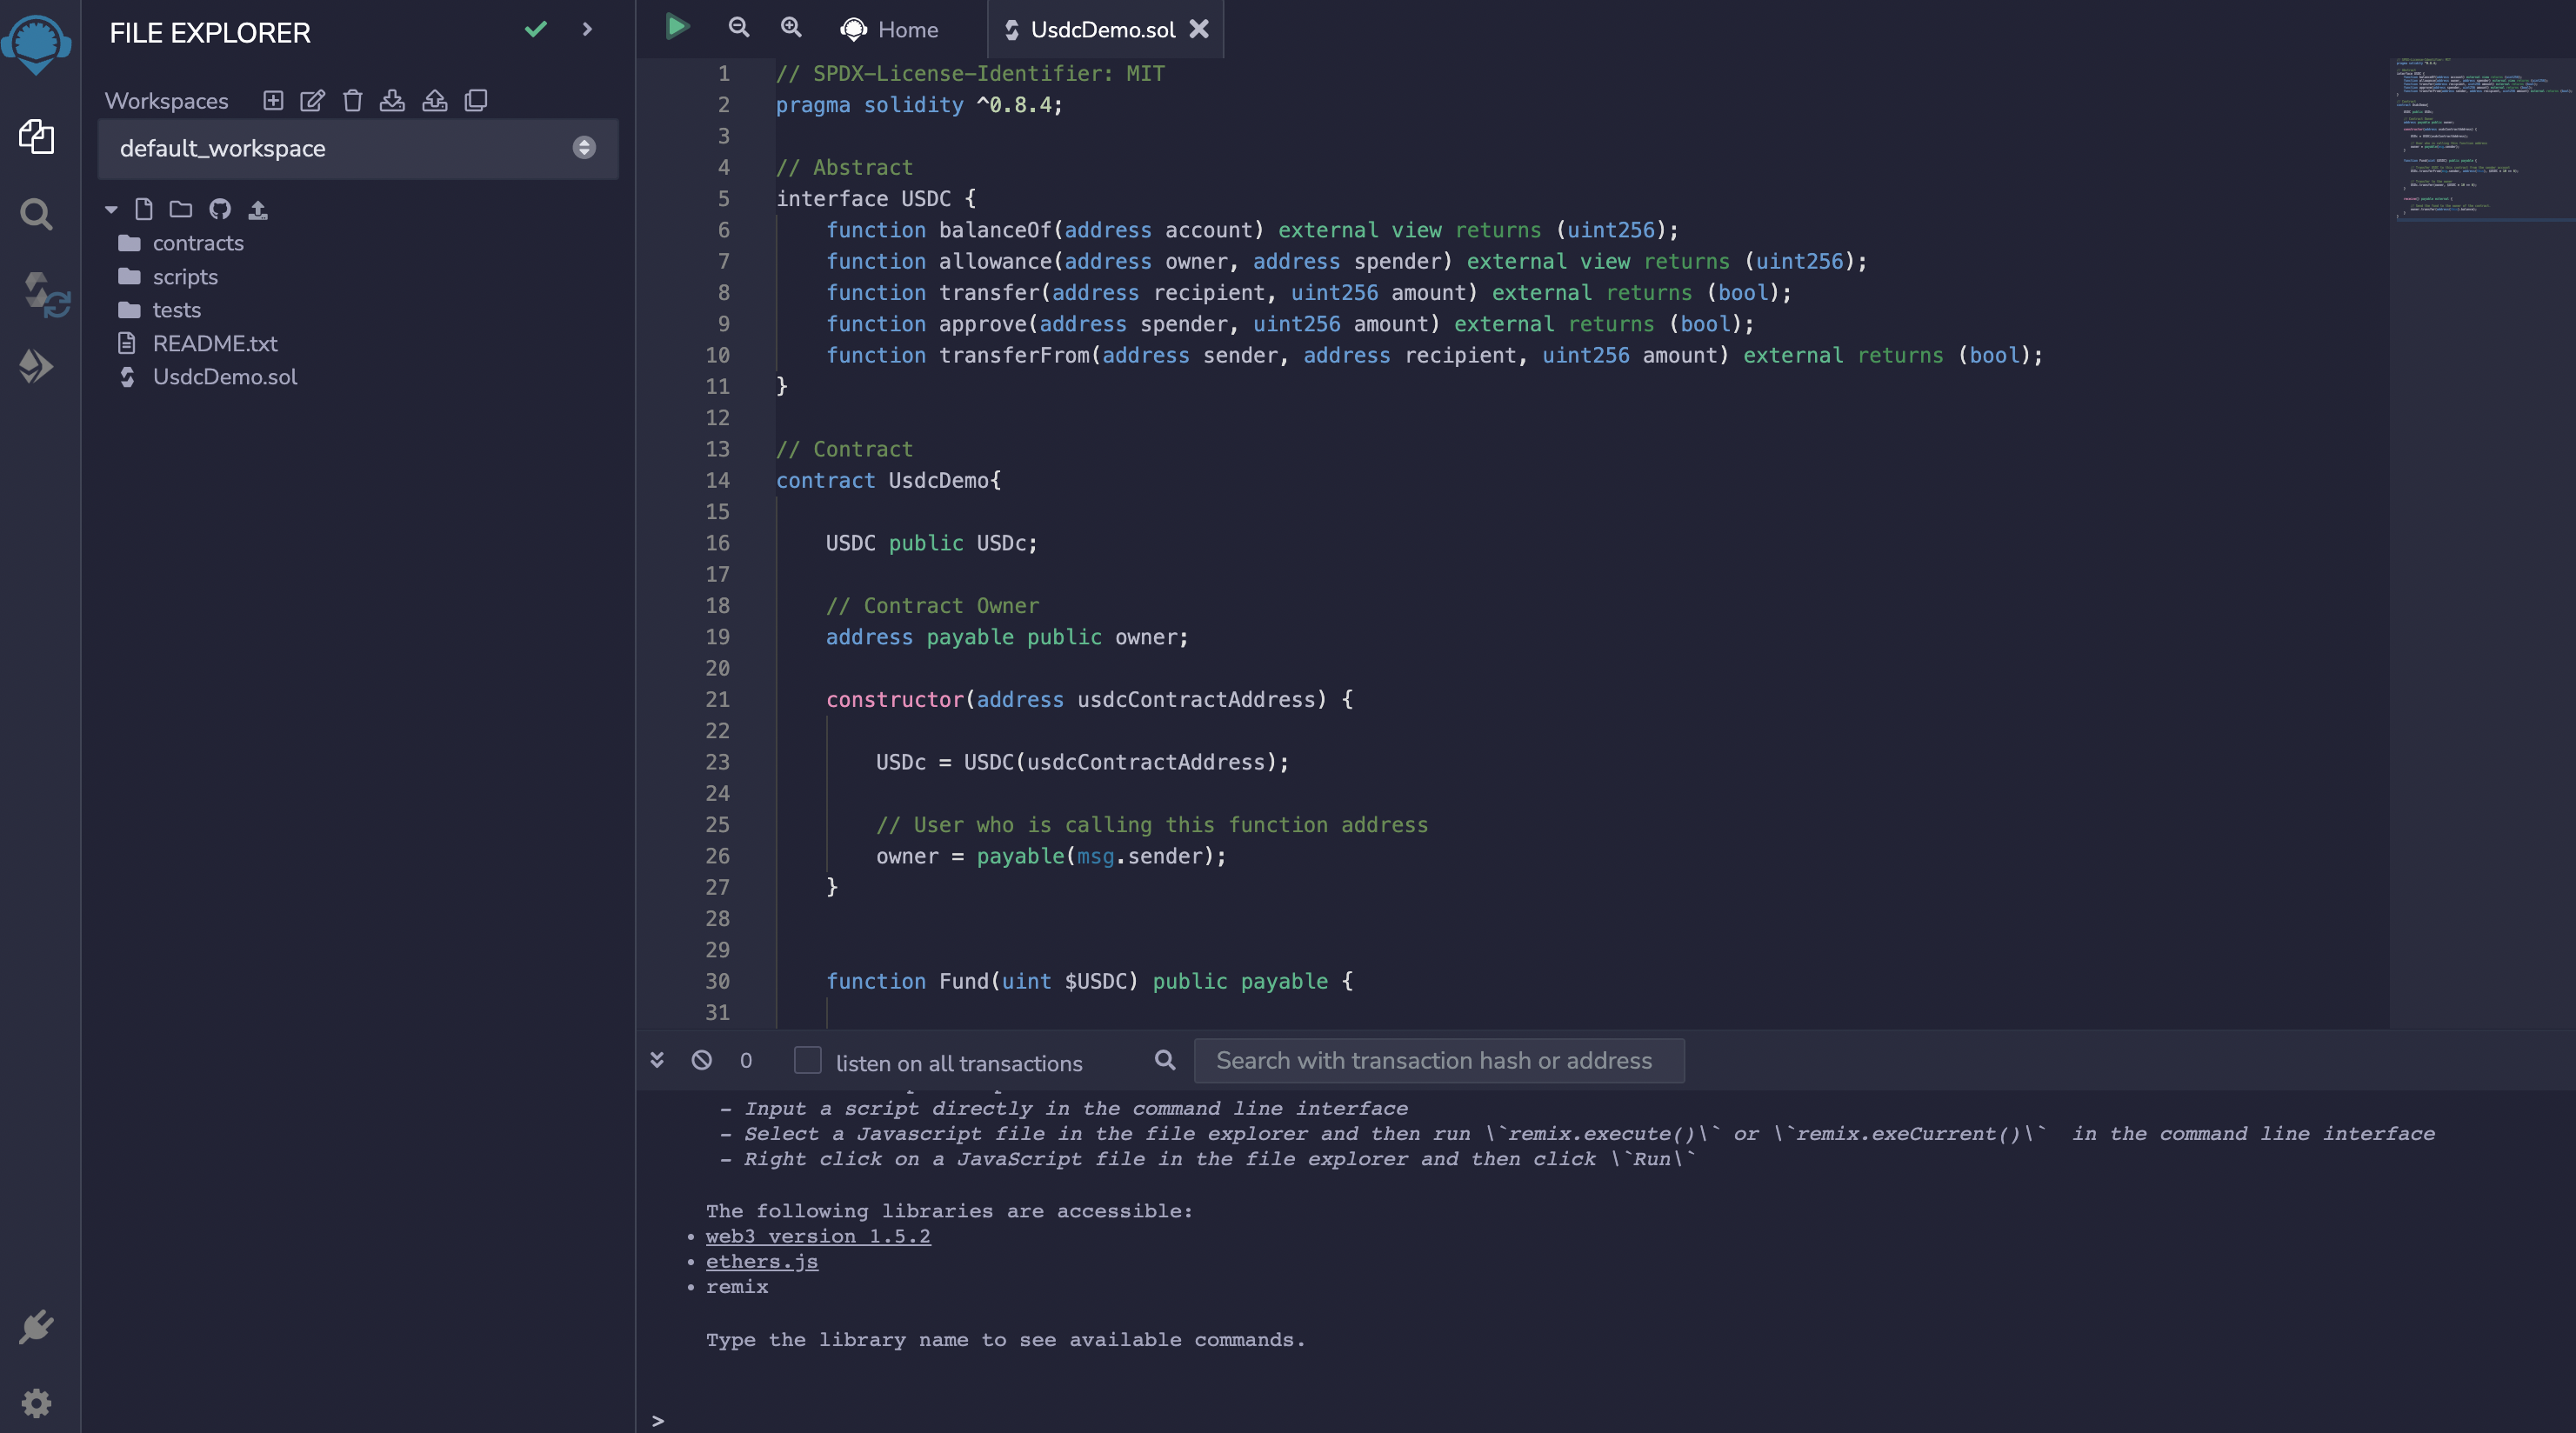
Let us Navigate to the Remix site and create a new file called UsdcDemo.sol as shown below.
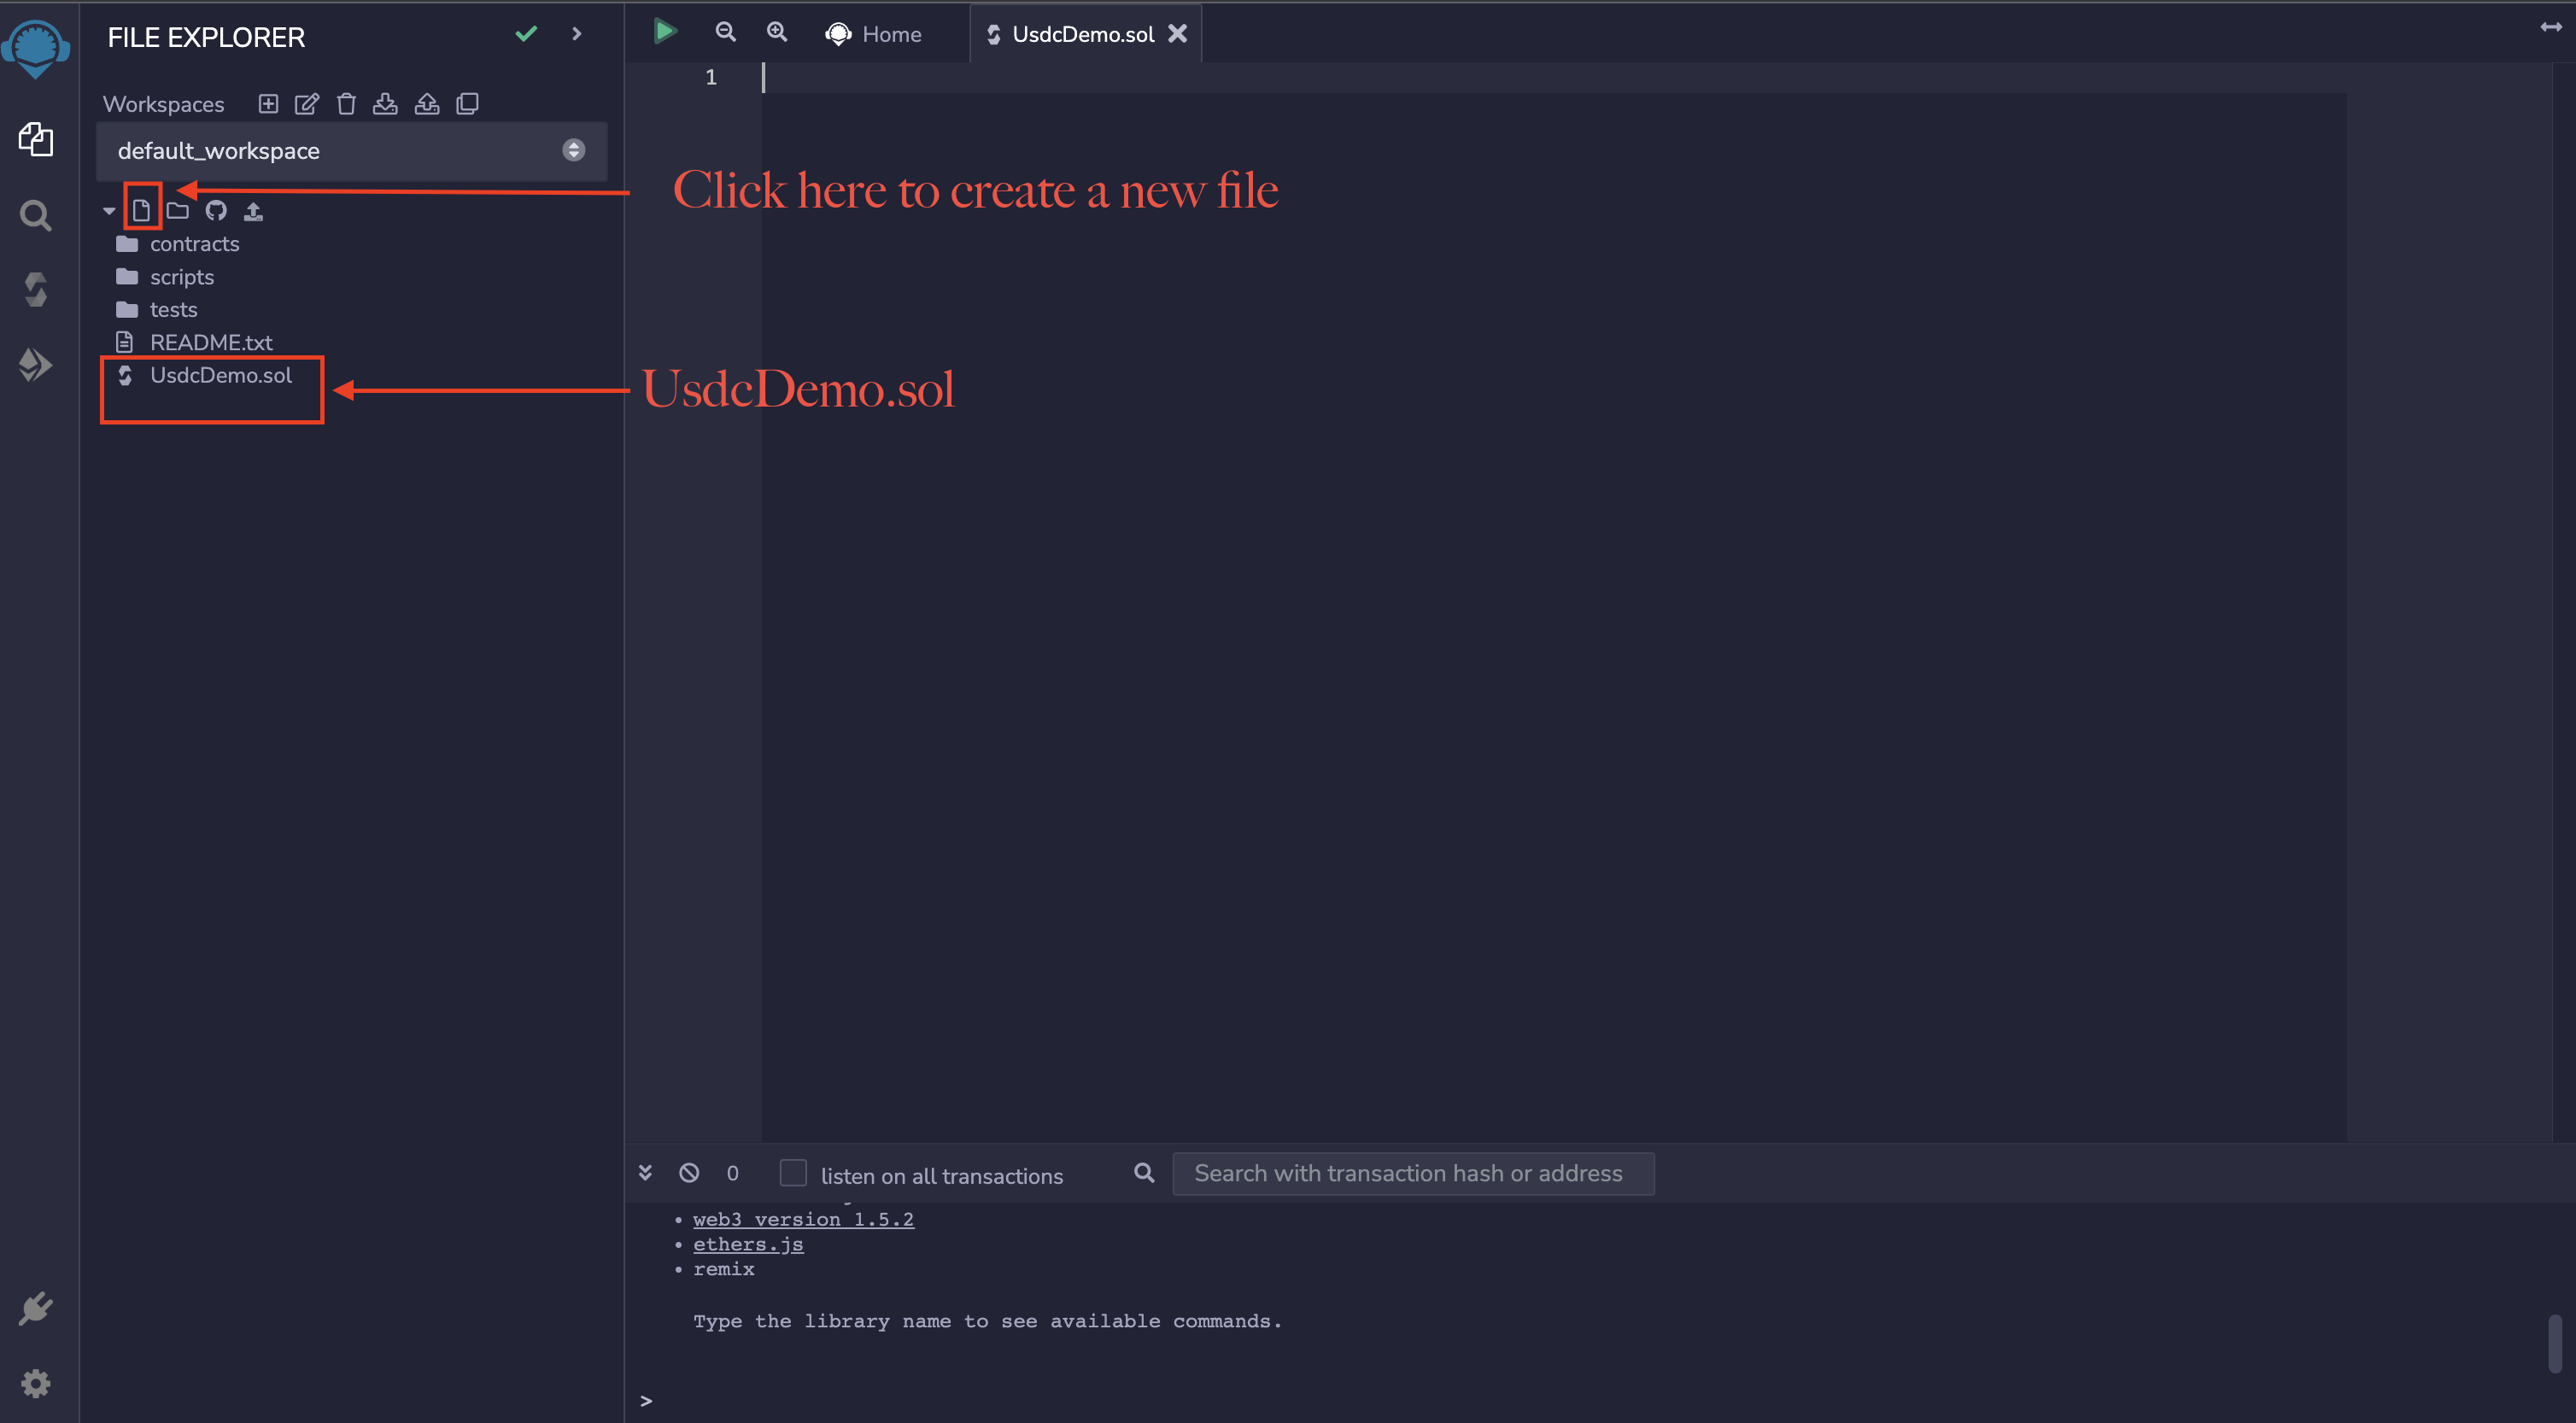
Next, update the UsdcDemo.sol file with the following code snippet.
// SPDX-License-Identifier: MIT
pragma solidity ^0.8.4;

// Abstract
interface USDC {
    function balanceOf(address account) external view returns (uint256);
    function allowance(address owner, address spender) external view returns (uint256);
    function transfer(address recipient, uint256 amount) external returns (bool);
    function approve(address spender, uint256 amount) external returns (bool);
    function transferFrom(address sender, address recipient, uint256 amount) external returns (bool);
}

// Contract
contract UsdcDemo{

    USDC public USDc;

    // Contract Owner
    address payable public owner;

    constructor(address usdcContractAddress) {

        USDc = USDC(usdcContractAddress);

        // User who is calling this function address
        owner = payable(msg.sender);
    }


    function Fund(uint $USDC) public payable {

        // Transfer USDC to this contract from the sender account
        USDc.transferFrom(msg.sender, address(this), $USDC * 10 ** 6);


        // Transfer to the owner
        USDc.transfer(owner, $USDC * 10 ** 6);
    }

    // Alternatively
    // receive() payable external {

        // Send the fund to the owner of the contract.
       // owner.transfer(address(this).balance);
    // }
}
In the code snippet above, we:
- Created an
interfaceto utilize the function created on the main USDC smart contract - Created a
UsdcDemocontract - Initialize the
USDcvariable from the interface created and also the contract owner - Created the function
Fundthat accepts a parameter of the amount connected account is willing to fund. Inside this function, we utilized thetransferFromfunction from the interface to transfer the desired amount from the user to the contract, and then we sent it to the contract's owner using thetransferfunction. - Added a
receivefunction which alternatively does the automatic transfer of tokens deposited on the smart contract to the contracts' owner to avoid funds being permanently stuck on the contract
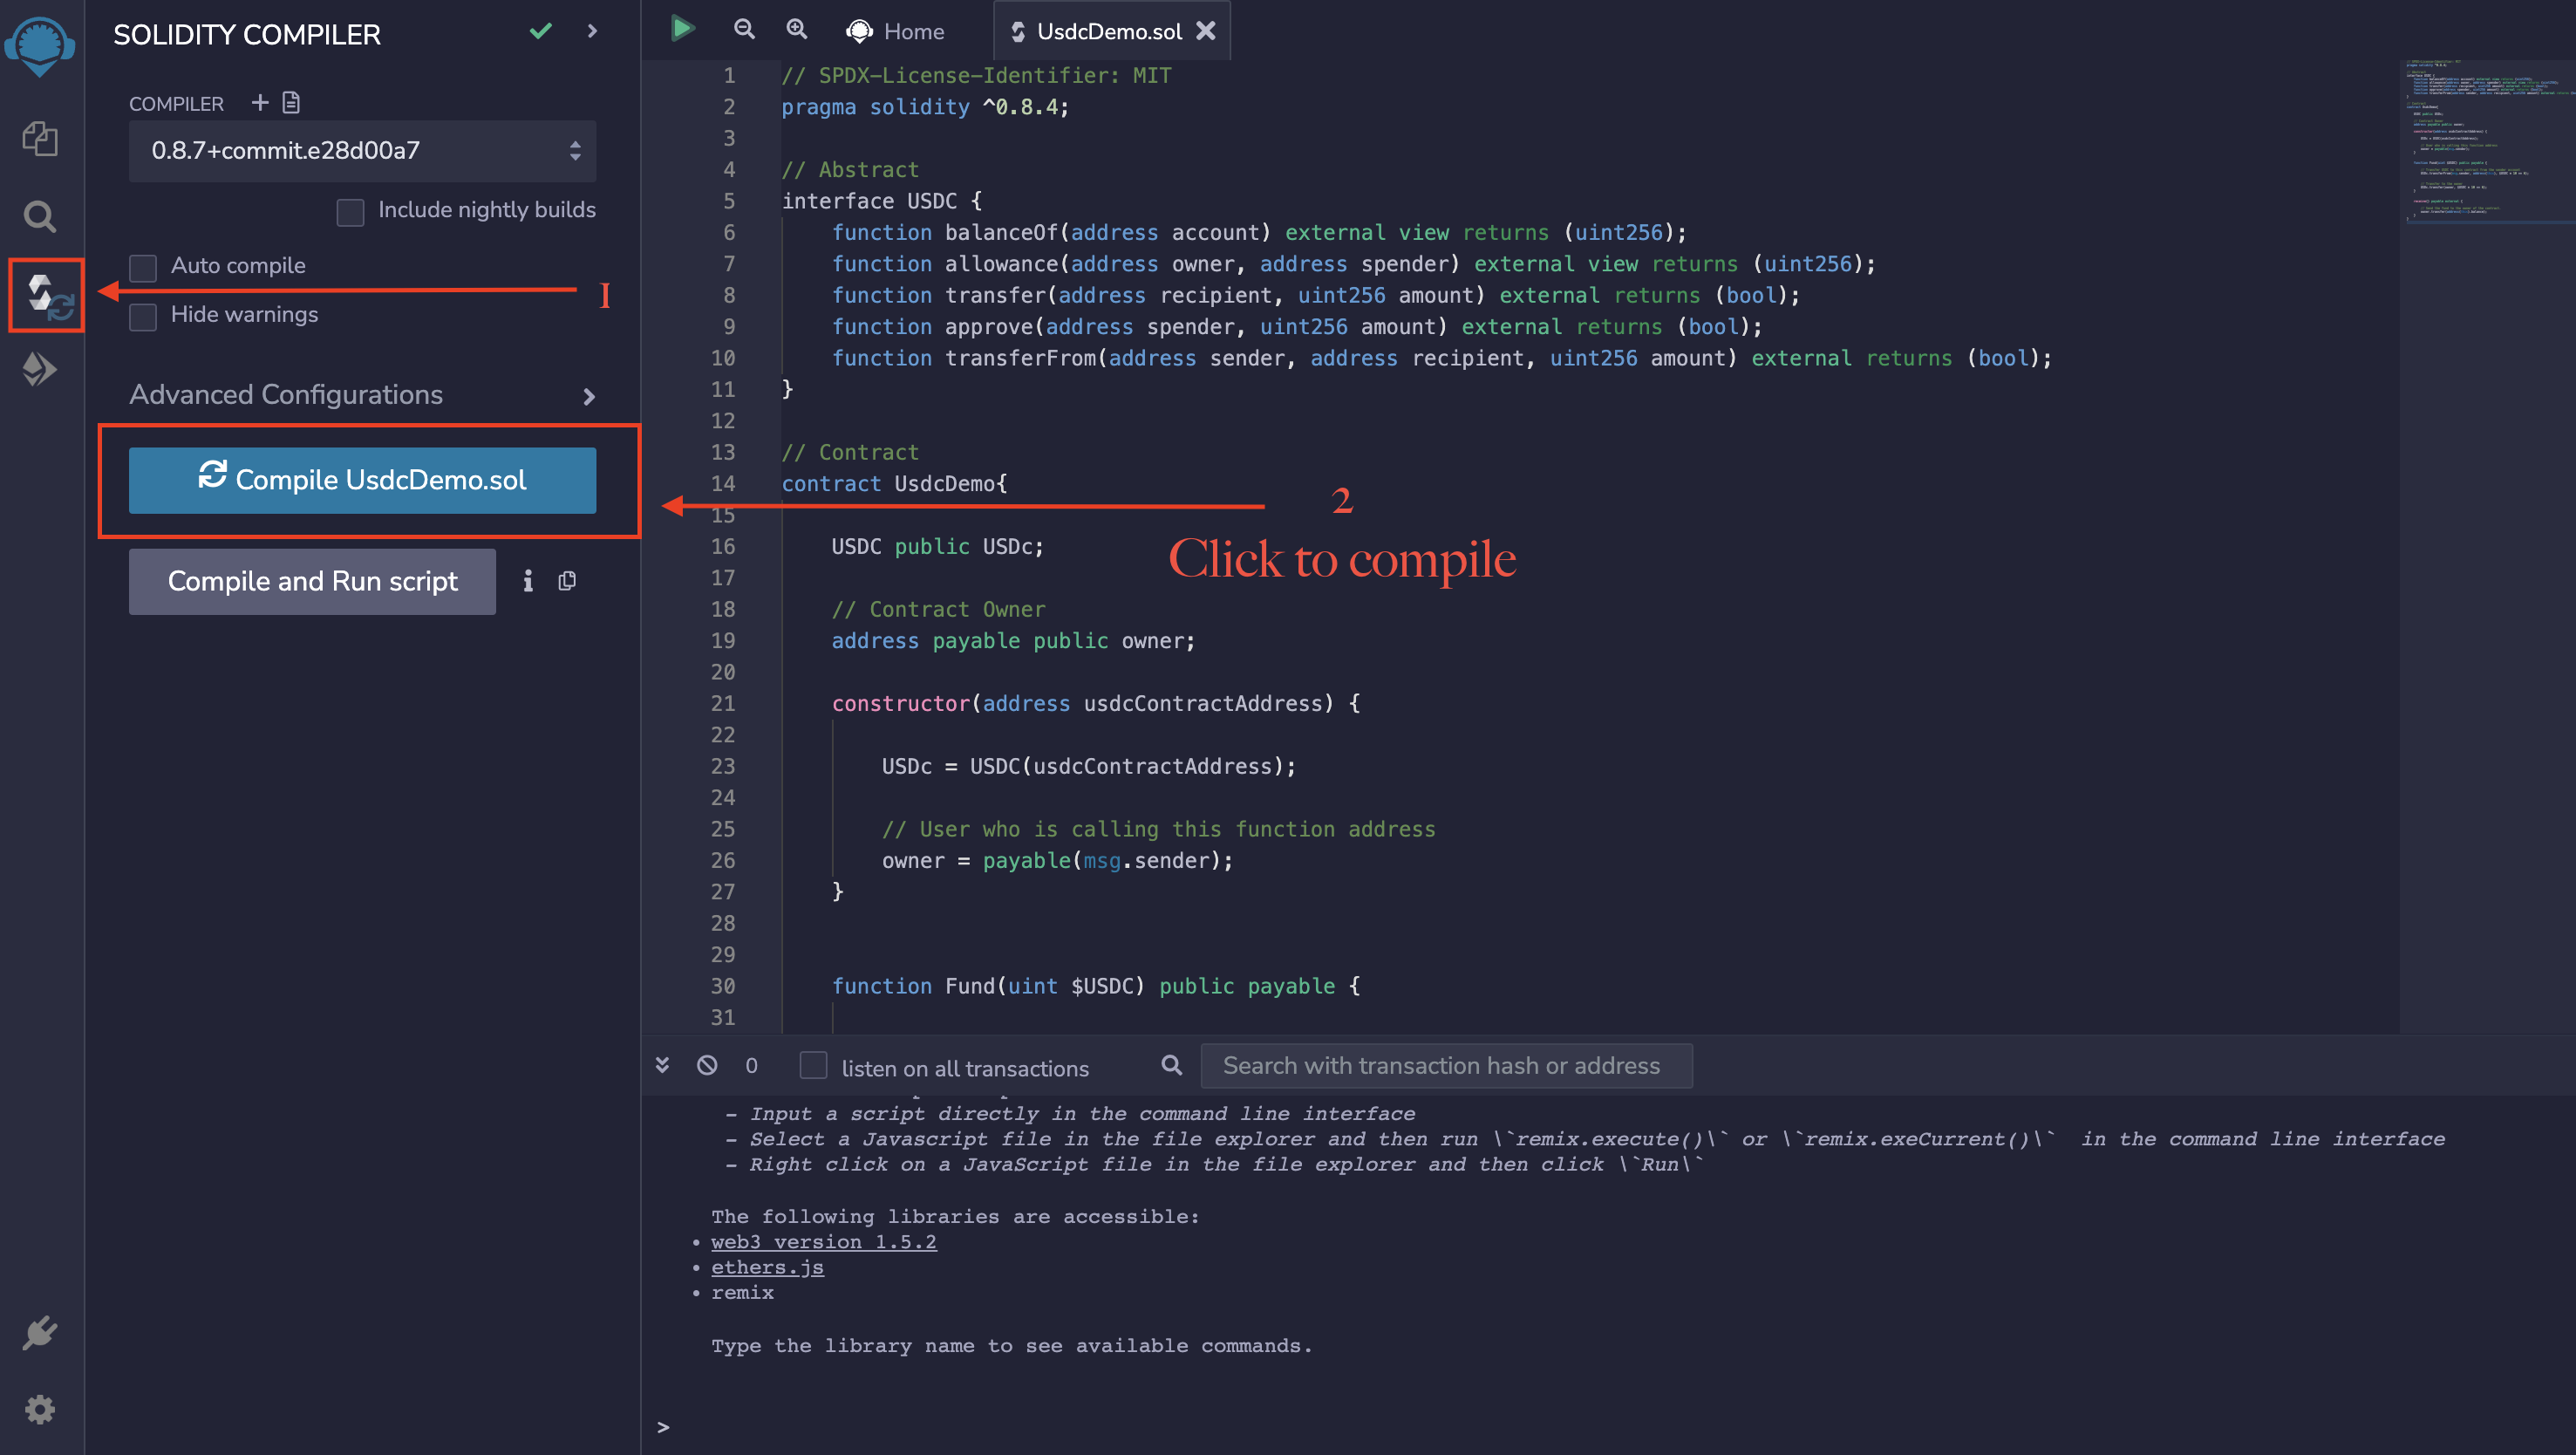
Compile a USDC-based Smart Contract
In this section, we will compile the USDC-based smart contract we wrote in the previous step, as shown below.
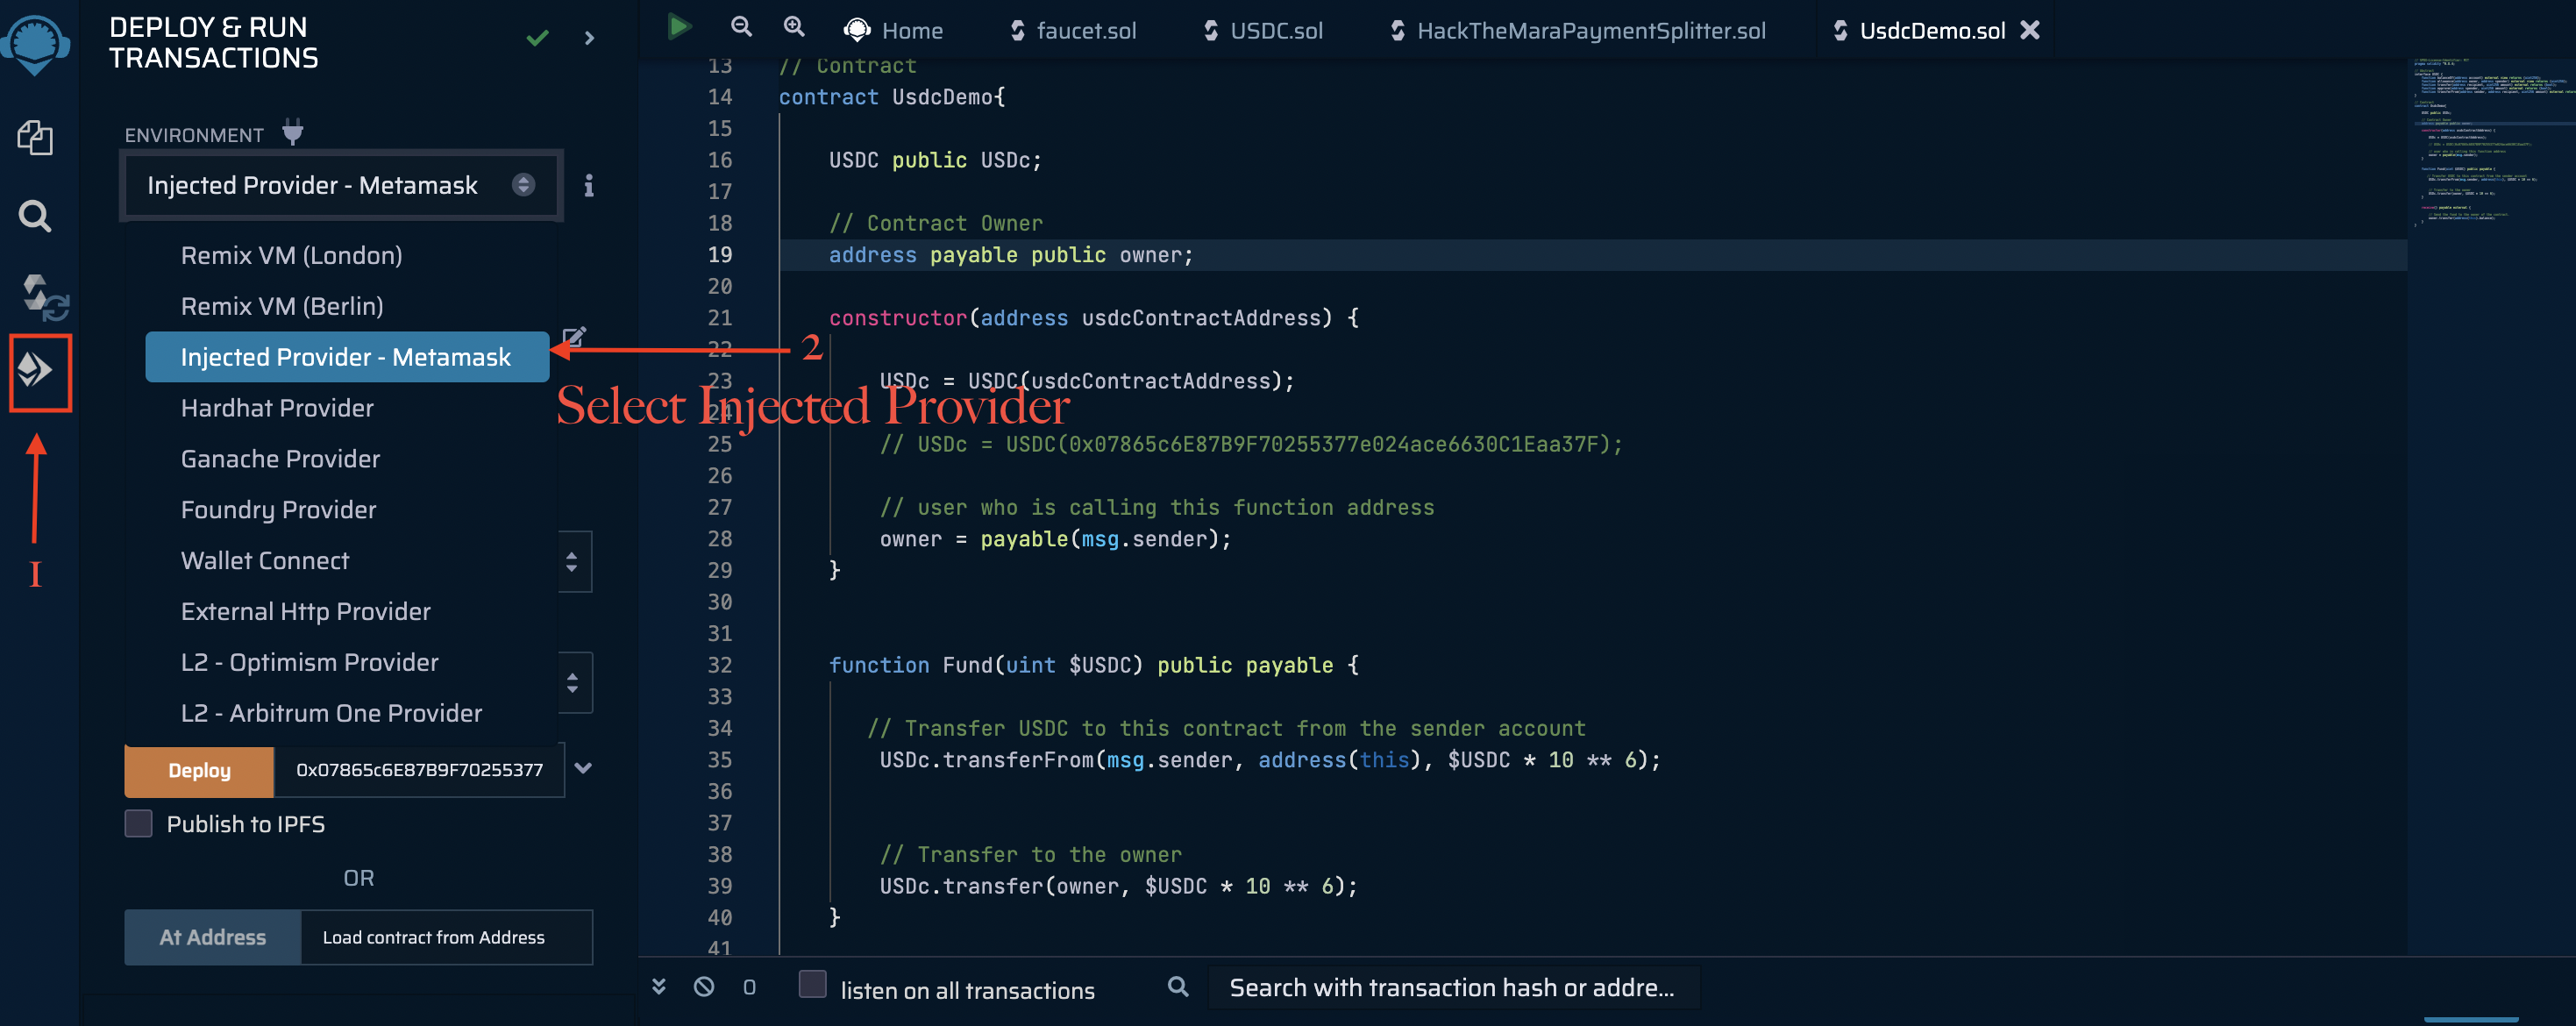
Deploy a USDC-based Smart Contract
We successfully built and compiled the USDC-based smart contract in the previous steps. We will proceed to deploy the smart contract to the Goerli Ethereum network.
Ensure you have Metamask installed, or click here to download and install Metamask.
Select the contract UsdcDemo we want to deploy, as shown below.
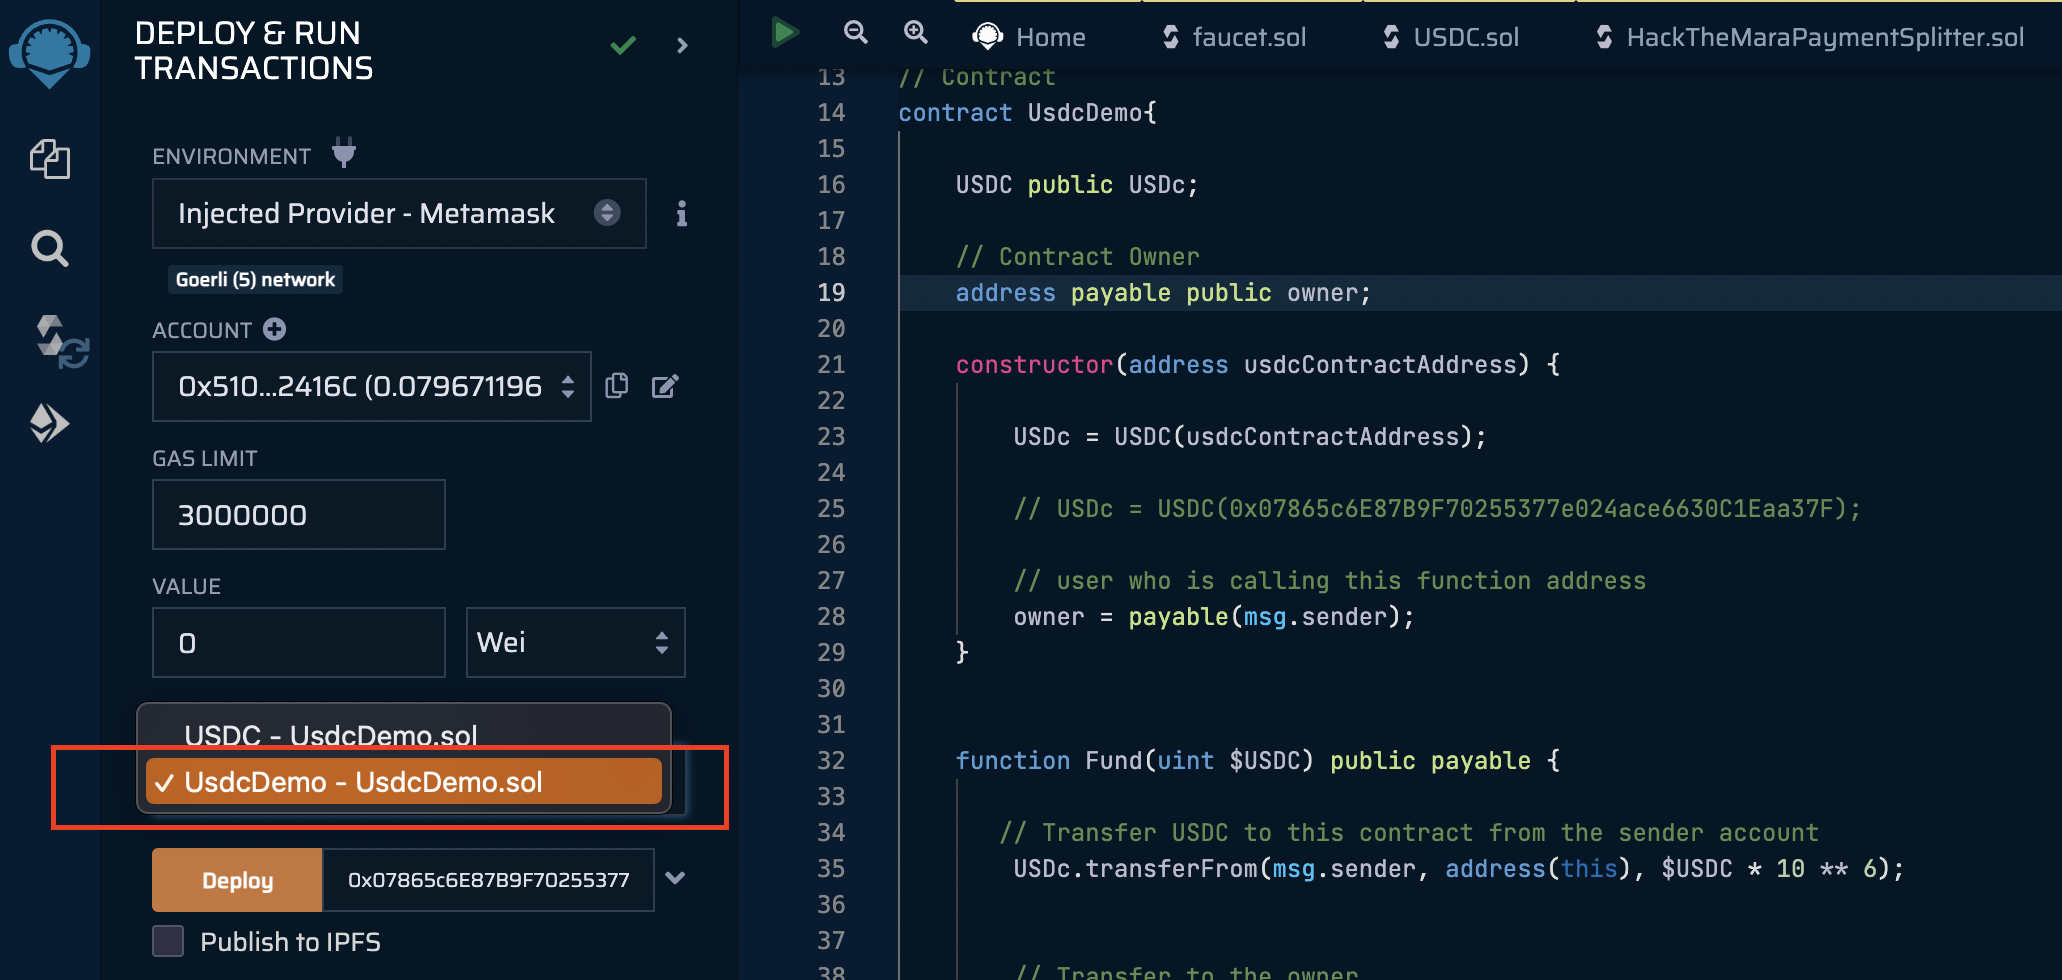
Next, paste the original USDC contract address 0x07865c6E87B9F70255377e024ace6630C1Eaa37F and click the Deploy button, as shown below.
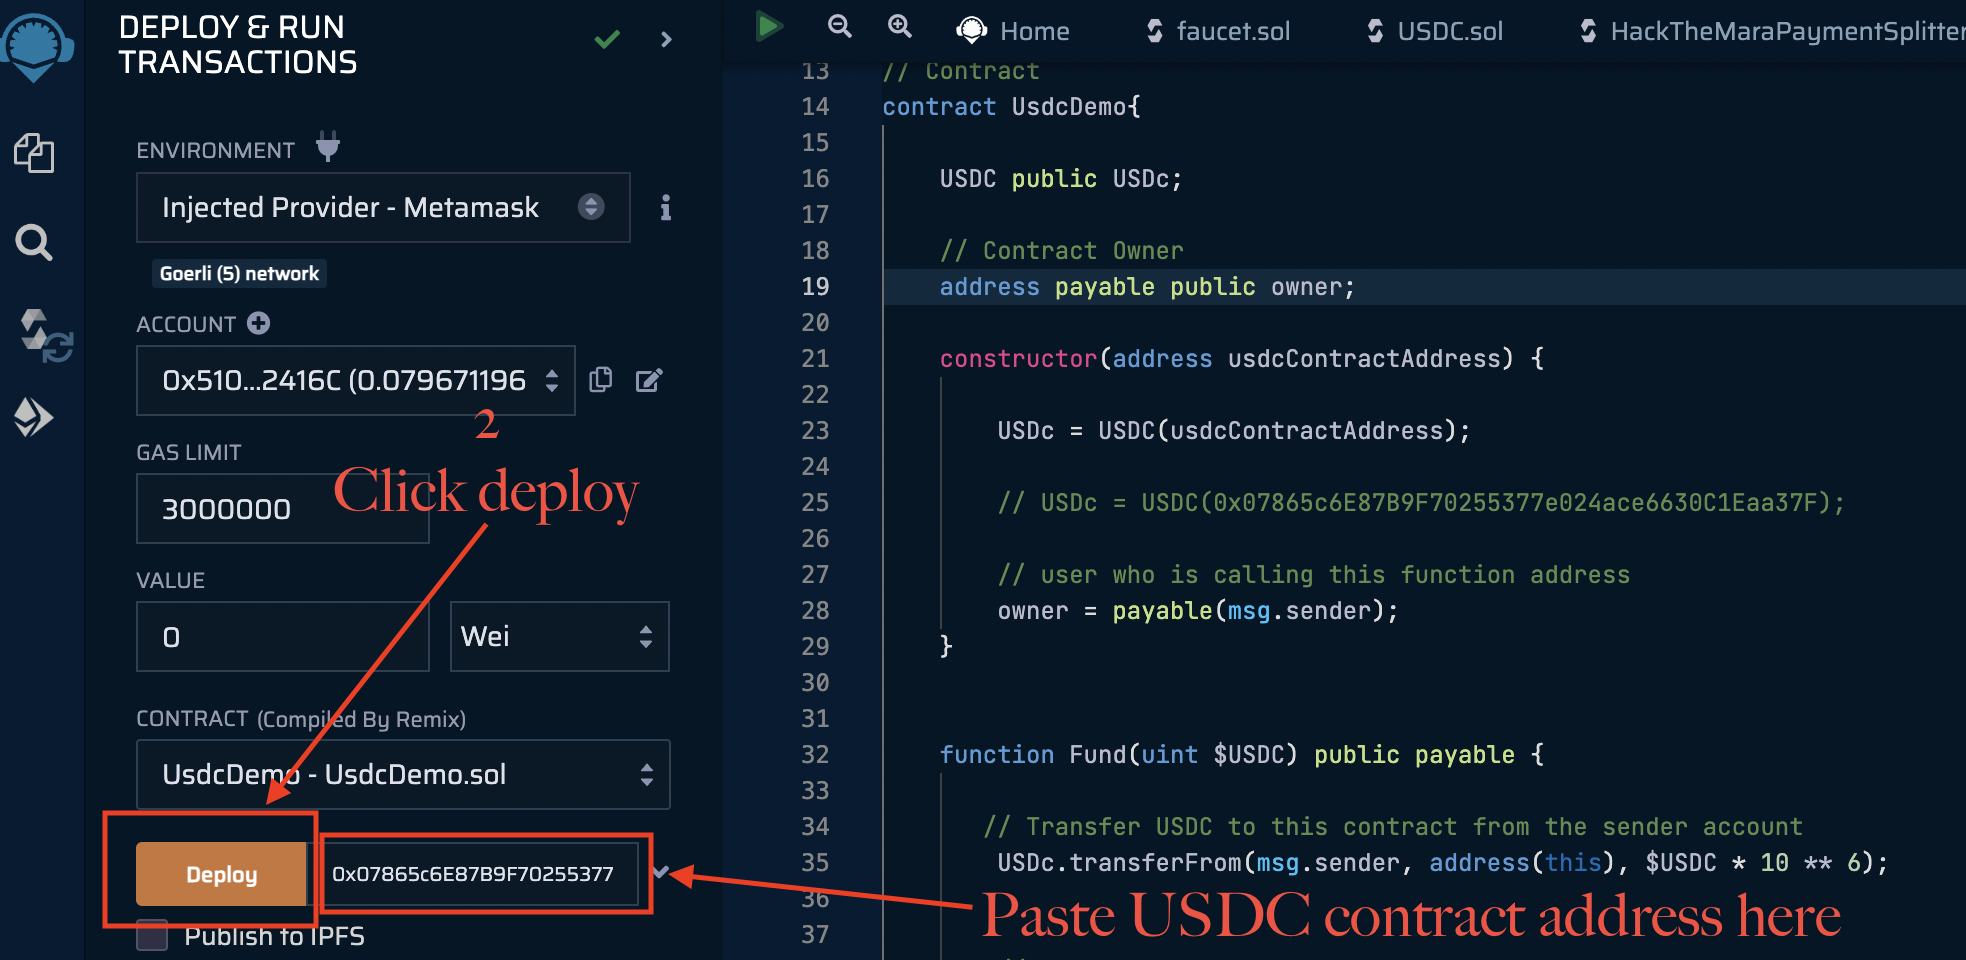
Metamask will prompt a message to confirm the request then we will see a deployment message on the console, as shown below, after the contract has successfully been deployed on the Goerli Ethereum Network.

We have entirely built and deployed our smart contract. In the next section, we will implement a simple user interface to test and interact with the smart contract using Reactjs.
Building a Frontend Client with ReactJs
Let's clone this project on GitHub to start the project setup and installation.
Next, we will launch the project locally after cloning it using the following command on our terminal.
cd usdcdemo-frontend && npm install && npm run dev
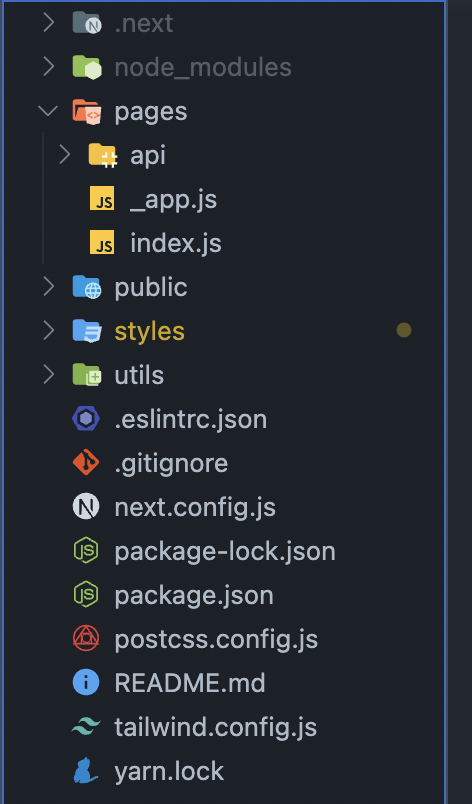
After cloning and installing the project, we should have something similar to what we have below:
Update Project Smart Contract Address and Contract ABI
In this section, we will update the cloned project smart contract address and contract ABI with our own that we just built and deployed.
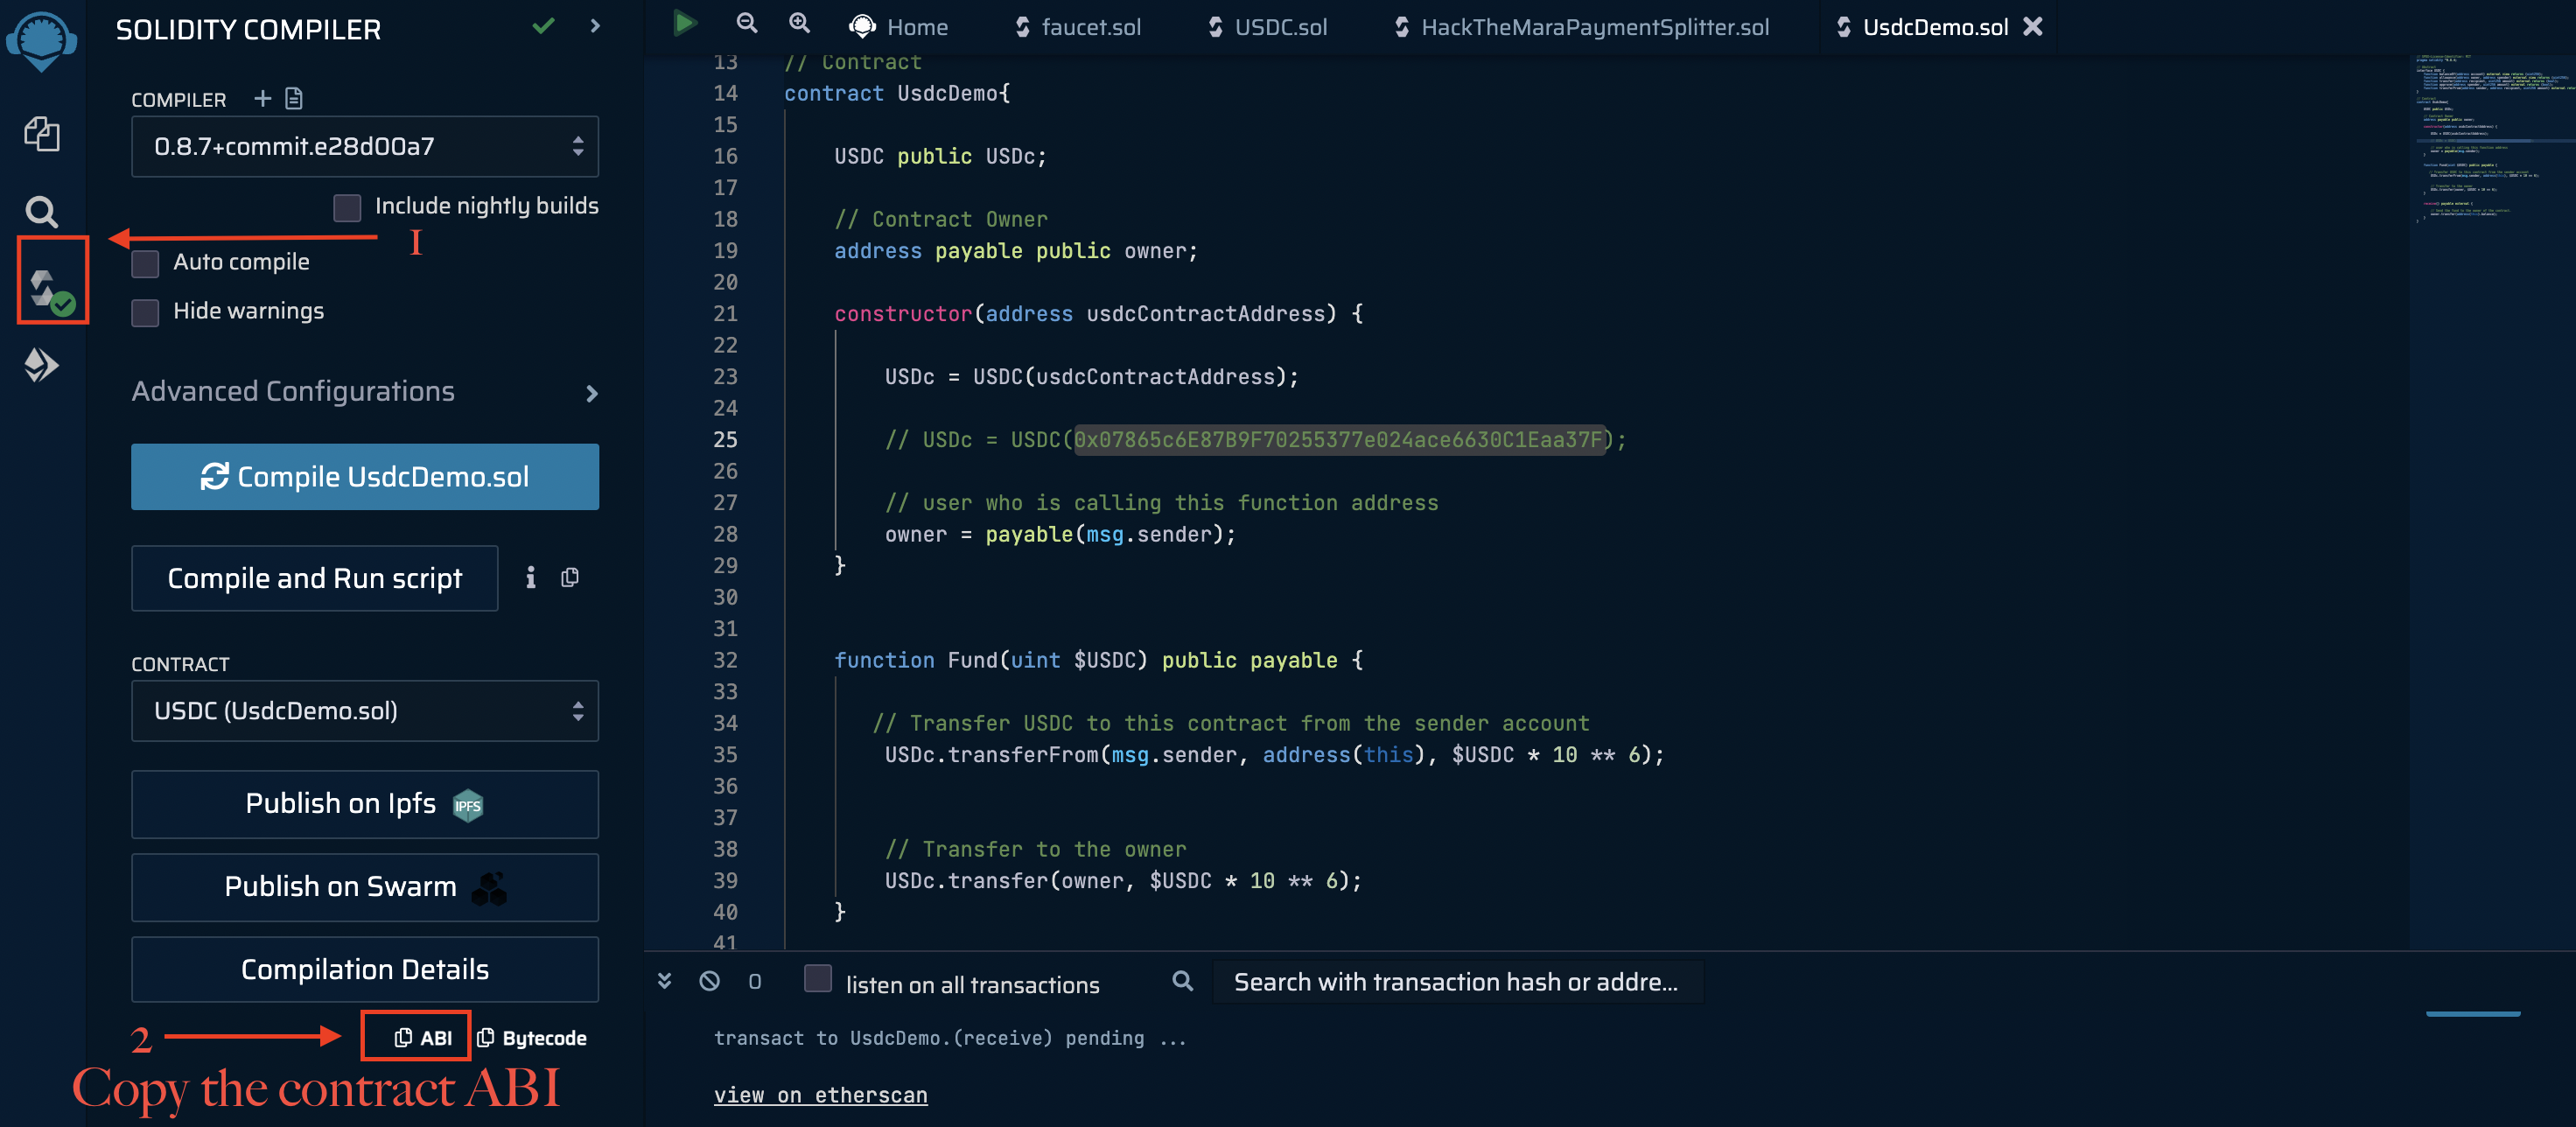
Please navigate to the Remix Site where we wrote and deployed the USDC-based smart. Copy the contract address and ABI as shown below.
Inside the frontend project, navigate to the utils folder and paste the Abi we copied into the contract.json file.
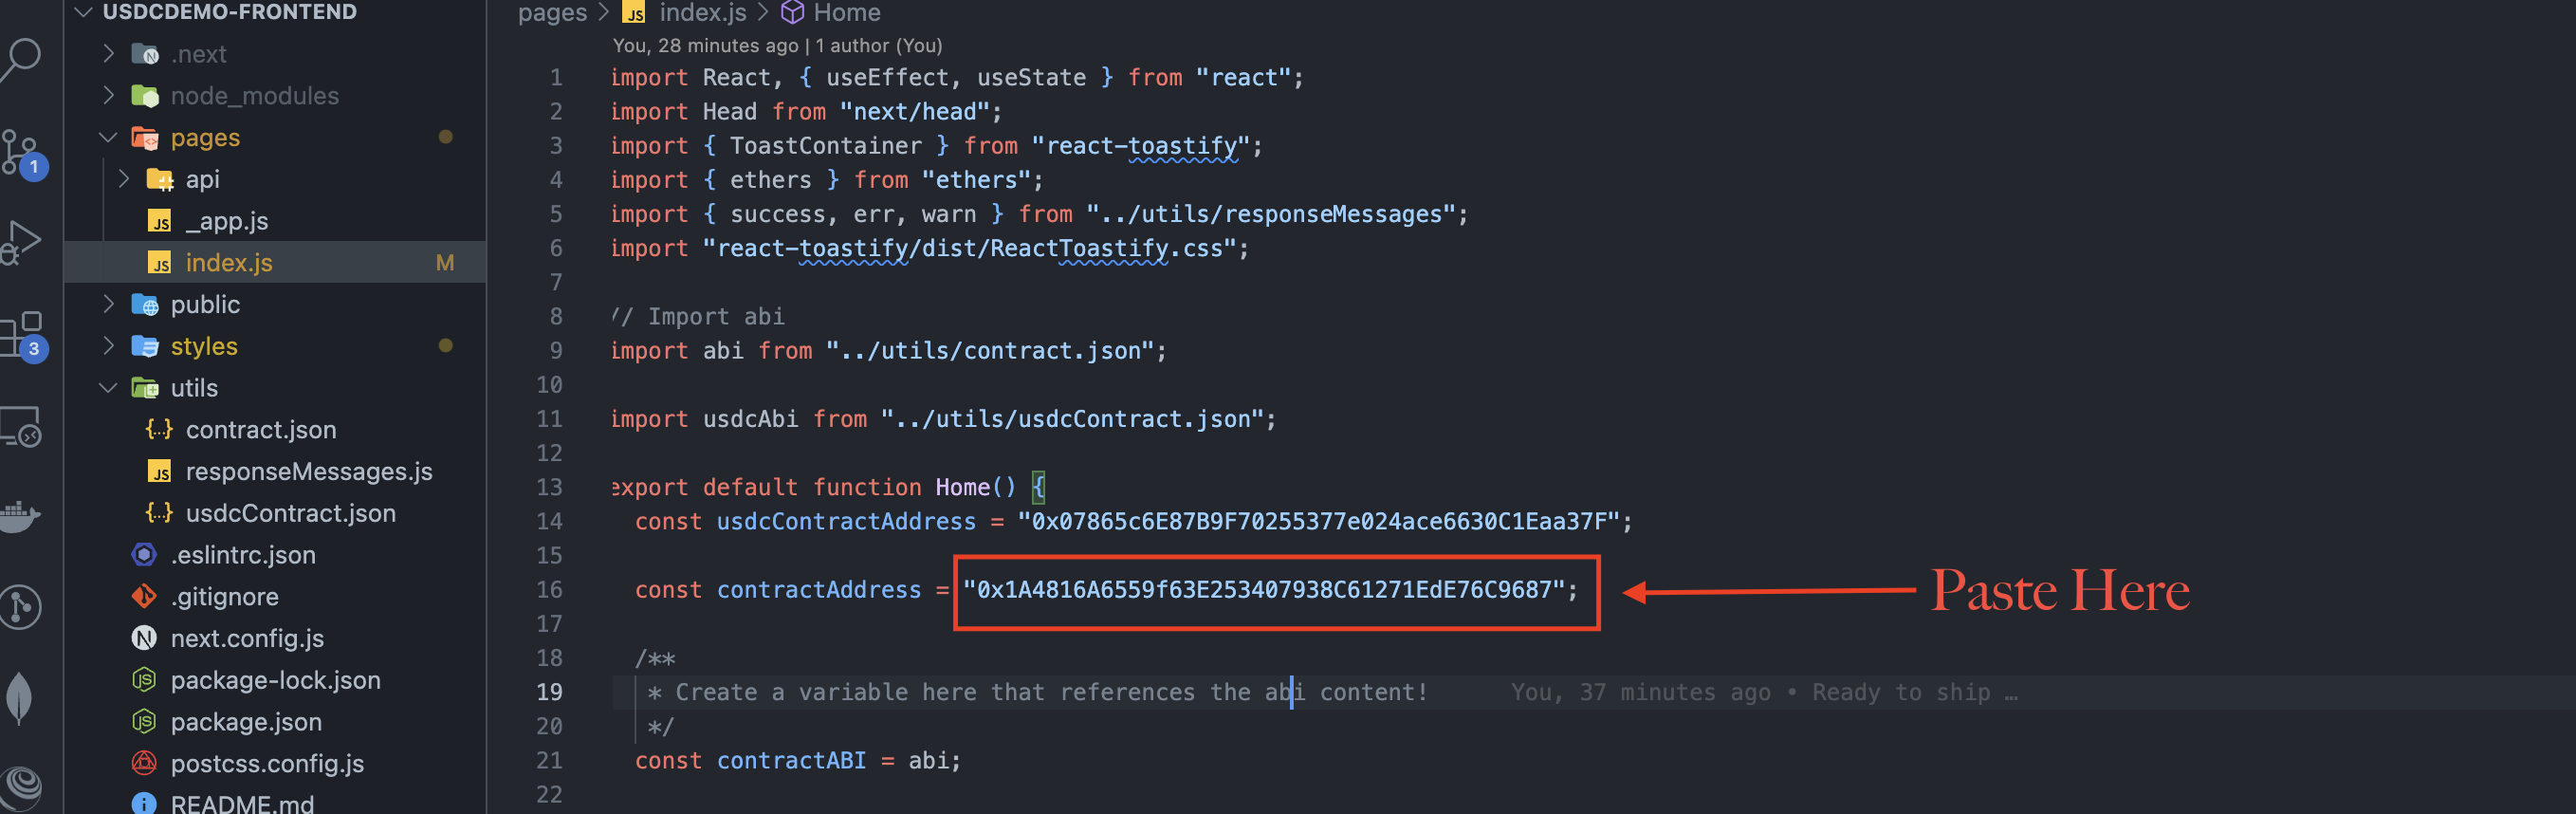
Next, copy the contract address on the Remix site as shown below.

Inside the index.js file under the pages folder, paste the contract address we just copied to replace the existing one, as shown below.
In the index.js file, we have a few functions named checkIfWalletIsConnected, connectWallet, and Fund; in the following section, we will learn what each function does.
Validate if a User Wallet is Connected
const checkIfWalletIsConnected = async () => {
    try {
      const { ethereum } = window;

      /*
       * Check if we're authorized to access the user's wallet
       */
      const accounts = await ethereum.request({ method: "eth_accounts" });

      // Validate that we have an account
      if (accounts.length !== 0) {
        const account = accounts[0];

        // Set the current account
        setCurrentAccount(account);

        // Display a success message to the user that they are connected
        success("🦄 Wallet is Connected!");
      } else {
        warn("Make sure you have MetaMask Connected!");
      }
    } catch (error) {
      err(`${error.message}`);
    }
  };
Connect Wallet
/**
   * Implement your connectWallet method here
   */
  const connectWallet = async () => {
    try {
      const { ethereum } = window;

      // Check if MetaMask is installed
      if (!ethereum) {
        warn("Make sure you have MetaMask Connected!");
        return;
      }

      //request account access if needed
      const accounts = await ethereum.request({
        method: "eth_requestAccounts",
      });

      // Get the first account we get back
      setCurrentAccount(accounts[0]);
    } catch (error) {
      console.log(error);
    }
  };
Approve
// Check if the user has approved the contract to spend their USDC
  const Approve = async () => {
    try {
      const { ethereum } = window;

      // Check if User already connected a wallet
      if (ethereum) {
        const provider = new ethers.providers.Web3Provider(ethereum);
        const signer = provider.getSigner();

        // Create a contract object
        const usdcContract = new ethers.Contract(
          usdcContractAddress,
          usdcAbi,
          signer
        );

        // Use the approve function to send USDC to the contract
        const usdcTxn = await usdcContract.approve(
          contractAddress,
          ethers.utils.parseUnits("1000", 6)
        );

        // Set the approving state to true
        setApproving(true);

        // Wait for the transaction to be mined
        await usdcTxn.wait();

        // Set the approving state to false
        setApproving(false);

        // Set the isApproved state to true
        setIsApproved(true);

        // Display a success message to the user
        success("🦄 USDC Approved Successfully!");
      }
    } catch (error) {
      err(`${error.message}`);
    }
  };
Fund
// Check if the user has approved the contract to spend their USDC
  const Fund = async () => {
    try {
      const { ethereum } = window;

      //Check is user already connected to a wallet
      if (ethereum) {
        const provider = new ethers.providers.Web3Provider(ethereum);
        const signer = provider.getSigner();

        // Create a contract instance
        const fundContract = new ethers.Contract(
          contractAddress,
          contractABI,
          signer
        );

        console.log("Connected to contract");
        console.log("amount: ", amount);

        // Send the transaction
        const Txn = await fundContract.Fund(amount, {
          gasLimit: 300000,
        });

        console.log("Mining...", Txn.hash);

        // Set the sending state to true
        setSending(true);

        // Wait for the transaction to be mined
        await Txn.wait();

        // Set the sending state to false
        setSending(false);

        console.log("Mined -- ", Txn.hash);

        // Display a success message to the user
        success("🦄 Donation Sent Successfully!");
      } else {
        console.log("Ethereum object doesn't exist!");
      }
    } catch (error) {
      err(`${error.message}`);
    }
  };
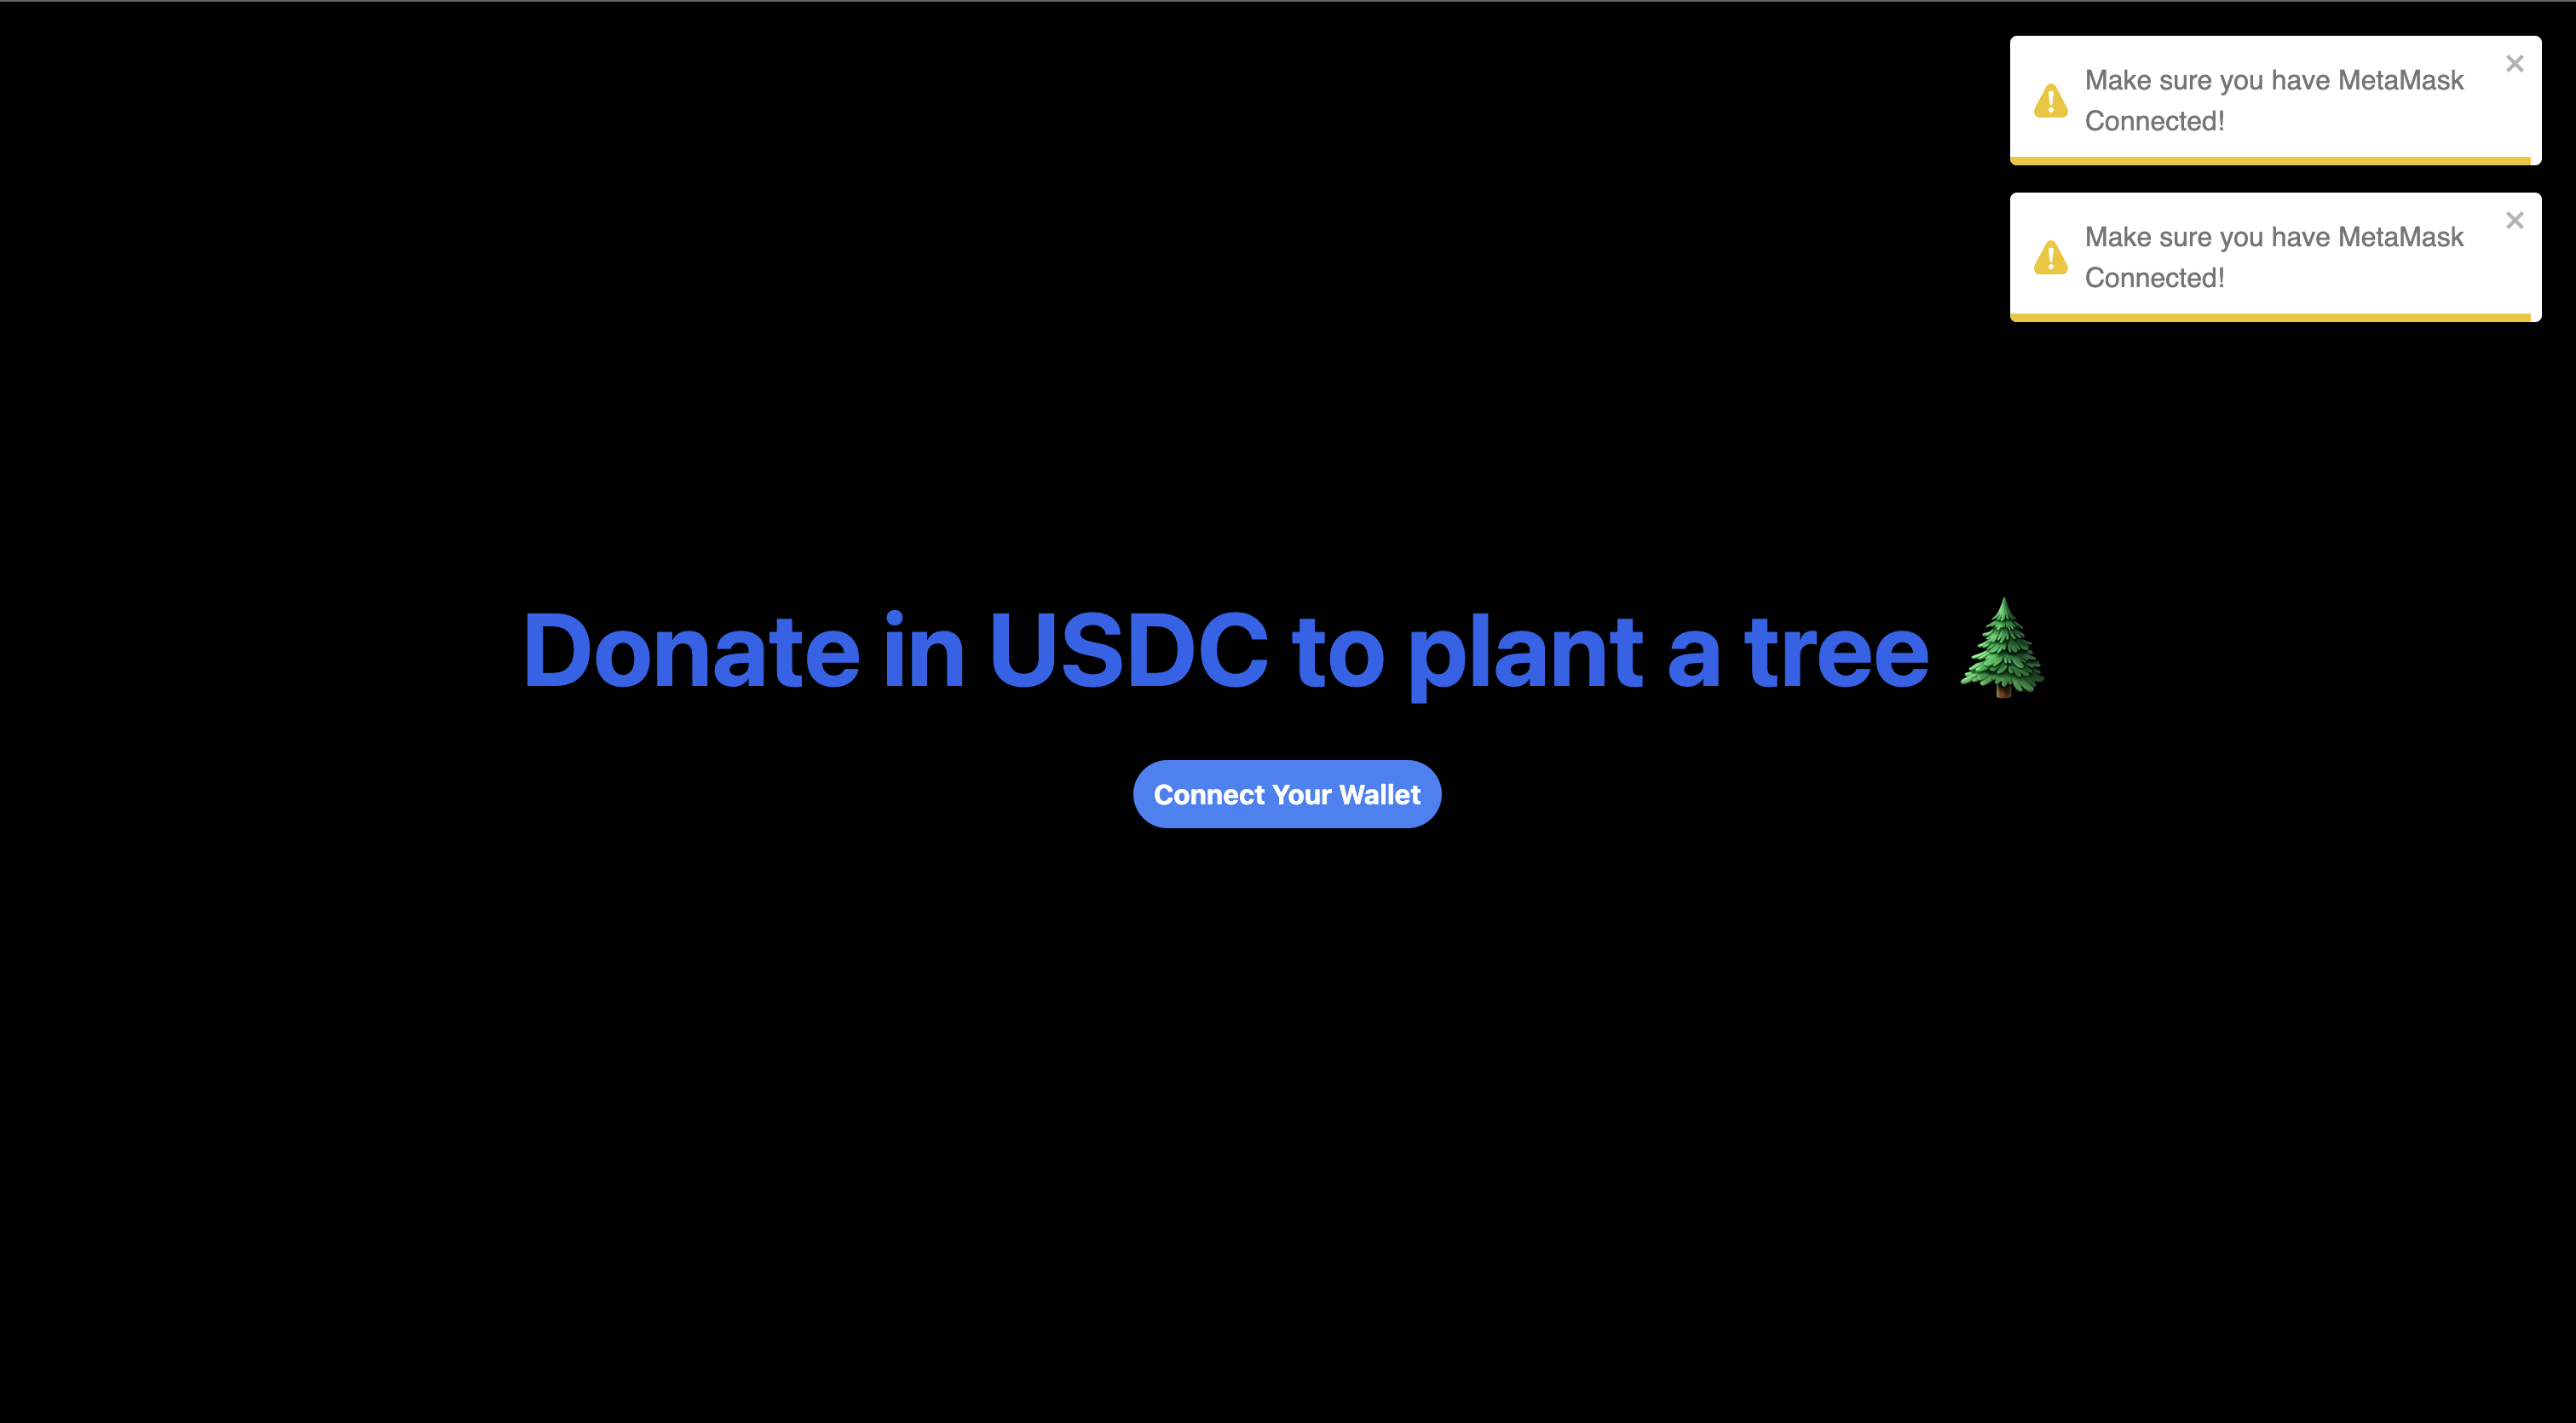
Let's head over to our browser to test the application; we should be able to connect our wallet, Approve USDC and donate USDC to the smart contract/owner as shown below.
Kindly Check here for the live demo.
To follow up, you can find the entire code for this project here.
Conclusion
In this article, we learned how to build and deploy USDC-based smart contracts to the Goerli Ethereum network and integrate with frontend React applications using EthersJs, ReactJs, and tailwind CSS.
I'd love to connect with you via Twitter | LinkedIn | GitHub | Portfolio
See you in my next blog article. Take care!!!