


JavaScript is a programming language that lets you create complex web page features. On the other hand, Scalable Vector Graphics (SVG) is a two-dimensional vector image format based on the Extensible Markup Language (XML). It supports interactivity and animation. Therefore, building a clock using SVG (Scalar Vector Graphics) and JavaScript is quite simple.
Table of Contents
- Introduction to JavaScript.
- What is SVG.
- Benefits of SVG.
- How to implement JavaScript with SVG on the web.
- Resources.
- Conclusion.
Prerequisites
- Basic understanding of JavaScript.
- Integrated Development Environment (eg. Visual studio code).
Introduction to JavaScript
JavaScript is a programming language that lets you create complex applications. It can also be used to create web games with dynamic styling, animation, and other features such as when buttons are pressed or data is entered on forms.
JavaScript is a powerful scripting language. On top of the core JavaScript language, developers have written numerous tools that unlock a vast amount of functionality with minimal effort.
Some of these tools include:
- Third-party frameworks and libraries that can be used with HTML to speed up the development of applications.
- Third-party APIs allow developers to integrate features from other content providers such as Twitter or Facebook, into their websites.
- Browser Application Programming Interfaces (APIs) are functions built into web browsers that allow you to access different features.
What is SVG
SVG is an abbreviation for Scalable Vector Graphics. This is an XML format that specifies vector-based graphics.
SVG types
SVG in HTML
<!DOCTYPE html>
<html>
  <body>
    <h1>My first SVG</h1>

    <svg width="100" height="100">
      <circle
        cx="50"
        cy="50"
        r="40"
        stroke="green"
        stroke-width="4"
        fill="yellow"
      />
    </svg>
  </body>
</html>
SVG Rectangle
  <svg width="400" height="110">
      <rect width="300" height="100" style="fill:rgb(0,0,255);stroke-width:3;stroke:rgb(0,0,0)" />
  </svg>
SVG Circle
  <svg height="100" width="100">
      <circle cx="50" cy="50" r="40" stroke="black" stroke-width="3" fill="red" />
  </svg>
SVG Ellipse
  <svg height="140" width="500">
      <ellipse cx="200" cy="80" rx="100" ry="50"
      style="fill:yellow;stroke:purple;stroke-width:2" />
  </svg>
SVG Line
  <svg height="210" width="500">
      <line x1="0" y1="0" x2="200" y2="200" style="stroke:rgb(255,0,0);stroke-width:2" />
  </svg>
SVG Polygon
  <svg height="210" width="500">
      <polygon points="200,10 250,190 160,210" style="fill:lime;stroke:purple;stroke-width:1" />
  </svg>
SVG Polyline
  <svg height="200" width="500">
      <polyline points="20,20 40,25 60,40 80,120 120,140 200,180"
      style="fill:none;stroke:black;stroke-width:3" />
  </svg>
SVG Path
  <svg height="210" width="400">
      <path d="M150 0 L75 200 L225 200 Z" />
  </svg>
SVG Text
  <svg height="30" width="200">
      <text x="0" y="15" fill="red">I love SVG!</text>
  </svg>
SVG Stroking
<svg height="80" width="300">
  <g fill="none">
  <path stroke="red" d="M5 20 l215 0" />
  <path stroke="black" d="M5 40 l215 0" />
  <path stroke="blue" d="M5 60 l215 0" />
  </g>
</svg>
SVG Blur Effects
<svg height="110" width="110"> <defs> <filter id="f1" x="0" y="0"> <feGaussianBlur in="SourceGraphic" stdDeviation="15" /> </filter> </defs> <rect width="90" height="90" stroke="green" stroke-width="3" fill="yellow" filter="url(#f1)" /> </svg>- SVG Drop Shadows
<svg height="120" width="120"> <defs> <filter id="f1" x="0" y="0" width="200%" height="200%"> <feOffset result="offOut" in="SourceGraphic" dx="20" dy="20" /> <feBlend in="SourceGraphic" in2="offOut" mode="normal" /> </filter> </defs> <rect width="90" height="90" stroke="green" stroke-width="3" fill="yellow" filter="url(#f1)" /> </svg> - SVG Linear
<svg height="150" width="400"> <defs> <linearGradient id="grad1" x1="0%" y1="0%" x2="100%" y2="0%"> <stop offset="0%" style="stop-color:rgb(255,255,0);stop-opacity:1" /> <stop offset="100%" style="stop-color:rgb(255,0,0);stop-opacity:1" /> </linearGradient> </defs> <ellipse cx="200" cy="70" rx="85" ry="55" fill="url(#grad1)" /> </svg> - SVG Radial
  <svg height="150" width="500">
      <defs>
          <radialGradient id="grad1" cx="50%" cy="50%" r="50%" fx="50%" fy="50%">
          <stop offset="0%" style="stop-color:rgb(255,255,255);
          stop-opacity:0" />
          <stop offset="100%" style="stop-color:rgb(0,0,255);stop-opacity:1" />
          </radialGradient>
      </defs>
      <ellipse cx="200" cy="70" rx="85" ry="55" fill="url(#grad1)" />
  </svg>
Benefits of SVG
The following are some of the benefits of using SVG over other image formats (such as JPEG and GIF):
- Any text editor can be used to generate and edit SVG files.
- Photos in SVG format can be found, indexed, scripted, and compressed.
- SVG images can be scaled to any size.
- SVG images can be printed in high resolution at any scale.
- Images in SVG can be zoomed in and out.
- When SVG graphics are zoomed or resized, they do not lose quality.
- SVG is free.
- SVG files are made up entirely of XML.
How to implement JavaScript with SVG on the web
Now, using JavaScript and one of the SVG examples from above, let's create a simple webpage to develop a clock on the web.
Step 1 - Open your Integrated Development Environment (IDE).
To open visual studio code, navigate to any Directory of your choice on your pc, in the terminal, type:
code.
Note:
code .won't work if you don't have visual studio code installed on your system
Step 2 - Generating files
Create index.html, style.css, and script.js, by typing the following command:
- Windows power shell
ni index.html,style.css,script.js
Linux
touch index.html,style.css,script.js
Step 3 - Add basic HTML code snippets to index.html
Inside the index.html we need to setup a basic html page with the following snippet:
<!DOCTYPE html>
<html>
  <head>
    <meta charset="utf-8" />
    <meta http-equiv="X-UA-Compatible" content="IE=edge" />
    <title>How to Build a Clock with JavaScript and SVG</title>
    <meta name="viewport" content="width=device-width, initial-scale=1" />
  </head>
  <body>
    <main class="main">
      <!-- clockbox -->
    </main>
  </body>
</html>
Step 4 - Reference the style.css and script.js files
<!DOCTYPE html>
<html>
  <head>
    <meta charset="utf-8" />
    <meta http-equiv="X-UA-Compatible" content="IE=edge" />
    <title>How to Build a Clock with JavaScript and SVG</title>
    <meta name="viewport" content="width=device-width, initial-scale=1" />
    <link rel="stylesheet" type="text/css" media="screen" href="style.css" /> <--css reference--!>
  </head>
  <body>
    <main class="main">
      <!-- clockbox -->
    </main>

    <script src="script.js"></script> <--js reference--!>
  </body>
</html>
Yes, we're ready to begin; I hope you're following along. 😊
Step 6 - Add SVG to index.html
Since we're building a clock, we'll need the svg circle and svg path for the arm, as shown below.
<!DOCTYPE html>
<html>
  <head>
    <meta charset="utf-8" />
    <meta http-equiv="X-UA-Compatible" content="IE=edge" />
    <title>How to Build a Clock with JavaScript and SVG</title>
    <meta name="viewport" content="width=device-width, initial-scale=1" />
    <link rel="stylesheet" type="text/css" media="screen" href="style.css" />
  </head>
  <body>
    <h1>How to Build a Clock with JavaScript and SVG</h1>
    <main class="main">
      <div class="clockbox">
        <svg
          id="clock"
          xmlns="http://www.w3.org/2000/svg"
          width="300"
          height="200"
          viewBox="0 0 600 600"
        >
          <g id="face">
            <circle class="circle" cx="300" cy="300" r="253.9" />
            <path
              class="hour-marks"
              d="M300.5 94V61M506 300.5h32M300.5 506v33M94 300.5H60M411.3 107.8l7.9-13.8M493 190.2l13-7.4M492.1 411.4l16.5 9.5M411 492.3l8.9 15.3M189 492.3l-9.2 15.9M107.7 411L93 419.5M107.5 189.3l-17.1-9.9M188.1 108.2l-9-15.6"
            />
            <circle class="mid-circle" cx="300" cy="300" r="16.2" />
          </g>
          <g id="hour">
            <path class="hour-arm" d="M300.5 298V142" />
            <circle class="sizing-box" cx="300" cy="300" r="253.9" />
          </g>
          <g id="minute">
            <path class="minute-arm" d="M300.5 298V67" />
            <circle class="sizing-box" cx="300" cy="300" r="253.9" />
          </g>
          <g id="second">
            <path class="second-arm" d="M300.5 350V55" />
            <circle class="sizing-box" cx="300" cy="300" r="253.9" />
          </g>
        </svg>
      </div>
      <!-- .clockbox -->
    </main>

    <script src="script.js"></script>
  </body>
</html>
Have you noticed that all tags now have an id and a class? We'll use these ids as a reference point for our design and JavaScript.
Step 7 - Implementing the JavaScript code for the clock
It's time to start writing some JavaScript code. The JavaScript code and time configurations, the core functionalities of this web application are shown and explained below.
// Declare and Initialize your variables and make references to the id defined in the html file, as needed.
const HOURHAND = document.querySelector("#hour");
const MINUTEHAND = document.querySelector("#minute");
const SECONDHAND = document.querySelector("#second");

// Declare and Initialize the inbuilt date function
const date = new Date();

//
let hr = date.getHours();
let min = date.getMinutes();
let sec = date.getSeconds();

// Log to see the output in the console
console.log("Hour: " + hr + " Minute: " + min + " Second: " + sec);
Step 8 - Implementing positions
Now let's implement the positions for (hr, min sec) since we can now see the output in the console.
// Declare and Initialize your variables and create positions for each.
let hrPosition = (hr * 360) / 12 + (min * (360 / 60)) / 12;
let minPosition = (min * 360) / 60 + (sec * (360 / 60)) / 60;
let secPosition = (sec * 360) / 60;

// Create a function that actually run the clock
const runClock = () => {
  // Set each position when the function is called
  hrPosition = hrPosition + 3 / 360;
  minPosition = minPosition + 6 / 60;
  secPosition = secPosition + 6;

  // Set the transformation for each arm
  HOURHAND.style.transform = "rotate(" + hrPosition + "deg)";
  MINUTEHAND.style.transform = "rotate(" + minPosition + "deg)";
  SECONDHAND.style.transform = "rotate(" + secPosition + "deg)";
};

// Use the inbuilt setInterval function to invoke the method we created earlier
setInterval(runClock, 1000);
Step 9 - Adding styles in style.css
We are almost done 😊.
Lets's head to style.css to finish the remaining task.
body {
  color: black;
  background-color: rgb(94, 241, 119);
}

h1 {
  position: flex;
  text-align: center;
  font-style: normal;
  font-family: "Trebuchet MS", "Lucida Sans Unicode", "Lucida Grande",
    "Lucida Sans", Arial, sans-serif;
}

footer {
  text-align: center;
}

/* Layout */
.main {
  display: flex;
  padding: 1em;
  height: 80vh;
  justify-content: center;
  align-items: middle;
}

.clockbox,
#clock {
  width: 100%;
  height: 100%;
}

/* Clock styles */
.circle {
  fill: none;
  stroke: #000;
  stroke-width: 9;
  stroke-miterlimit: 10;
}

.mid-circle {
  fill: #000;
}

.hour-marks {
  fill: none;
  stroke: #000;
  stroke-width: 9;
  stroke-miterlimit: 10;
}

.hour-arm {
  fill: none;
  stroke: #000;
  stroke-width: 17;
  stroke-miterlimit: 10;
}

.minute-arm {
  fill: none;
  stroke: #000;
  stroke-width: 11;
  stroke-miterlimit: 10;
}

.second-arm {
  fill: none;
  stroke: #000;
  stroke-width: 4;
  stroke-miterlimit: 10;
}

/* Transparent box ensuring arms center properly. */
.sizing-box {
  fill: none;
}

/* Make all arms rotate around the same center point. */
/* Optional: Use transition for animation. */
#hour,
#minute,
#second {
  transform-origin: 300px 300px;
  transition: transform 0.5s ease-in-out;
}
Step 10 - Testing the application
To see the magic, start your live server or preview the application in your browser as shown below.
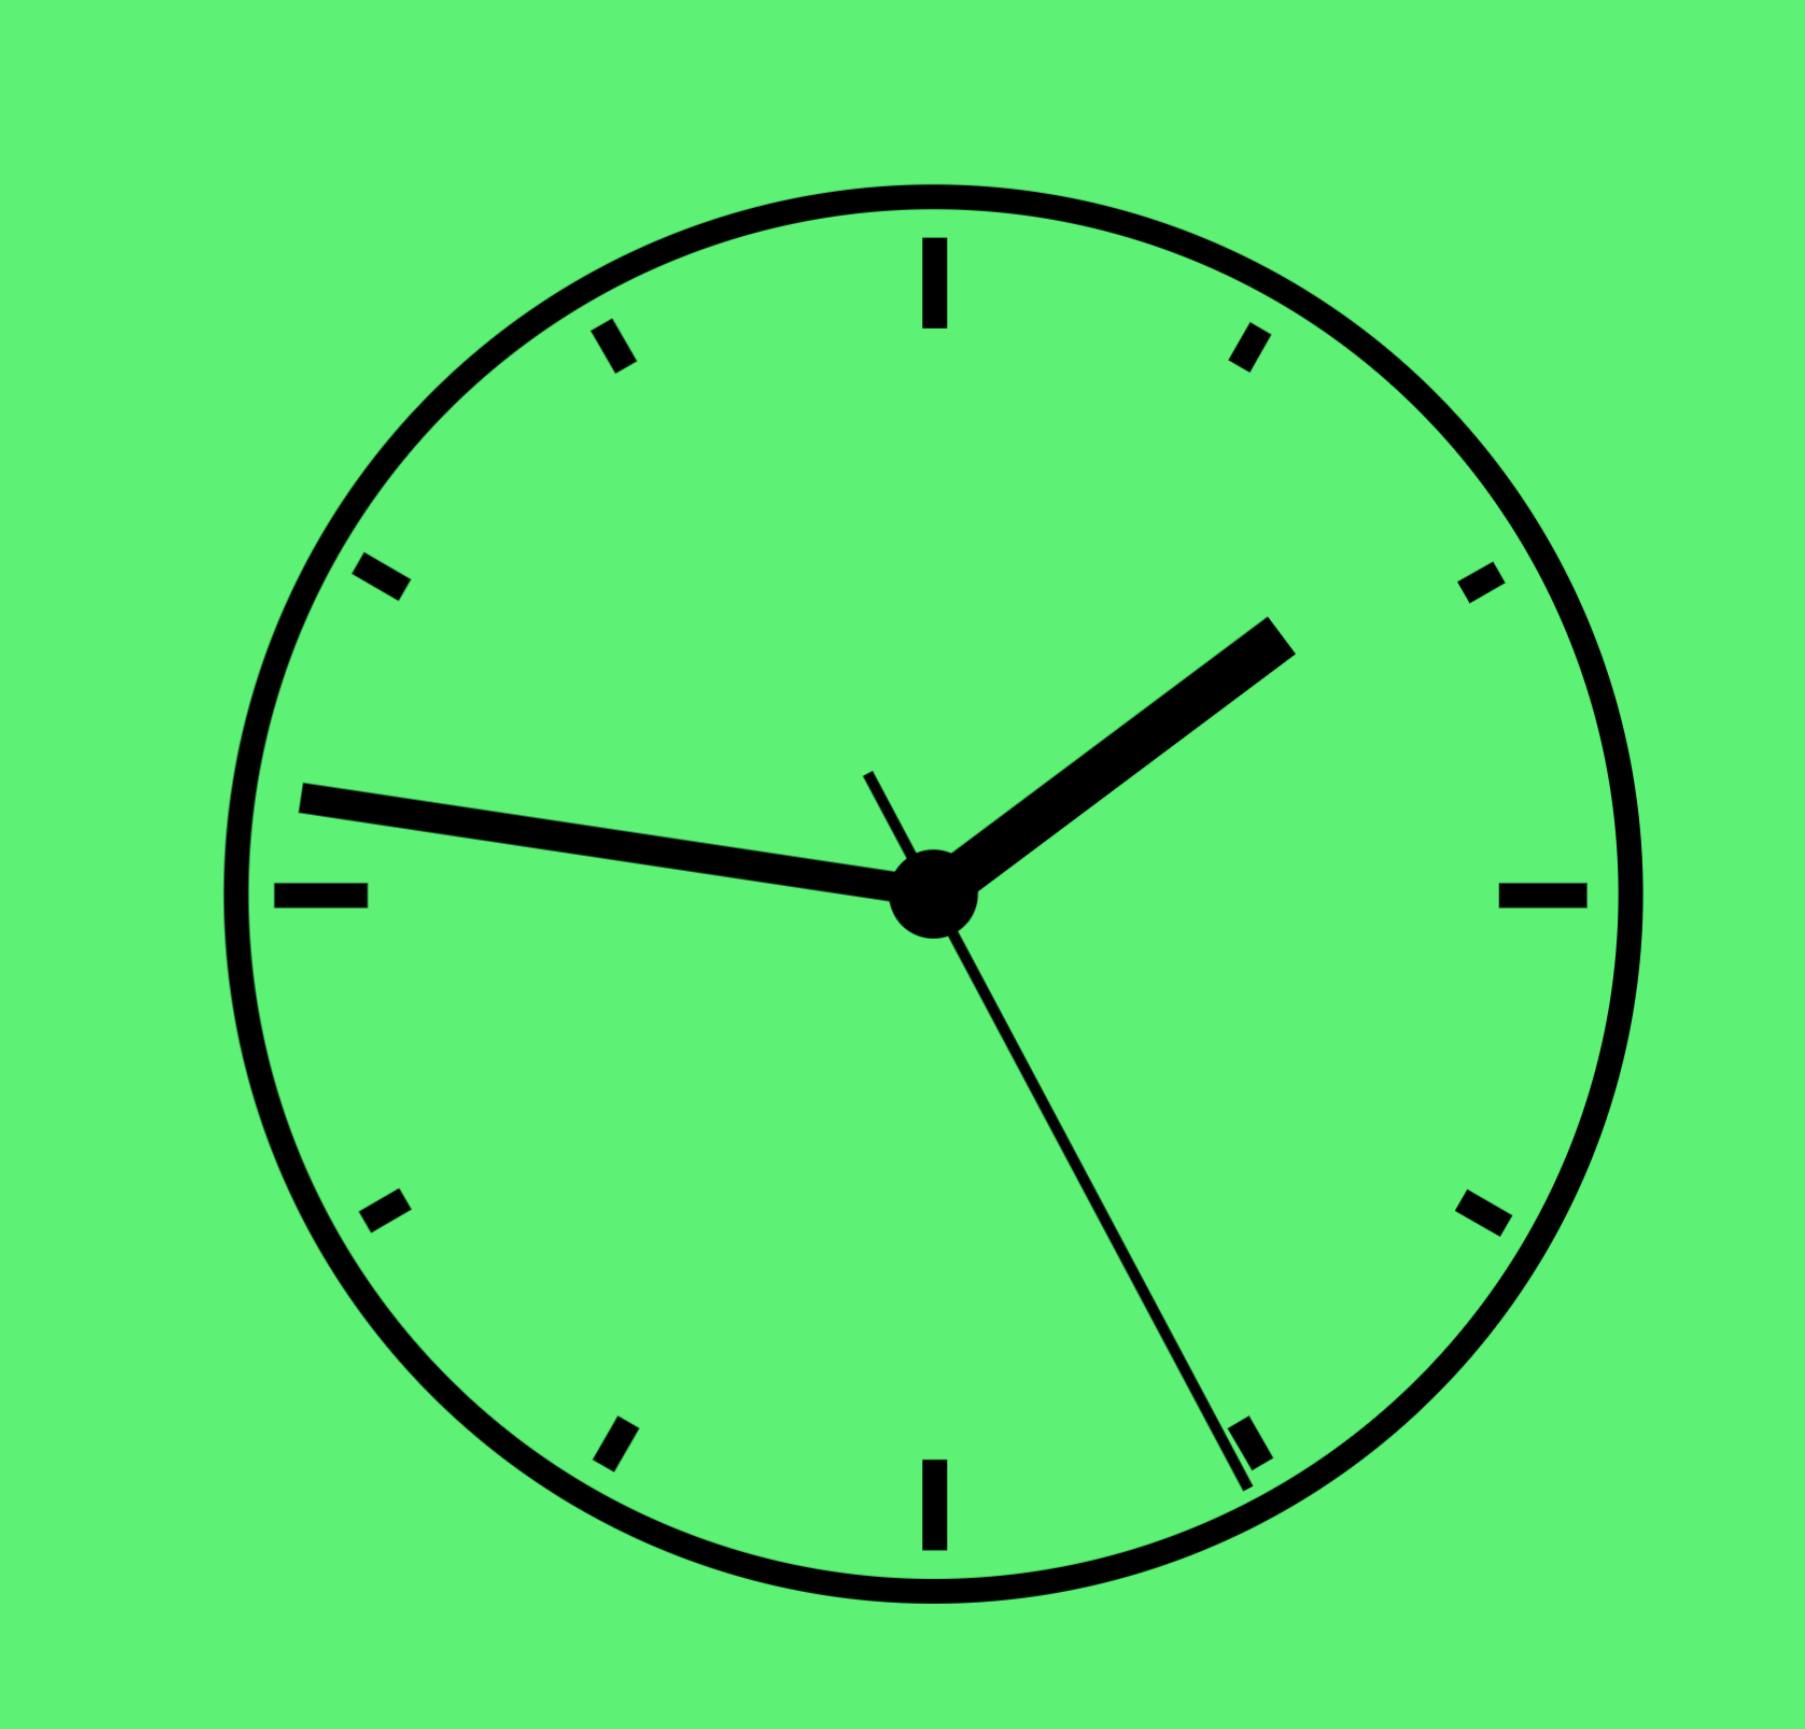
Congratulations 🎉🎉
Kindly find the link to CodePen below:
Thank you Sandeep Panda for the CodePen suggestion.
Thank you Hashnode and the team for making the CodePen Integration seamless.
Resources
Conclusion
You learned about JavaScript, what SVG is, the benefits of SVG, and how to use JavaScript with SVG on the web in this post. Some SVG types were also highlighted, as well as how to use them on the web.
Happy coding!
You can reach out to me on Twitter