The rapid popularity of Web3 has sparked a race to create the fastest, safest blockchain possible without sacrificing decentralization.
It's incredible how powerful decentralized applications are being developed to support the business environment.
In this article, you will learn about setting up Avalanche on Metamask, funding the C-Chain address, introducing the Avalanche network, building and deploying a smart contract on the Avalanche network, and verifying deployment on Snowtrace.
Introduction to Avalanche
Avalanche is an open-source platform that enables the deployment of enterprise blockchains and decentralized apps in a single, highly scalable ecosystem.
With nearly immediate transaction finality, Avalanche is the first decentralized smart contracts platform designed for the scope of global banking. As Avalanche functions out of the box with Solidity, Ethereum developers may immediately build on it.
Exchange Chain (X-Chain), Platform Chain (P-Chain), and Contract Chain are the three built-in blockchains of Avalanche (C-Chain).
All Avalanche validators, commonly known as the Primary Network, validate and safeguard all three blockchains. All users of all custom Subnets must also be members of the Primary Network, which is a unique Subnet, by staking a minimum of 2,000 AVAX.
- X-Chain: This chain manages assets and uses the X-Chain API that allows clients to create and trade assets on the X-Chain and other instances of the AVM.
- P-Chain: This is used to coordinate validators, keeps track of active Subnets, enables the creation of new Subnets, and uses the Snowman consensus protocol.
- C-Chain: This chain is used to create smart contracts using the C-Chain's API.
Project Setup and Installation
This section will set up all the requirements to build and deploy a smart contract on the Avalanche network.
Setting up Avalanche on MetaMask
Ensure you have MetaMask installed and set up completely.
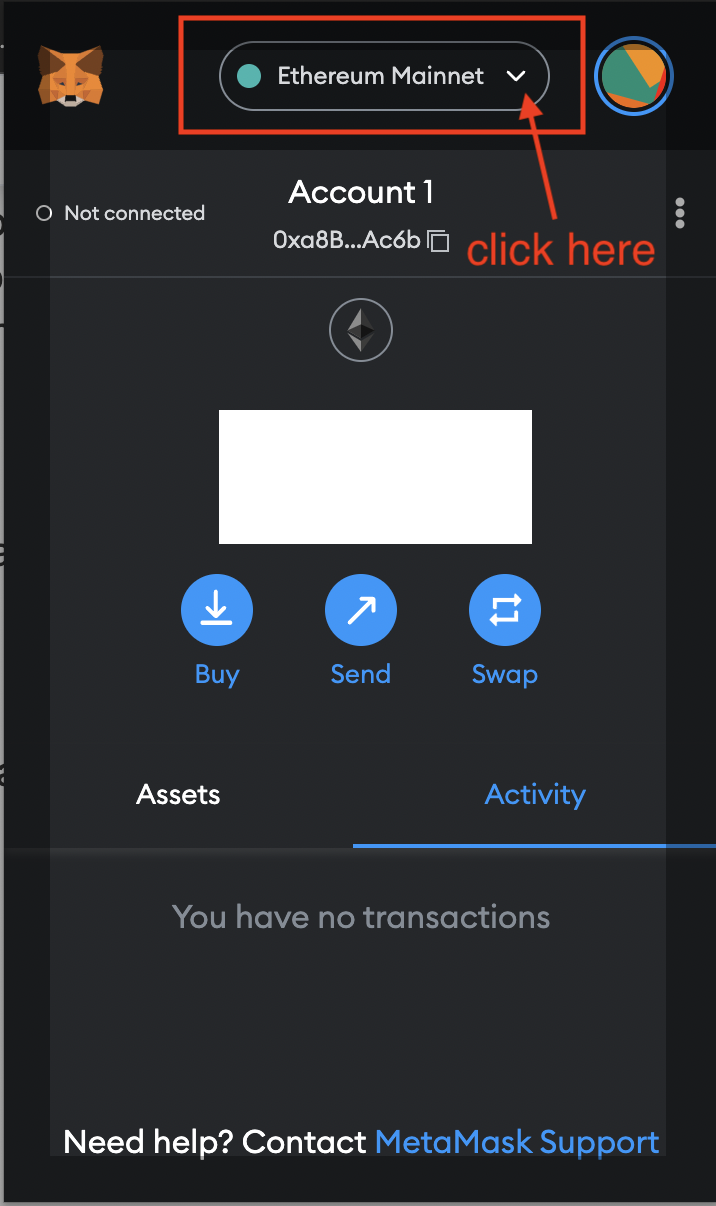
Click on the MetaMask icon on your browser and the arrow icon beside the Network, as shown below.

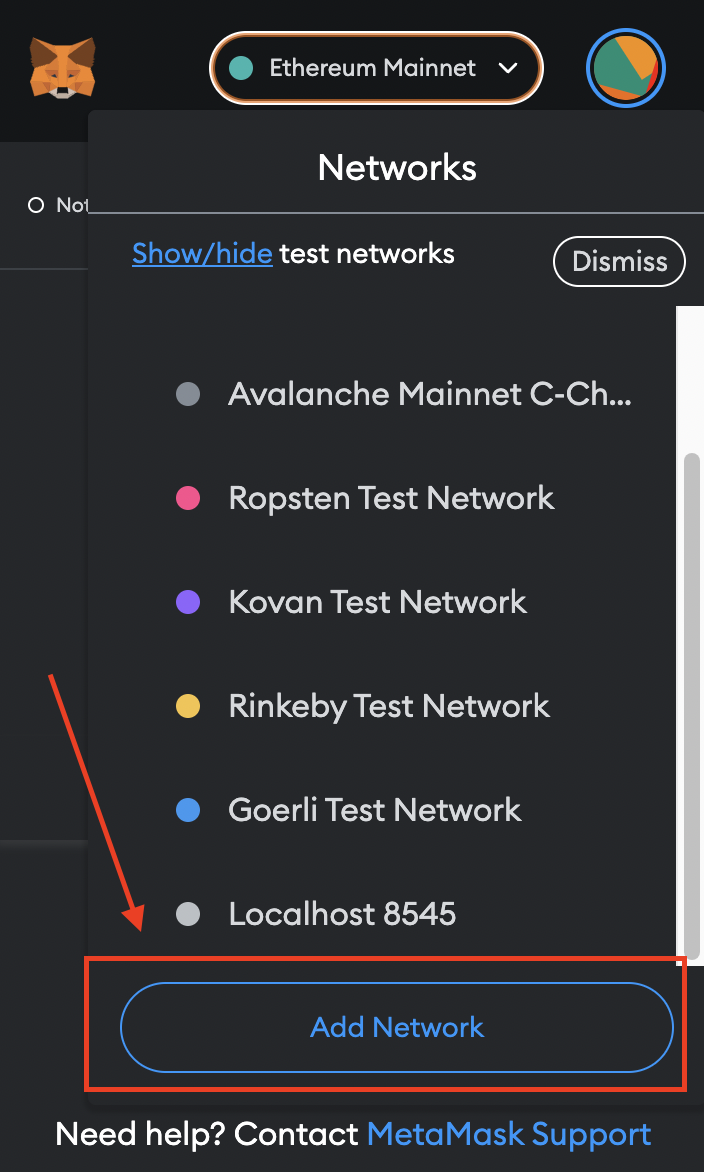
Next, select Add Network.
You can add the following configuration to set up RPC to Avalanche Mainnet, FUJI Testnet, and Local Testnet (Avalanche Network Runner).
Local Testnet (Avalanche Network Runner) Settings:
- Network Name: Avalanche Local C-Chain
- New RPC URL: http://127.0.0.1:34890/ext/bc/C/rpc (Note: the port number should match your local setting, which can be different from 34890.)
- ChainID:
43112 - Symbol:
AVAX - Explorer:
N/A
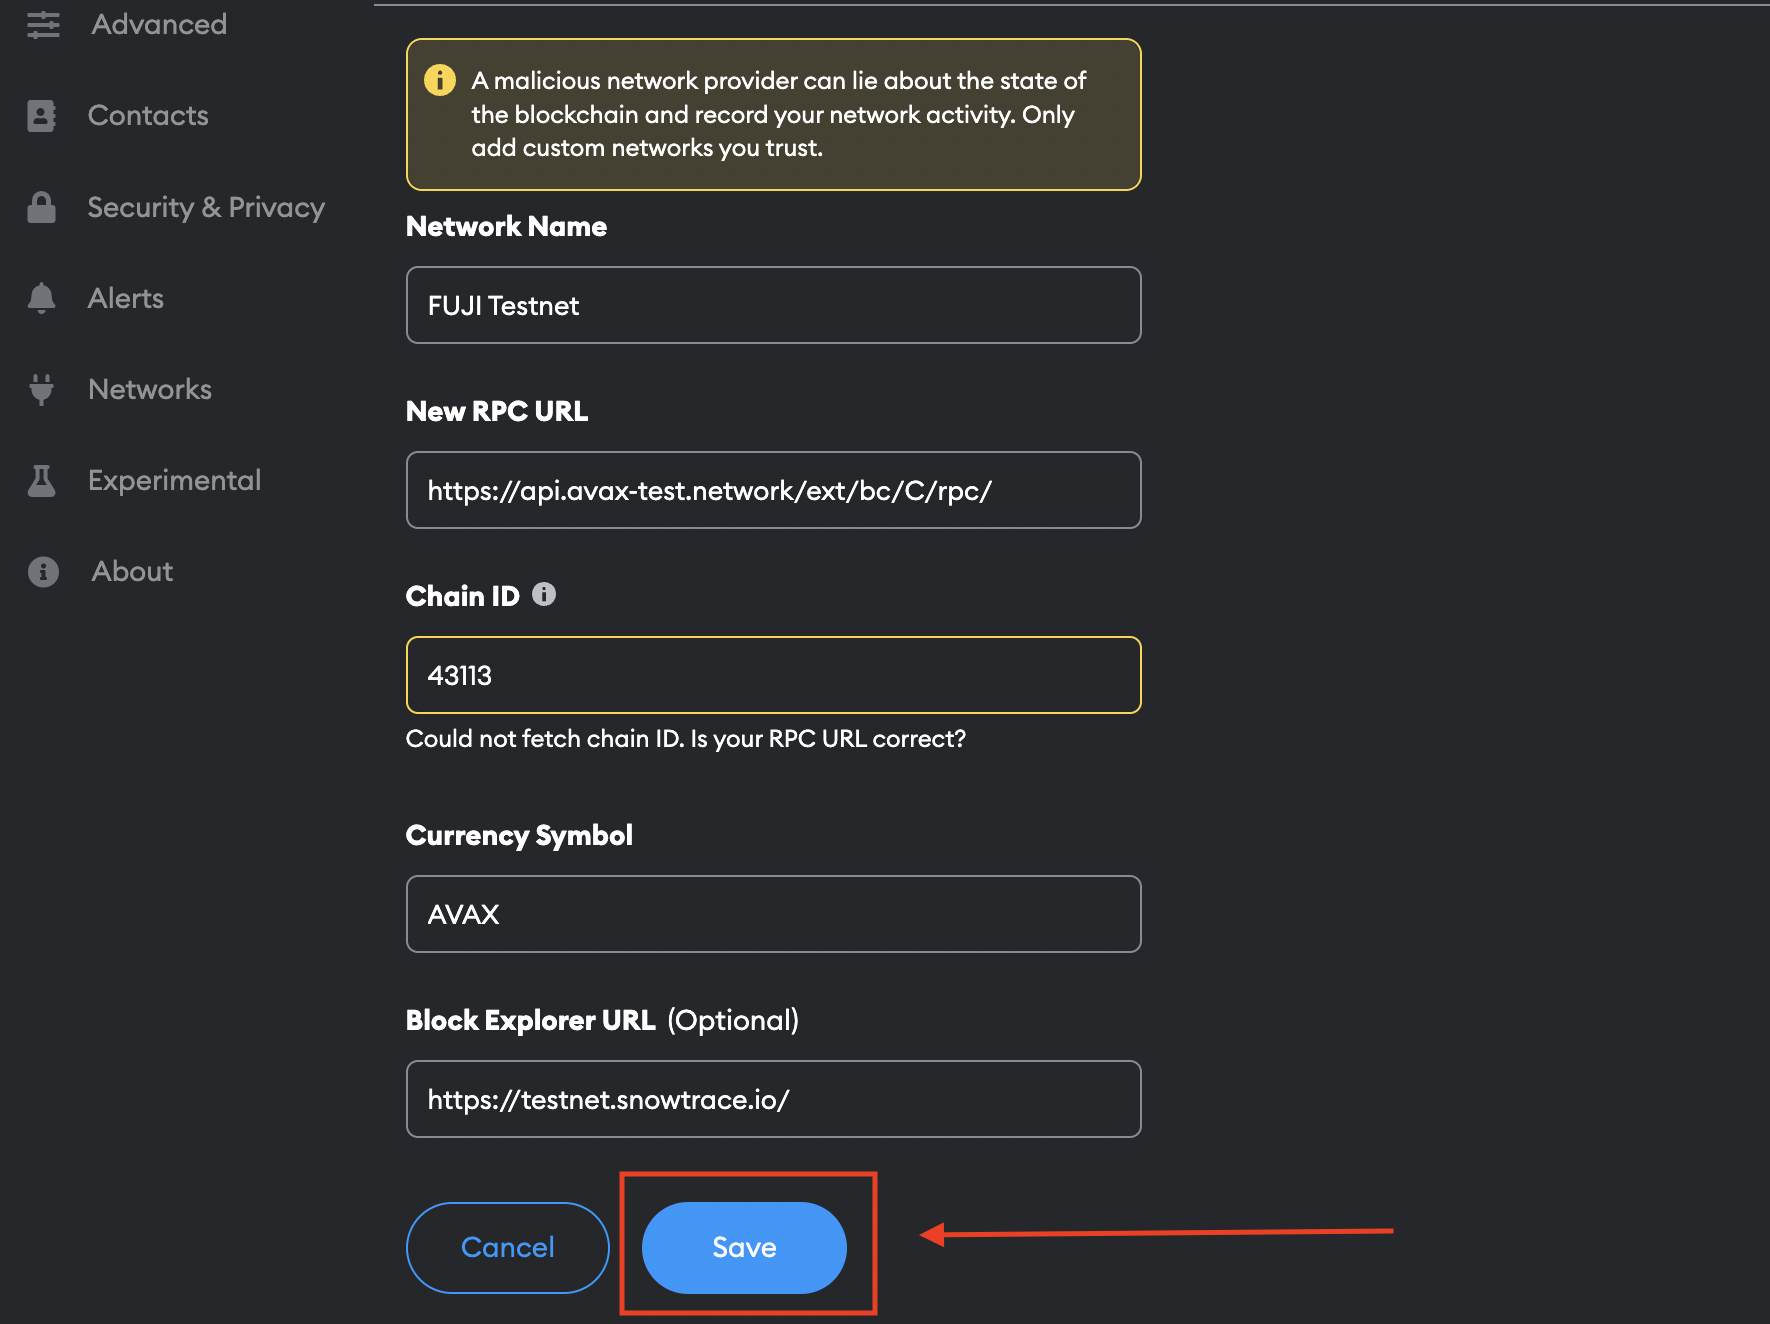
FUJI Testnet Settings:
- Network Name: Avalanche FUJI C-Chain
- New RPC URL: https://api.avax-test.network/ext/bc/C/rpc
- ChainID:
43113 - Symbol:
AVAX - Explorer: https://testnet.snowtrace.io/
Avalanche Mainnet Settings:
- Network Name: Avalanche Mainnet C-Chain
- New RPC URL: https://api.avax.network/ext/bc/C/rpc
- ChainID:
43114 - Symbol:
AVAX - Explorer: https://snowtrace.io/
Set up the FUJI Testnet by inputting the details as shown below.
Funding your C-Chain address
To send money from the X-Chain to your C-Chain address on the main net, utilize the Avalanche Wallet. Use the Test Network Faucet to get funding on the test network.
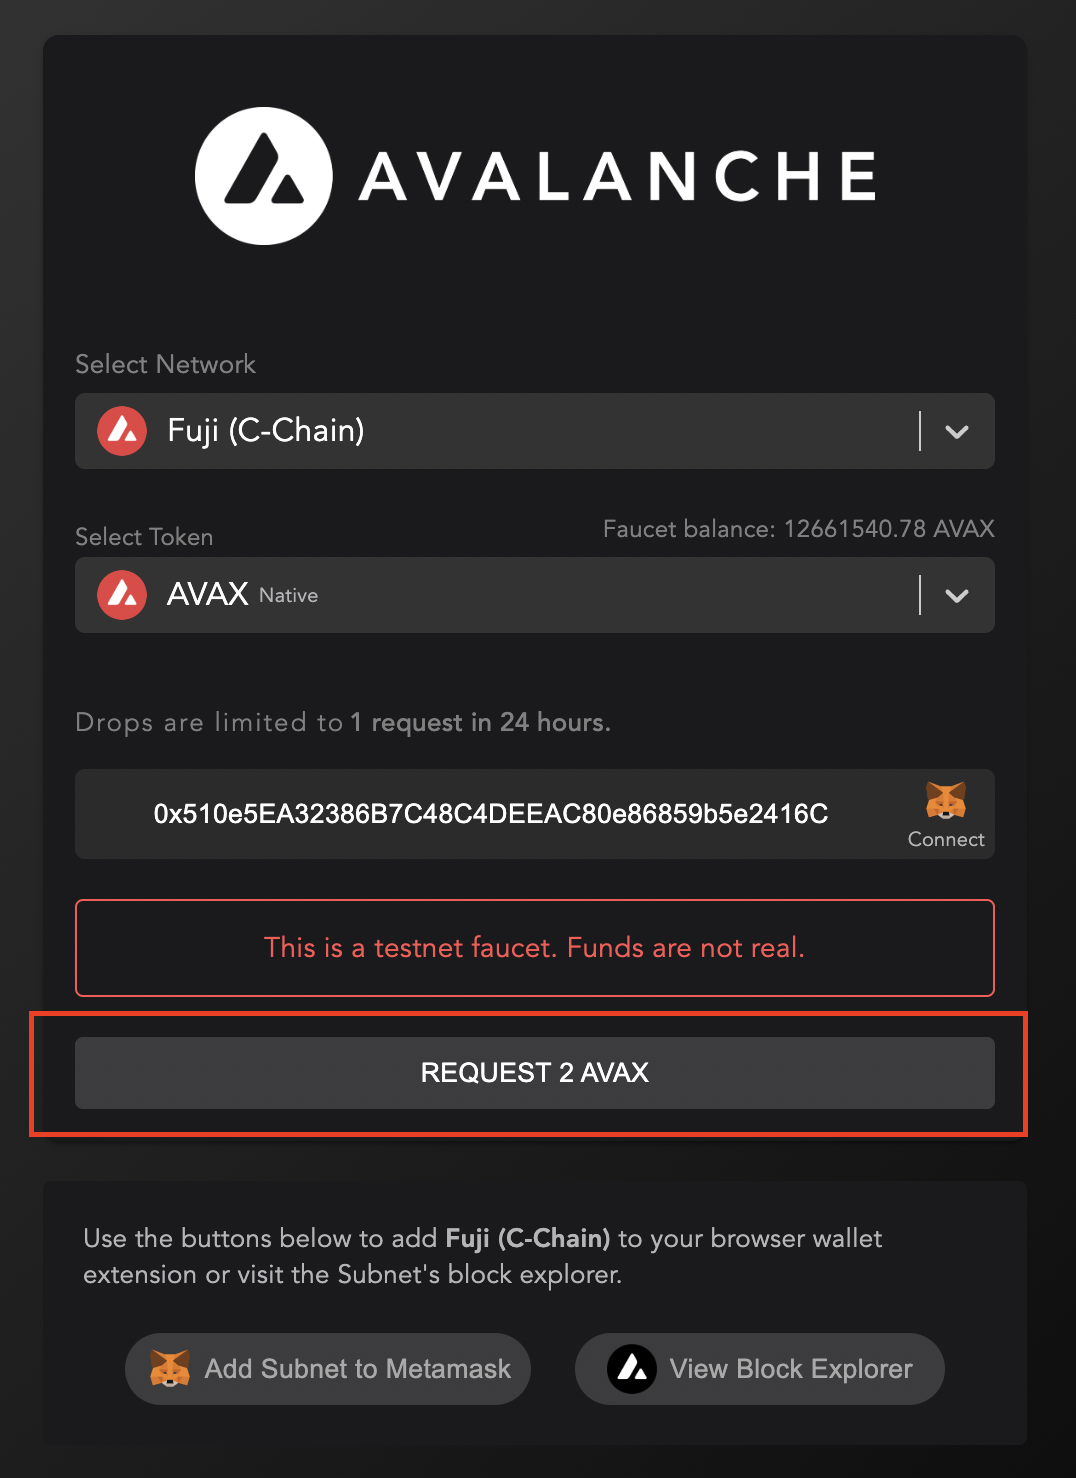
Copy and paste your C-Chain address into https://faucet.avax.network.
Automatically, Faucet will be aware that it must deliver the test AVAX to the C-Chain. The Request AVAX button can be selected after checking the captcha box. In a few seconds, test AVAX will be delivered to your address.
Smart Contract Development
You'll learn how to build and deploy an ERC20 Token Smart Contract using https://remix.ethereum.org, a free, user-friendly IDE with a solidity-compatible IntelliJ feature and decent compile-time errors.
Building a smart contract
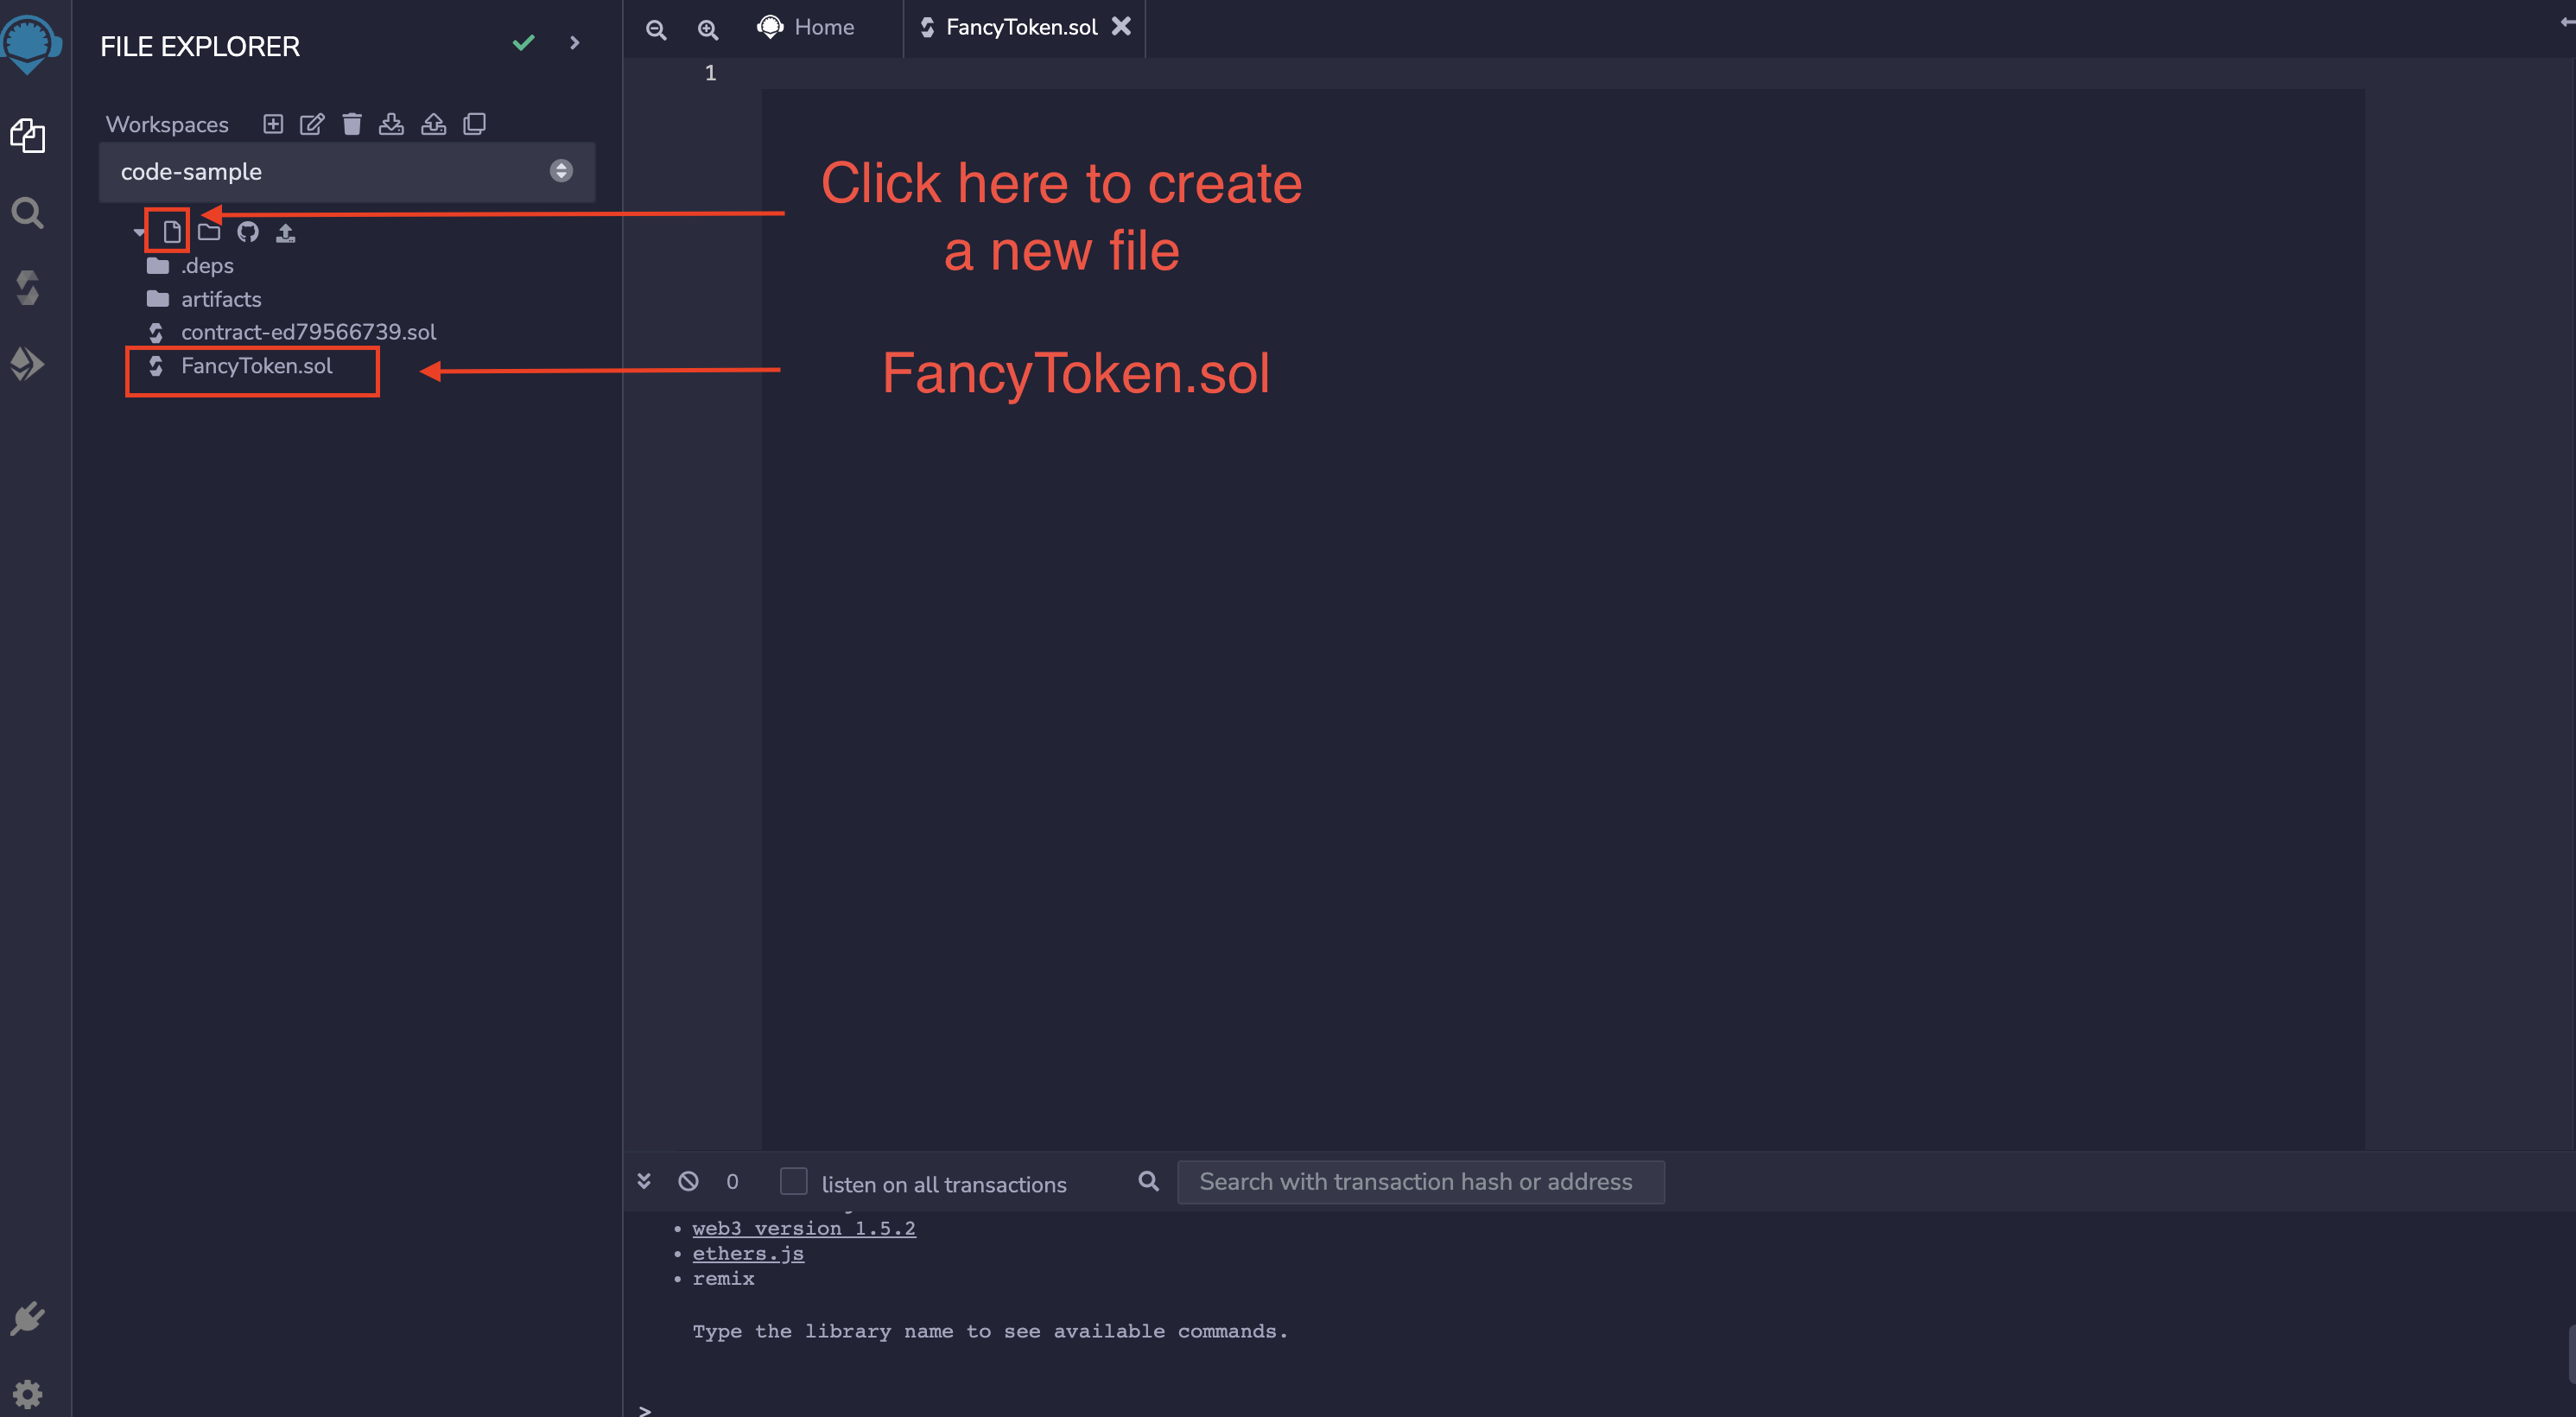
Navigate to the Remix site and create a new file called FancyToken.sol as shown below.
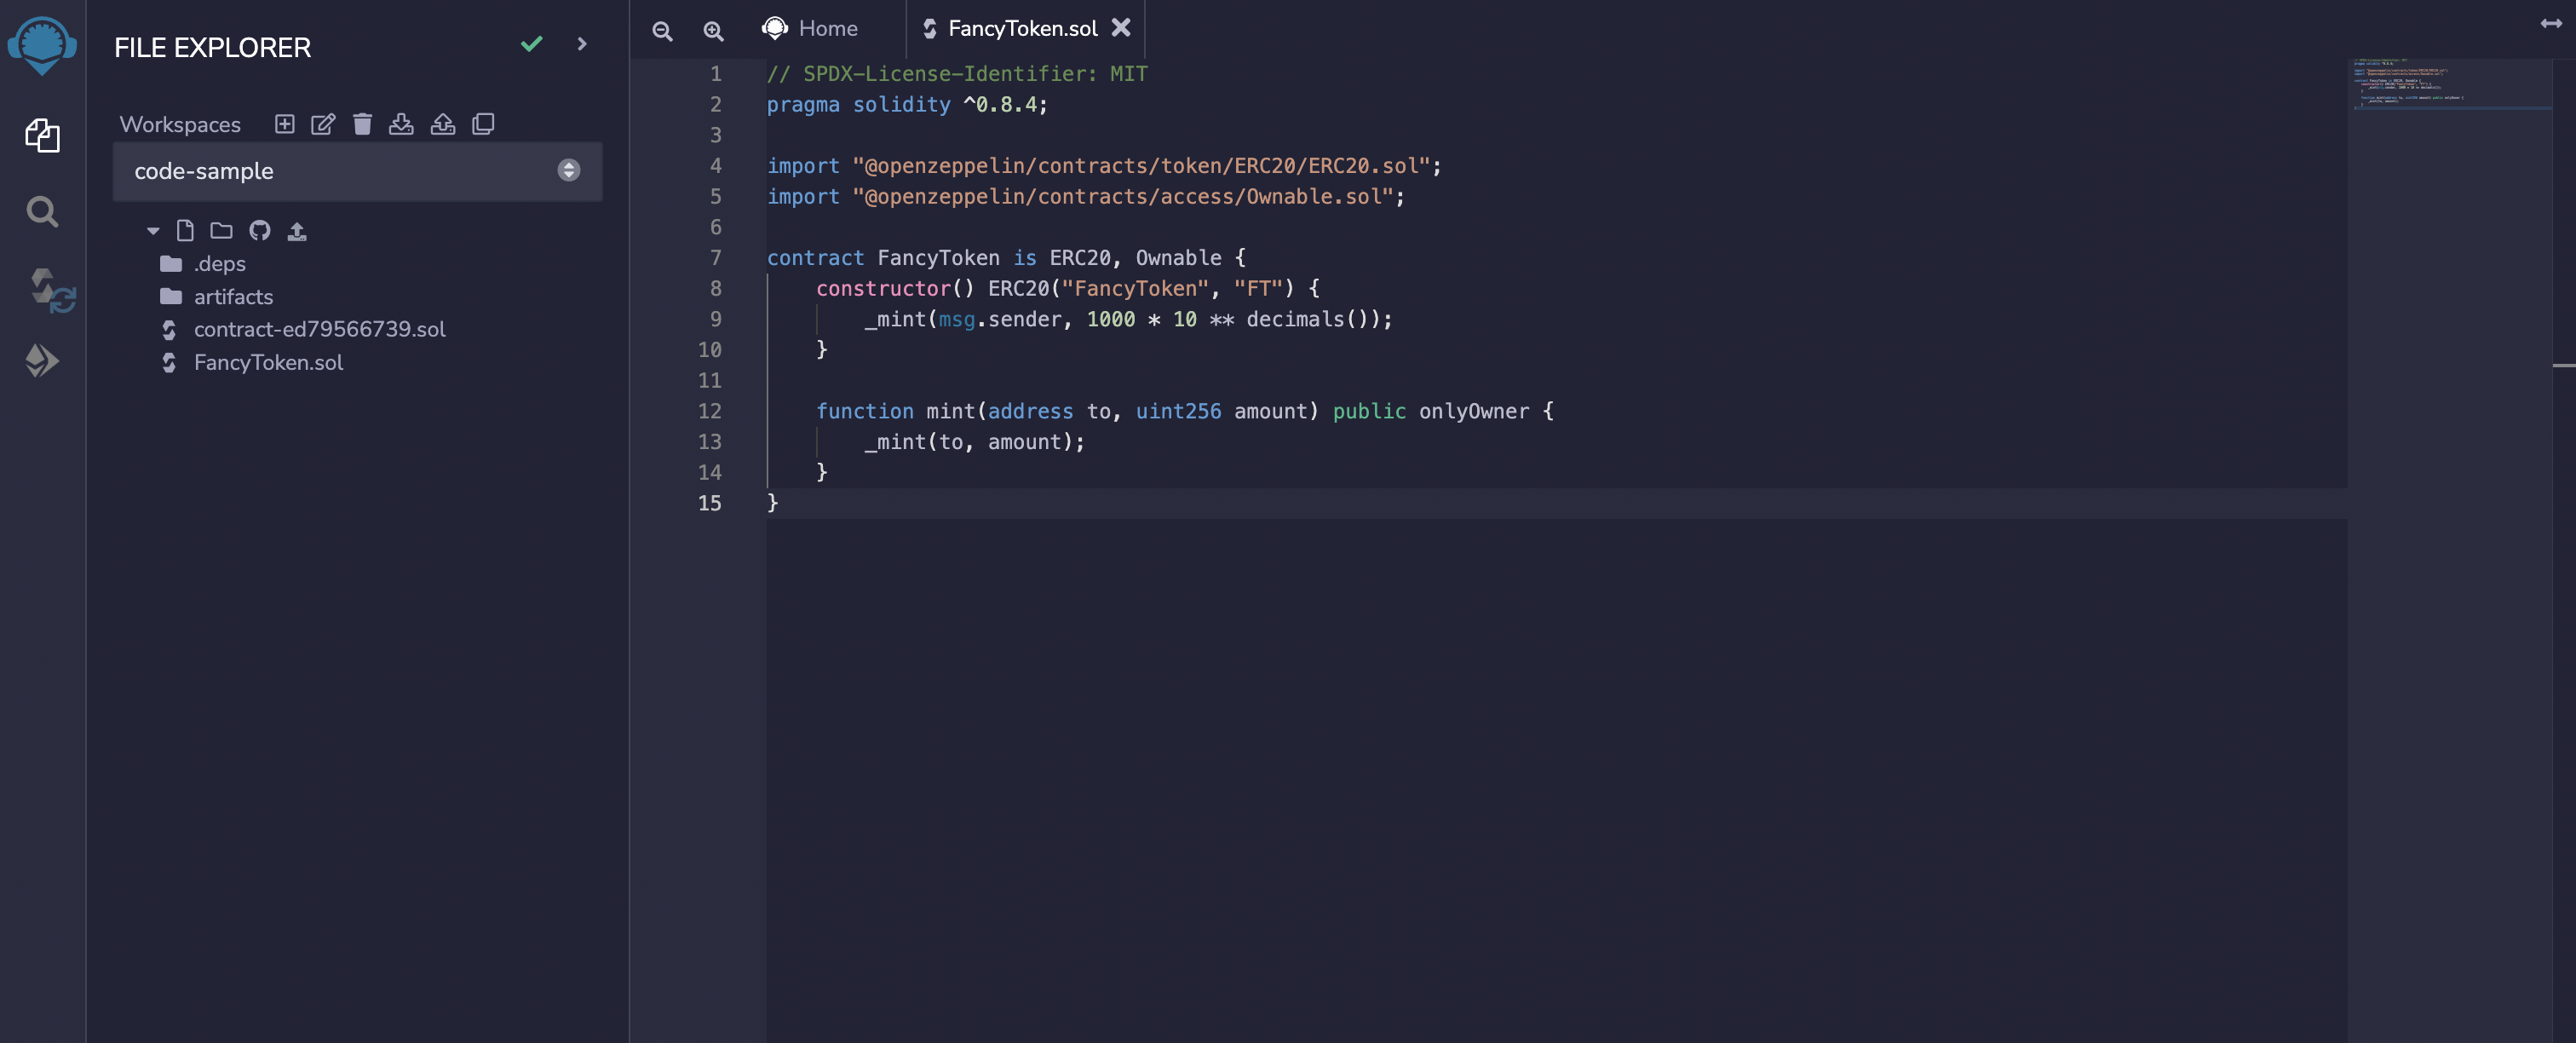
Update the FancyToken.sol file with the following code snippet.
// SPDX-License-Identifier: MIT
pragma solidity ^0.8.4;

import "@openzeppelin/contracts/token/ERC20/ERC20.sol";
import "@openzeppelin/contracts/access/Ownable.sol";

contract FancyToken is ERC20, Ownable {
    constructor() ERC20("FancyToken", "FT") {
        _mint(msg.sender, 1000 * 10 ** decimals());
    }

    function mint(address to, uint256 amount) public onlyOwner {
        _mint(to, amount);
    }
}
In the code snippet above, we:
- Import the OpenZeppelin ERC20 contract
- Initialize the token, inheriting from the ERC20.sol contract
- Declare a new contract called
FancyToken,using the Solidity keywordcontract,while inheriting the ERC20 OpenZeppelin's contract using theiskeyword - Create an initial amount of
1000tokens for the deployer - Give access to Privileged accounts to create more supply using the mint function.
Compiling a smart contract
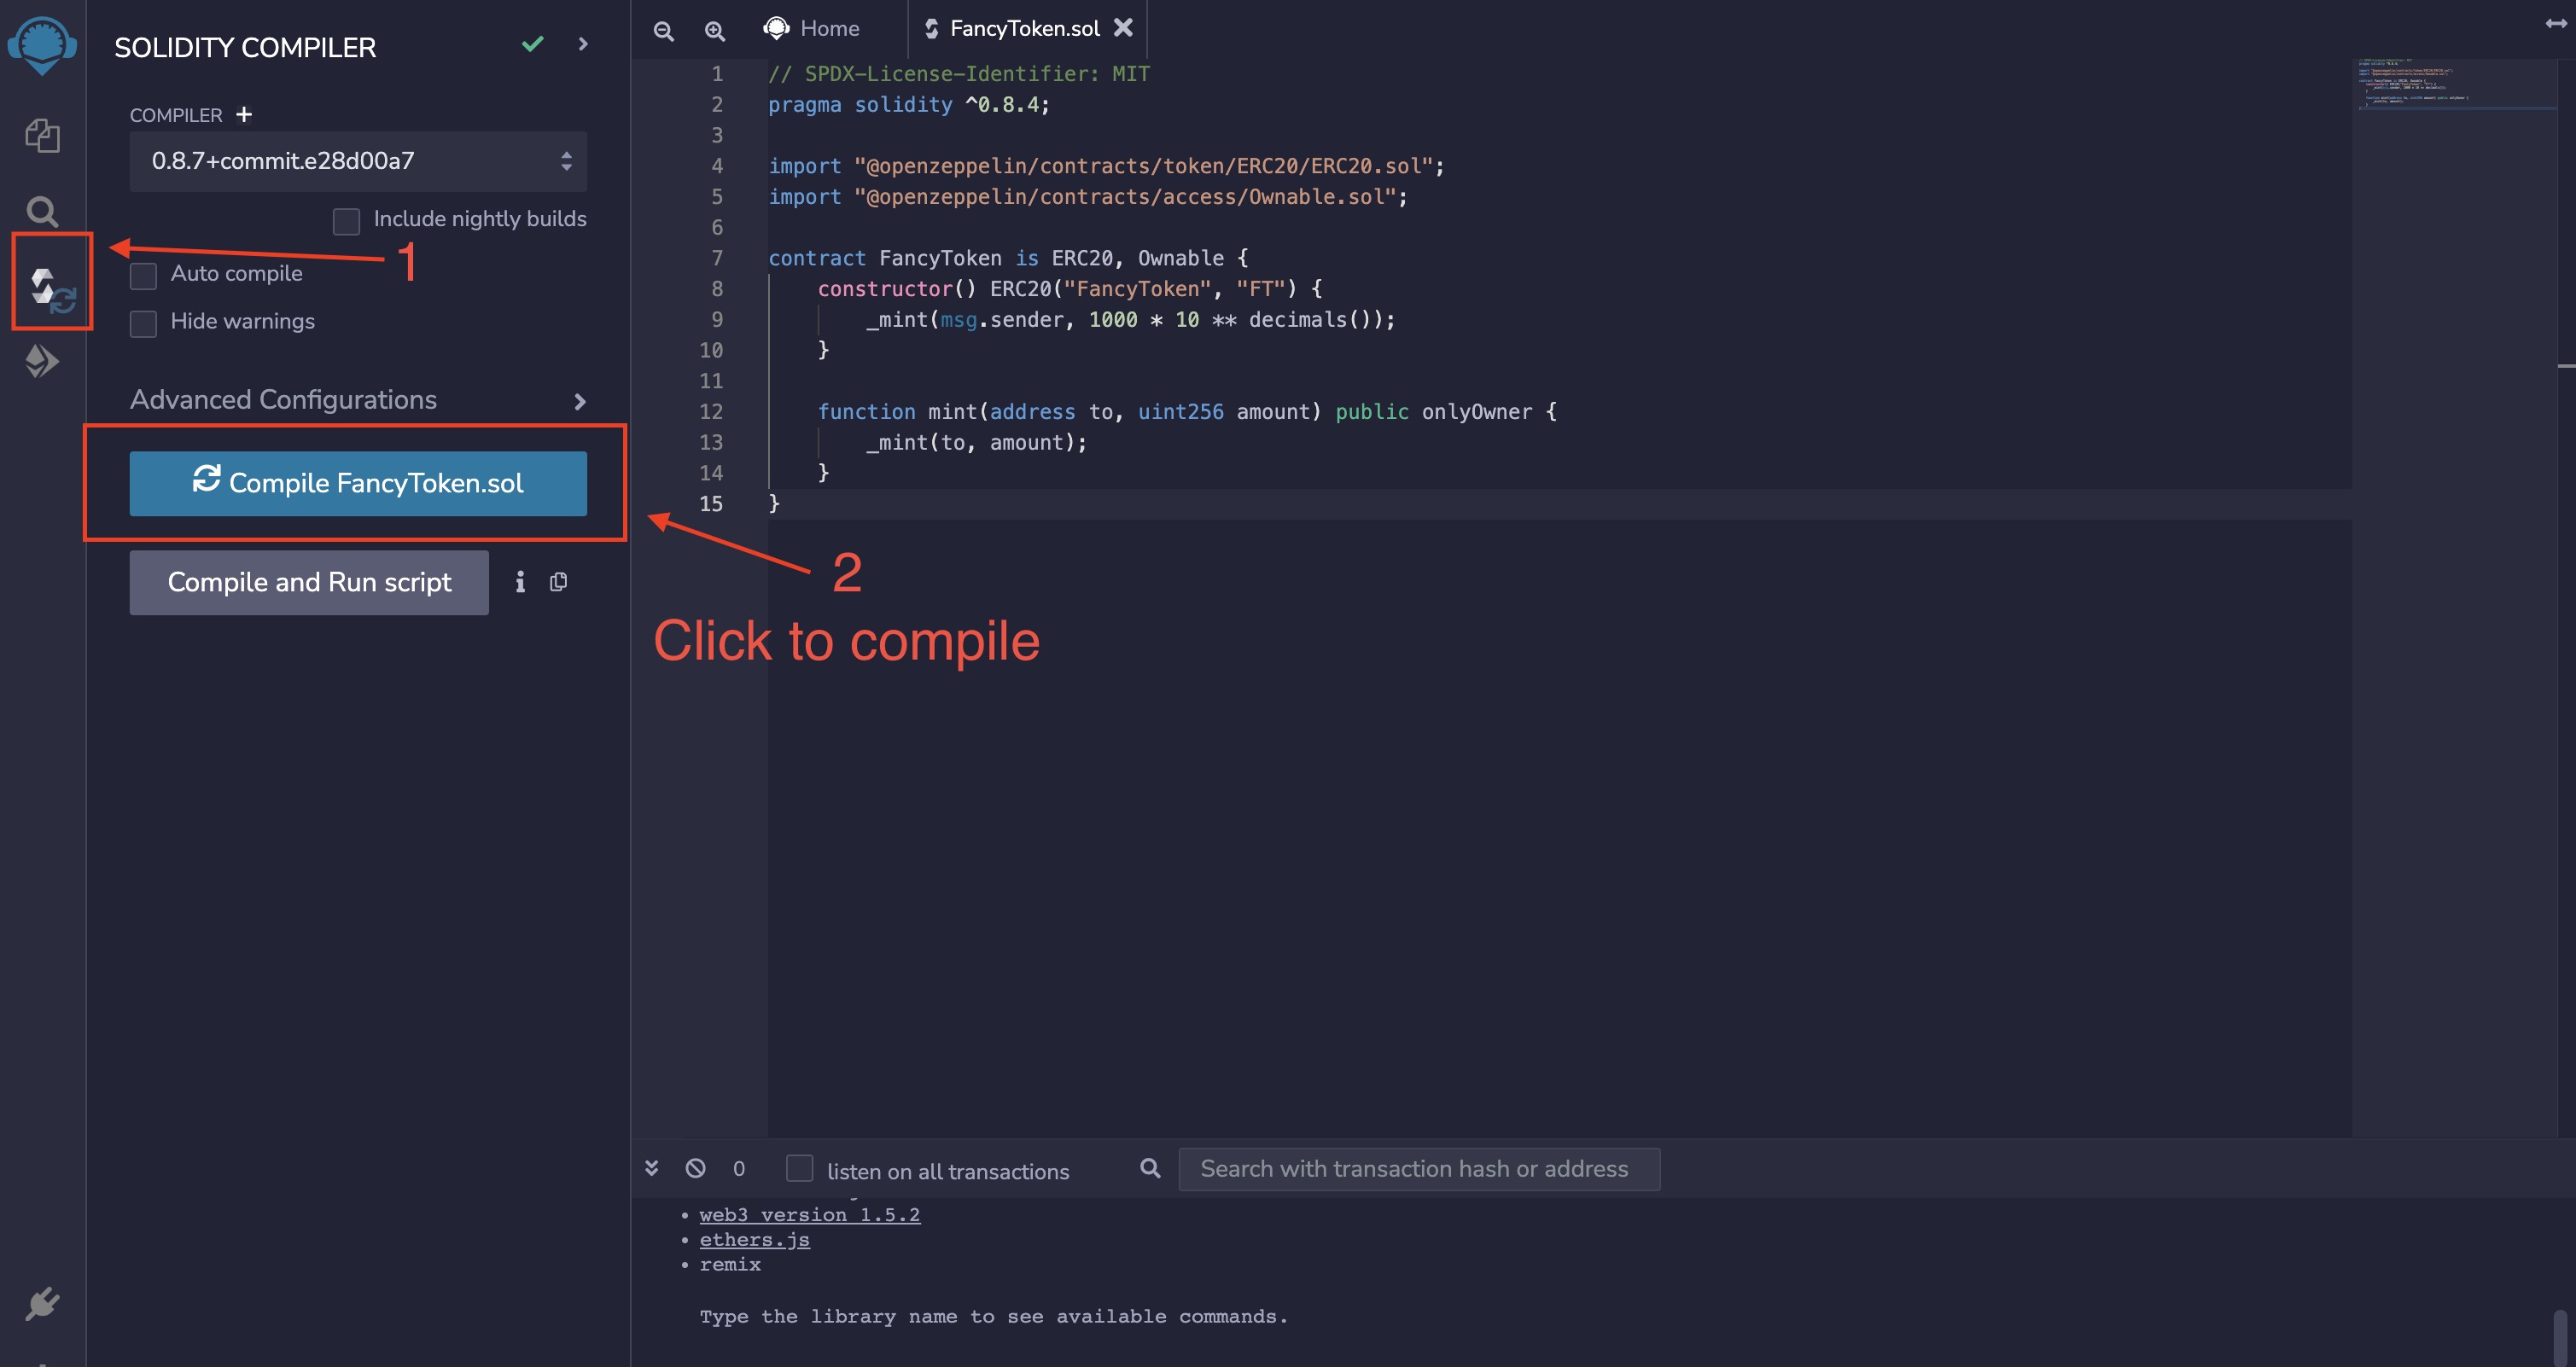
Next, you will compile your contract and prepare it for deployment, as shown below.
Smart Contract Deployment to Avalanche Network
In this step, you will deploy your smart contract to the Avalanche Network on FUJI testnet.
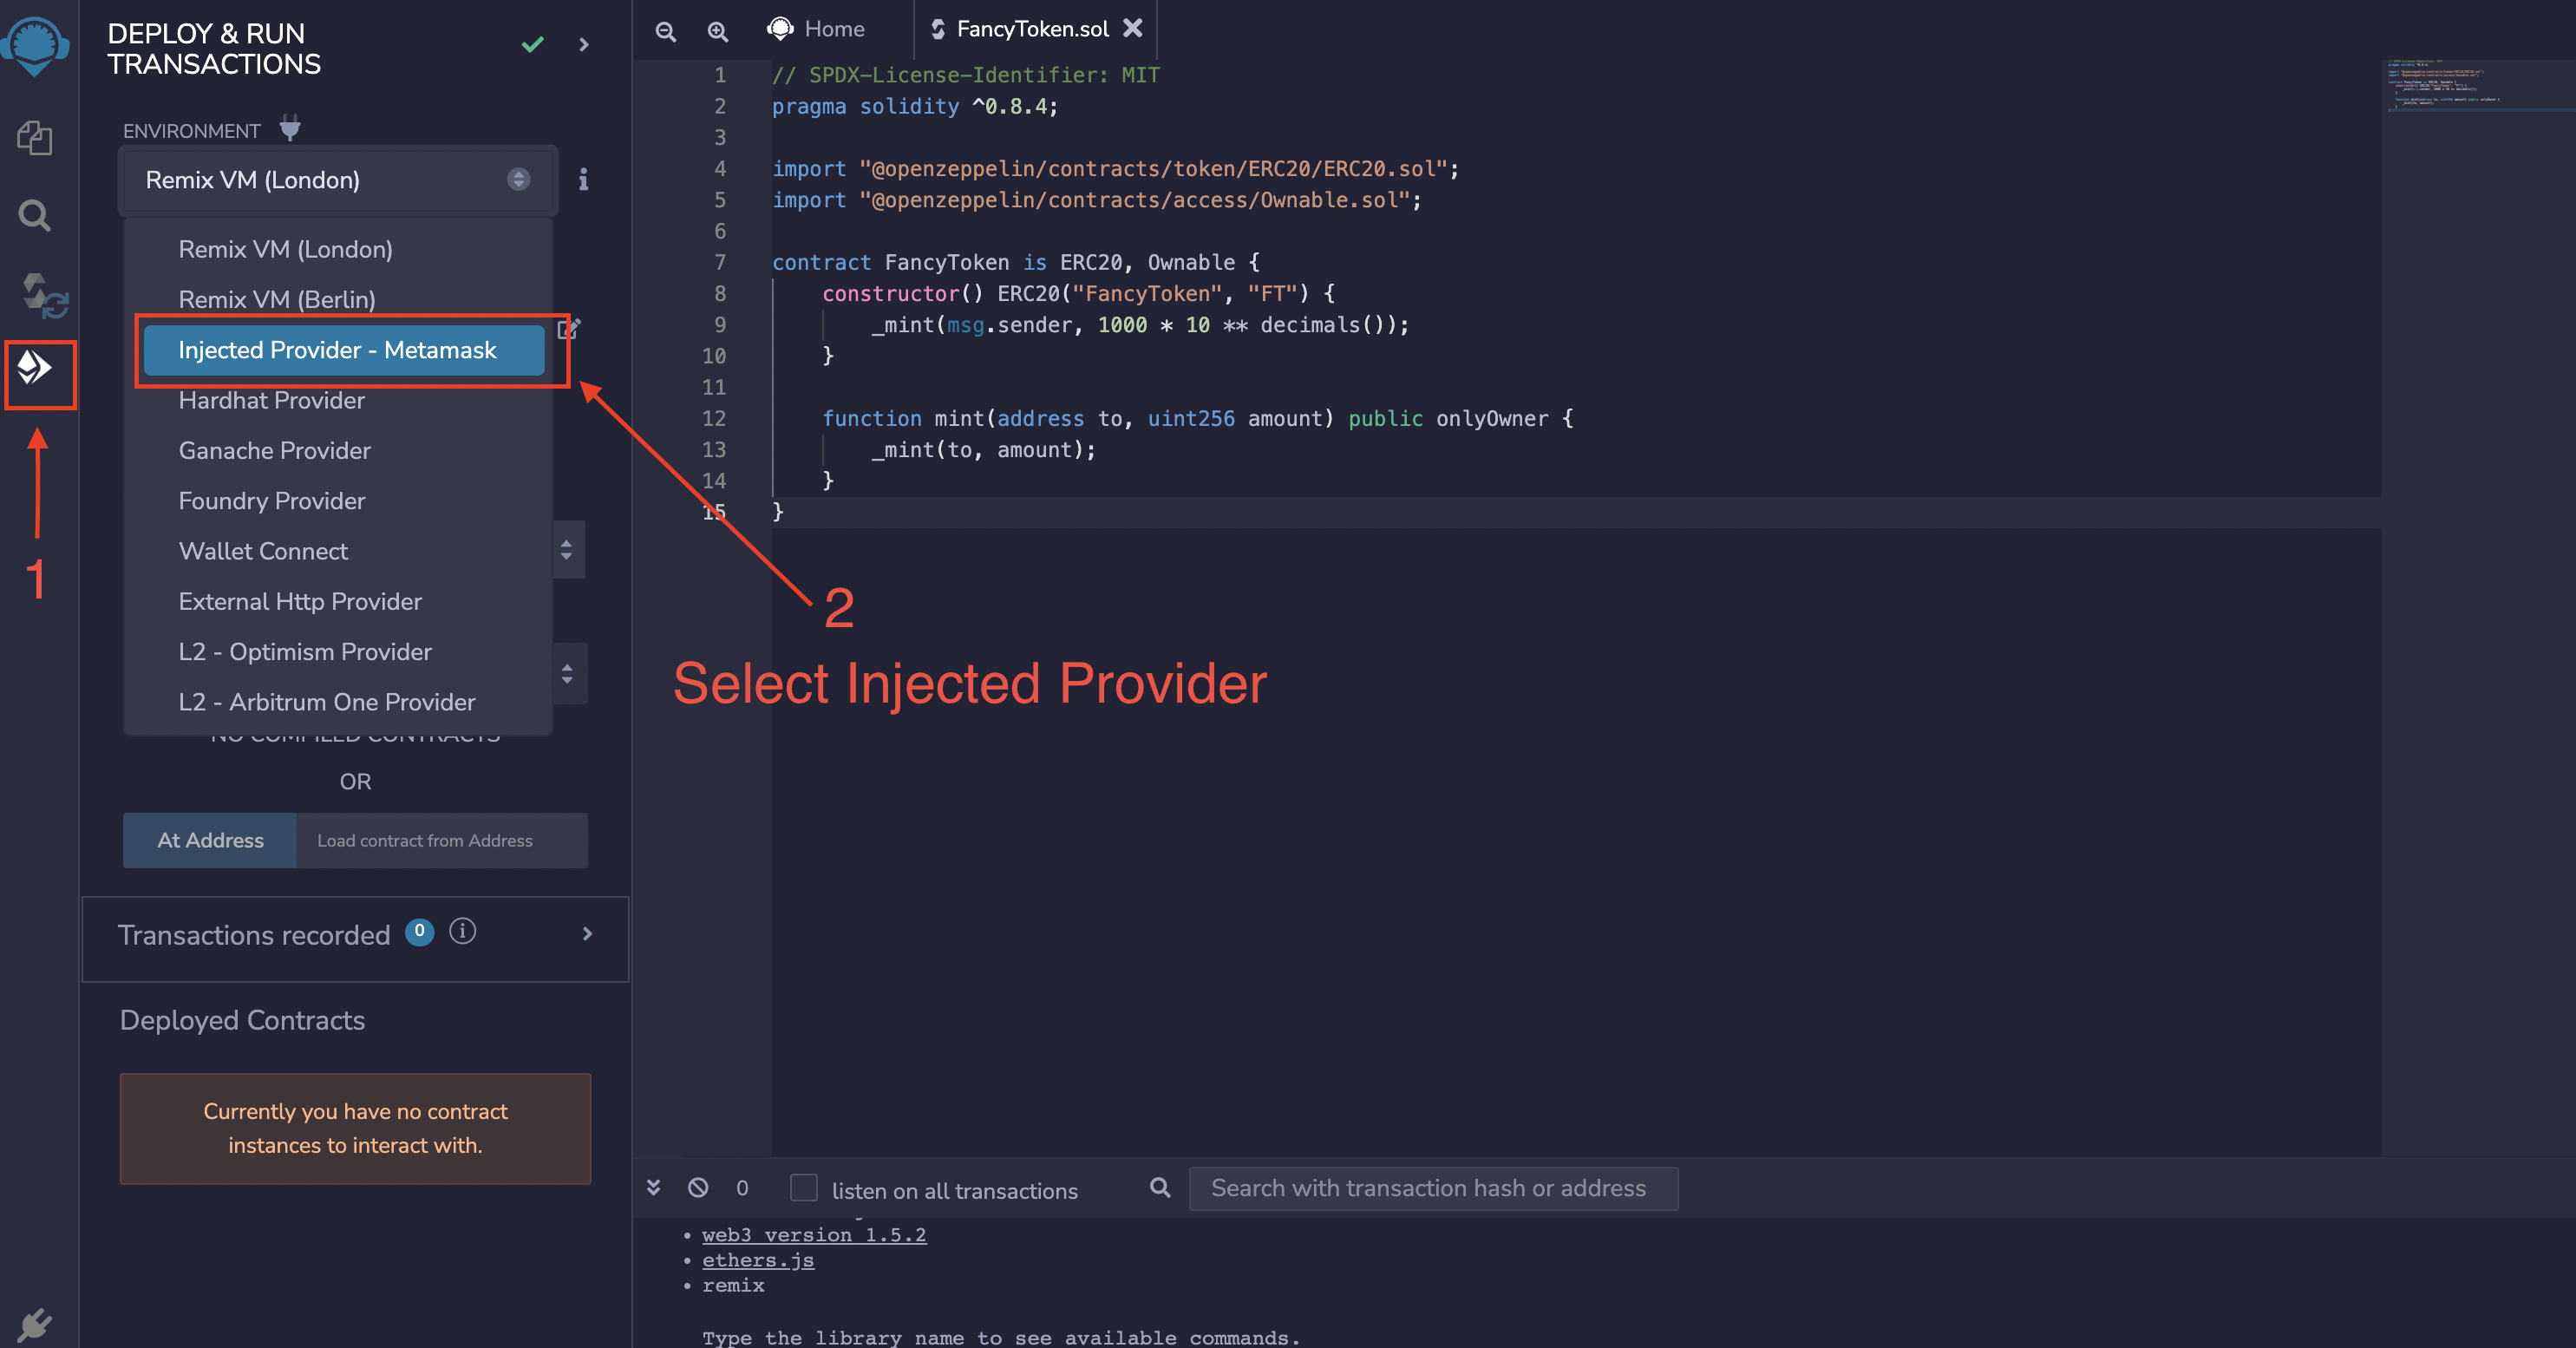
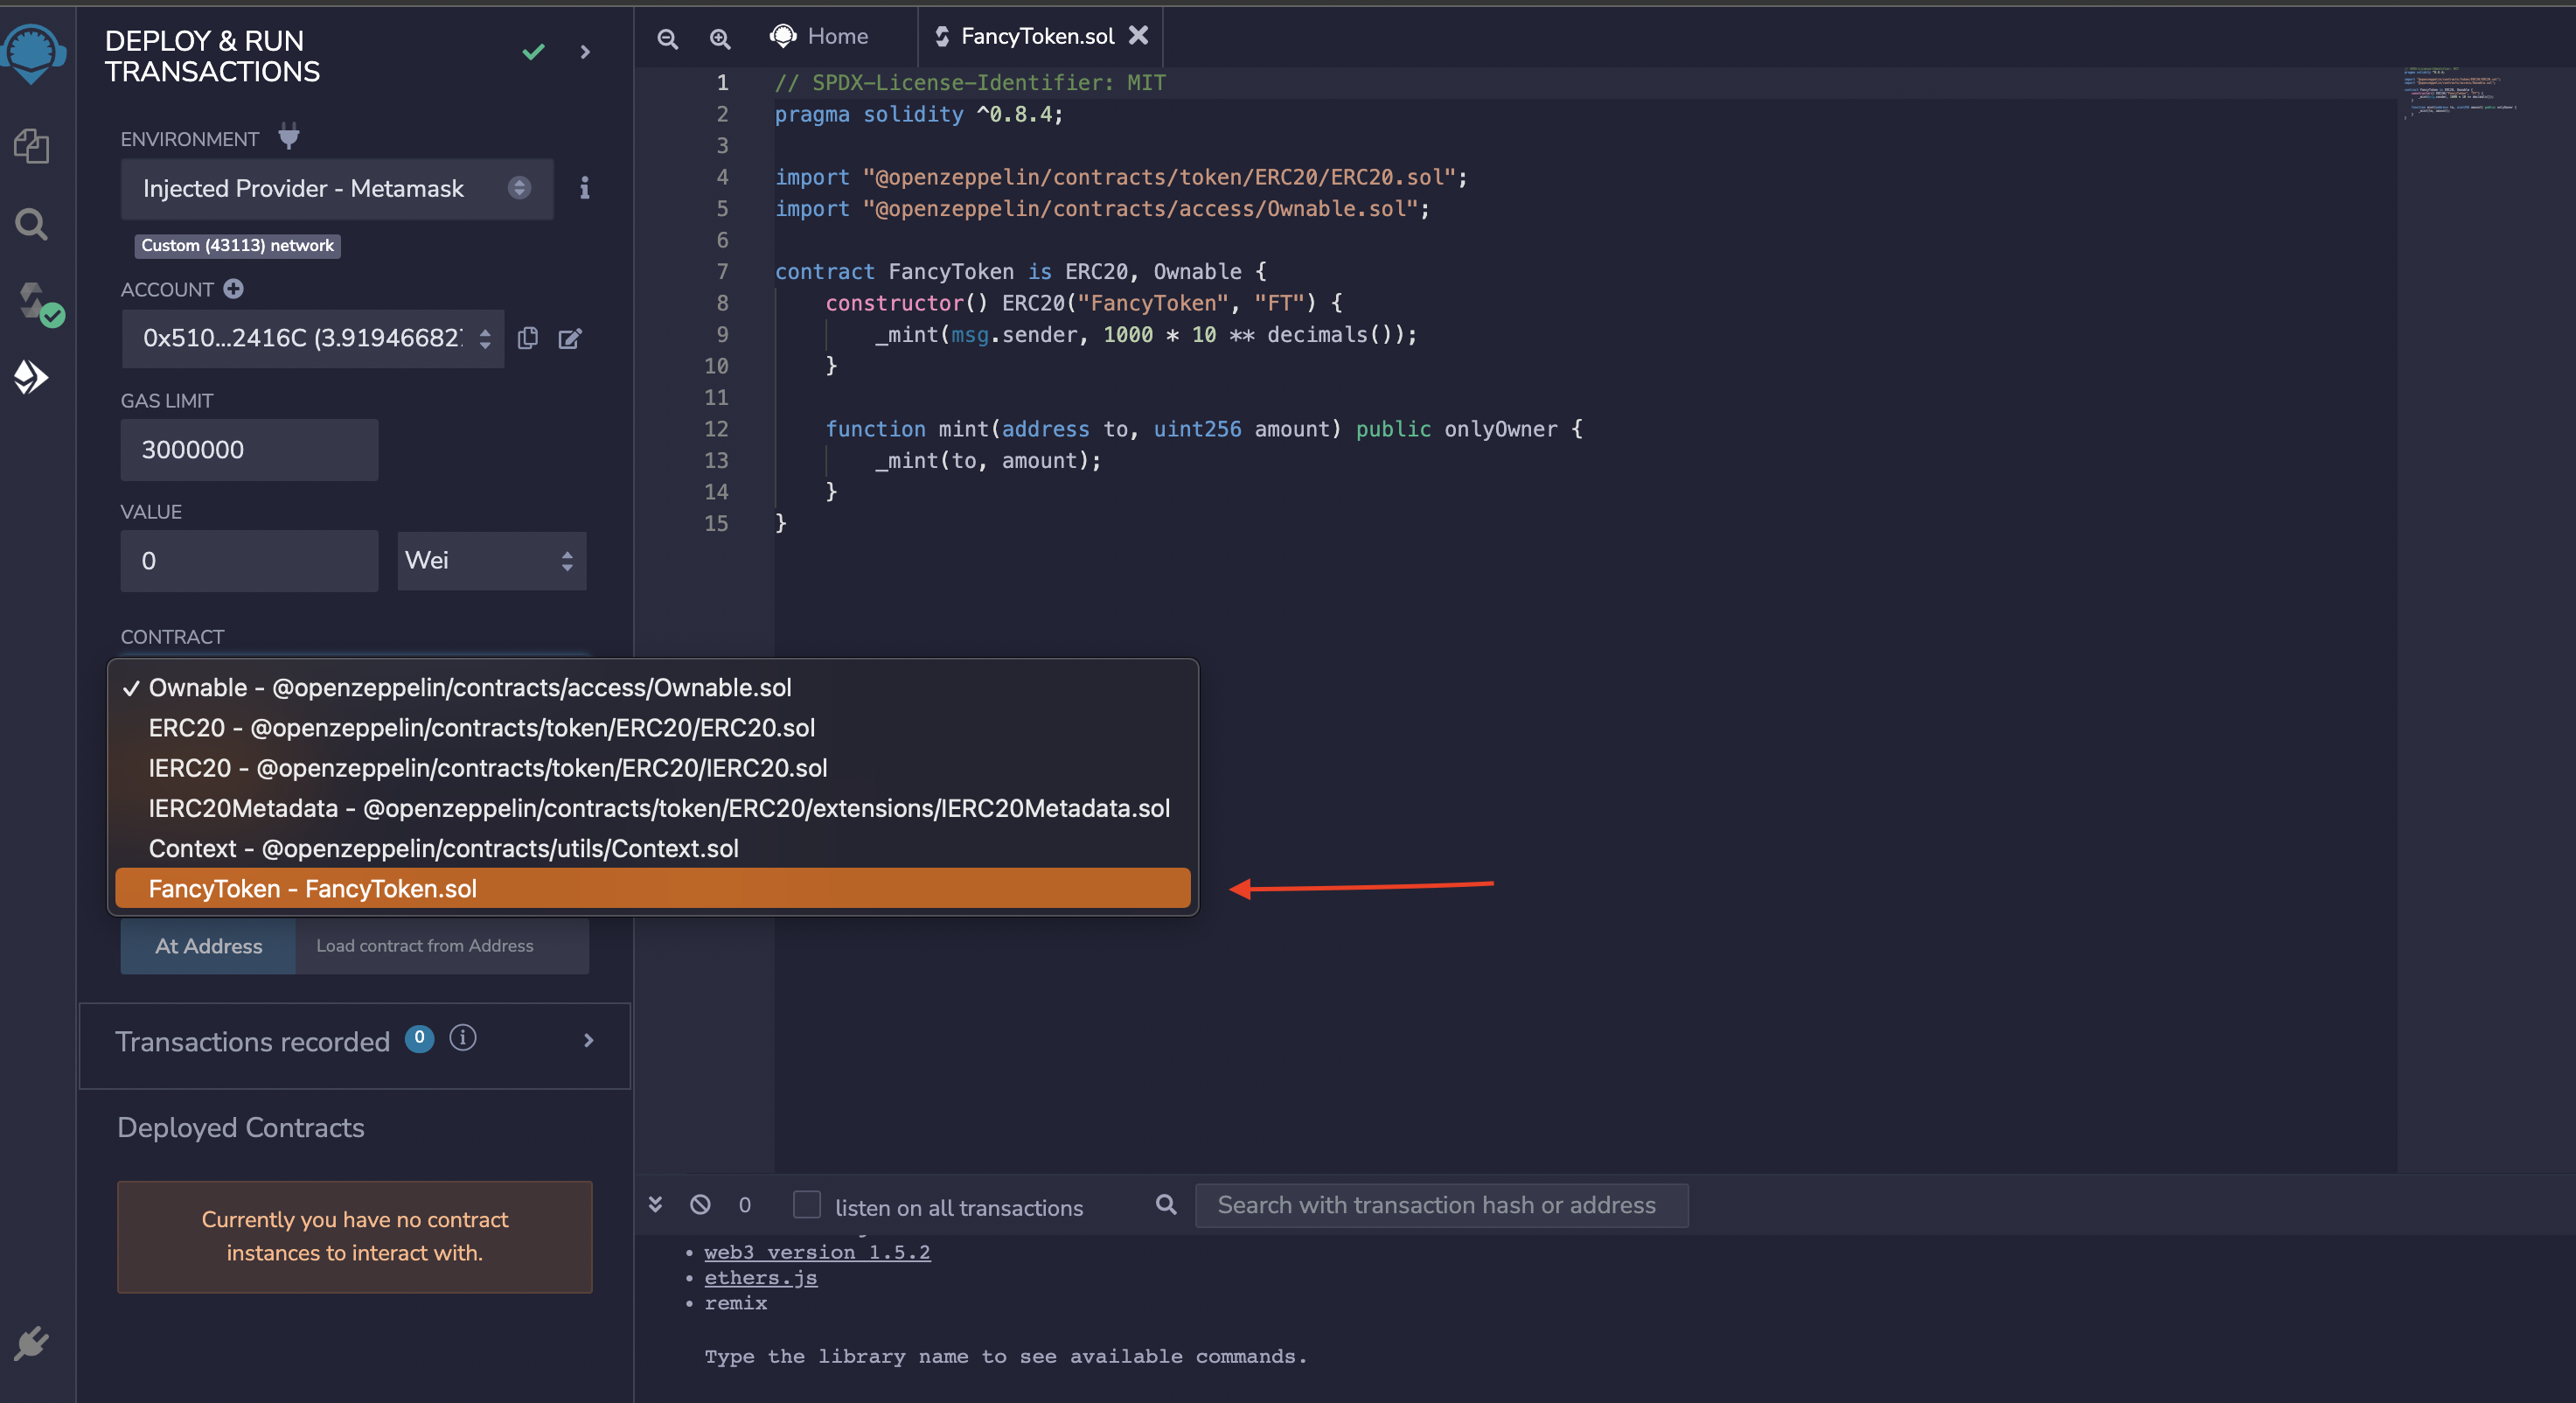
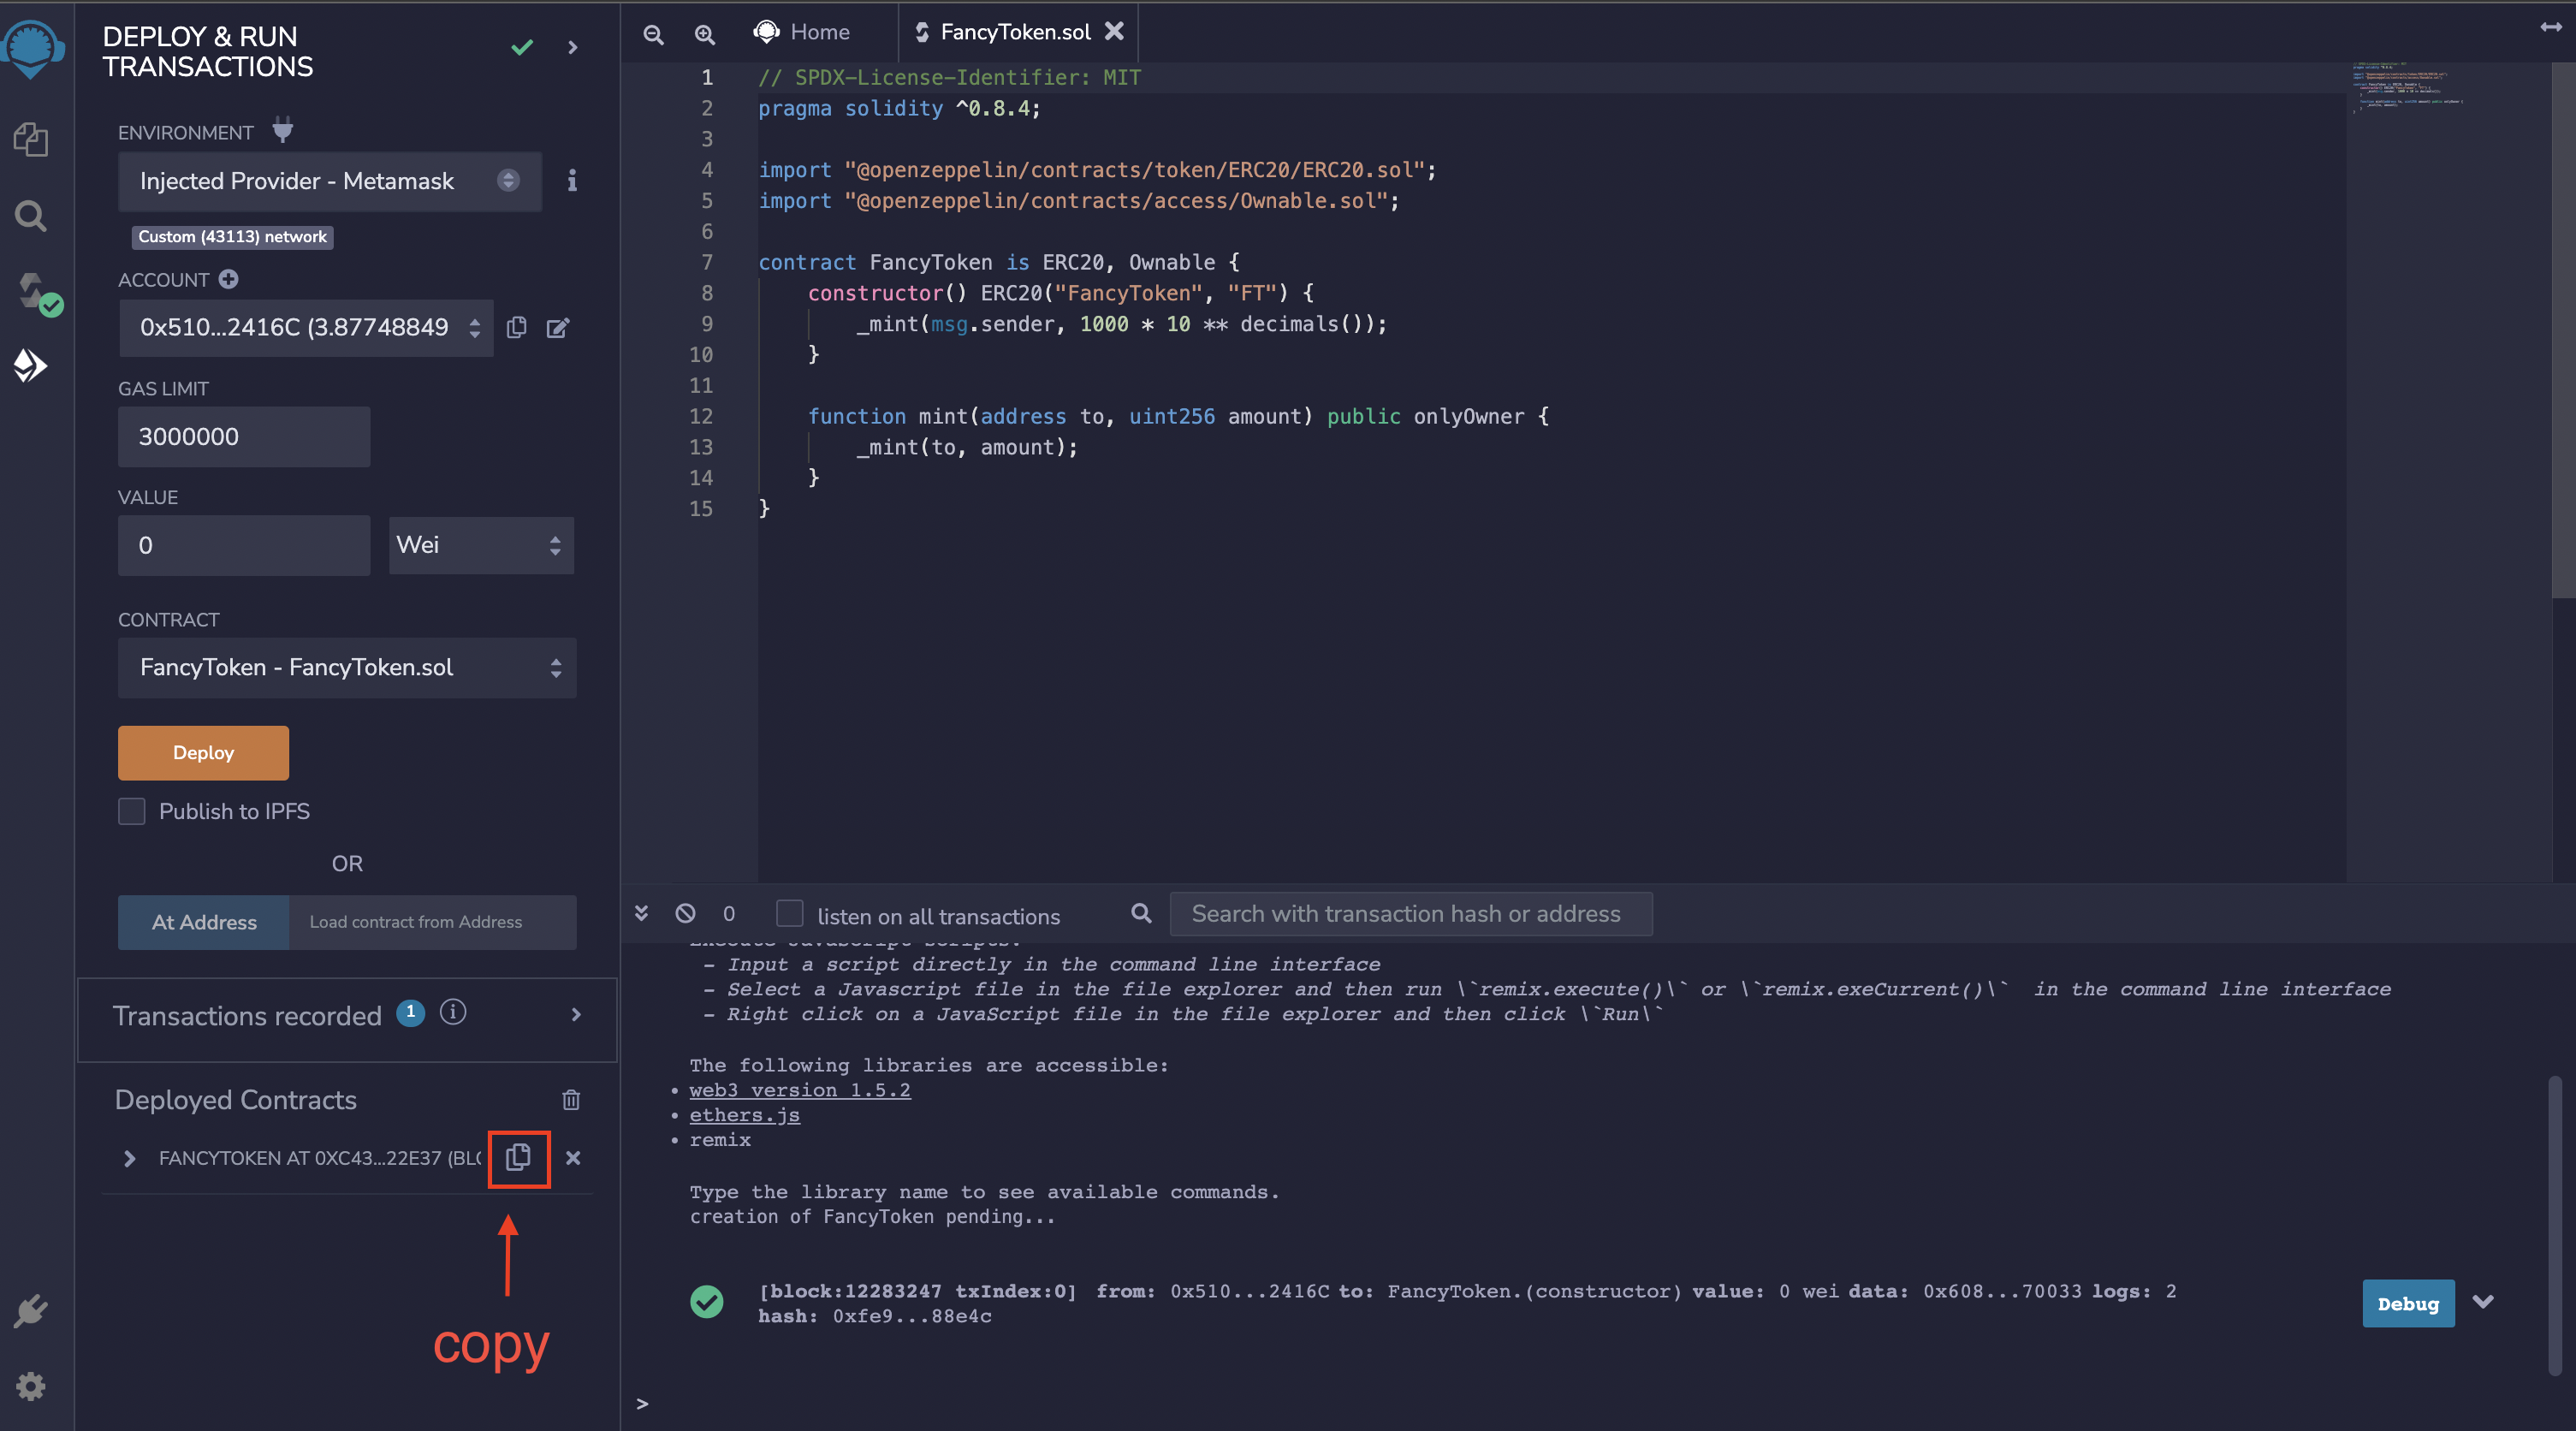
Select the Injected Provider - MetaMask on the dropdown.
Select the contract FancyToken you want to deploy.
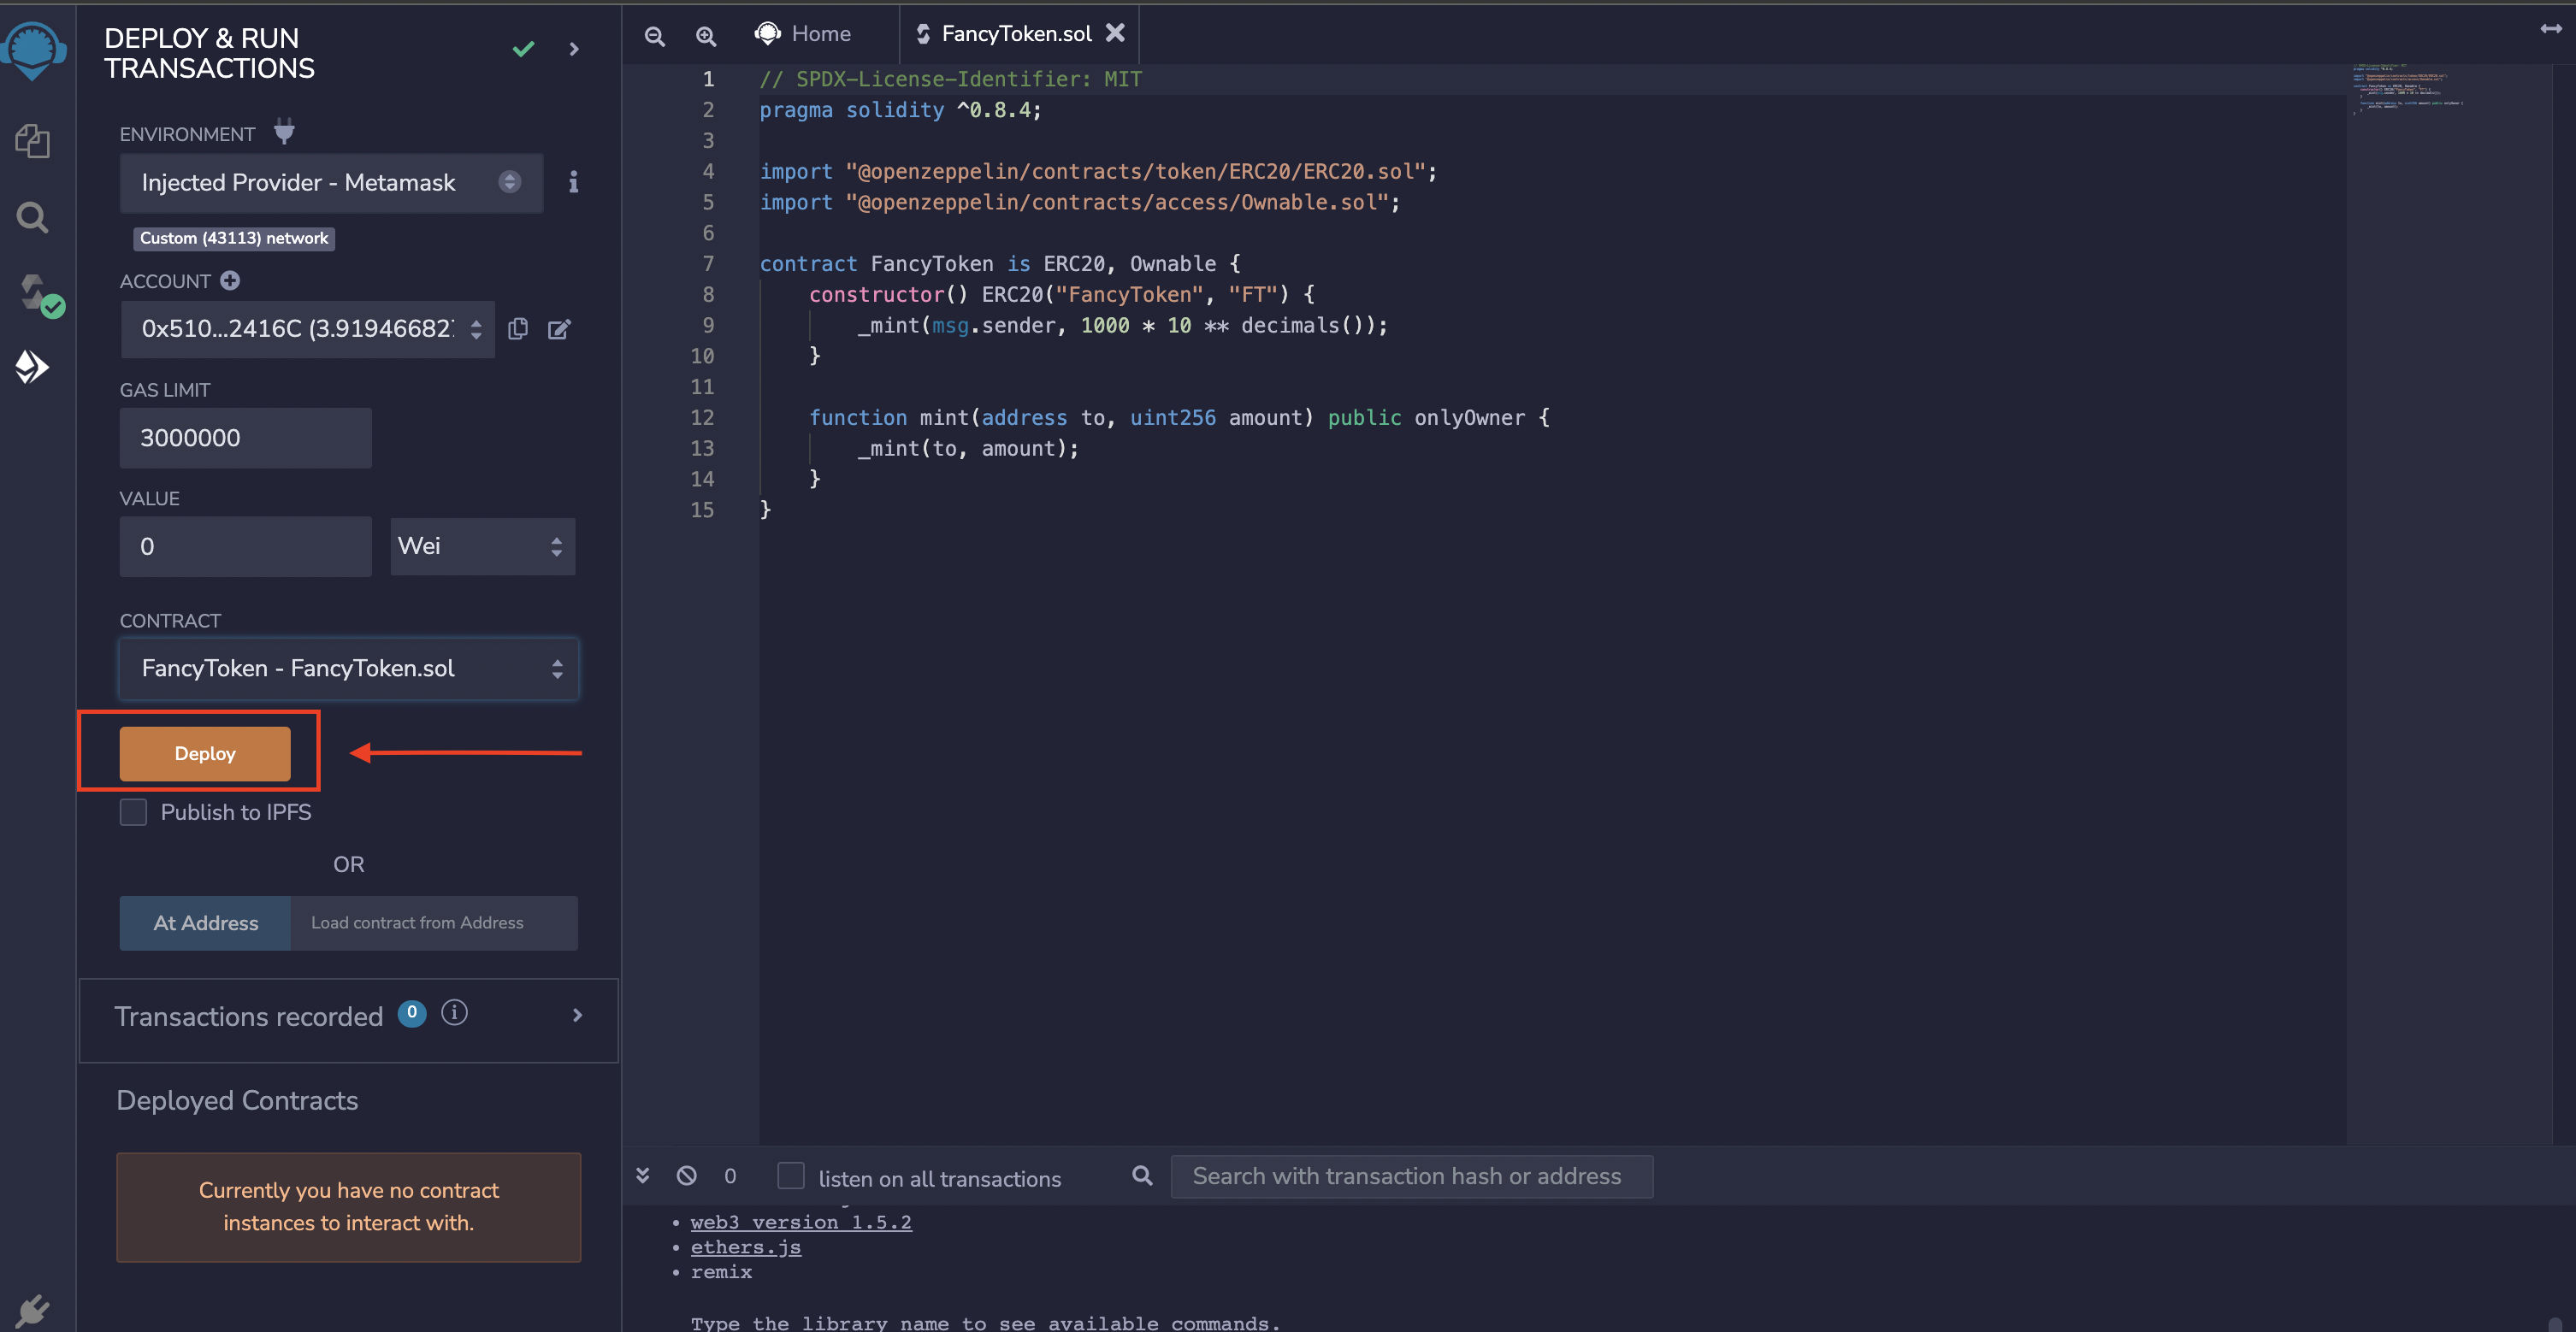
Next, click the Deploy button, as shown below.
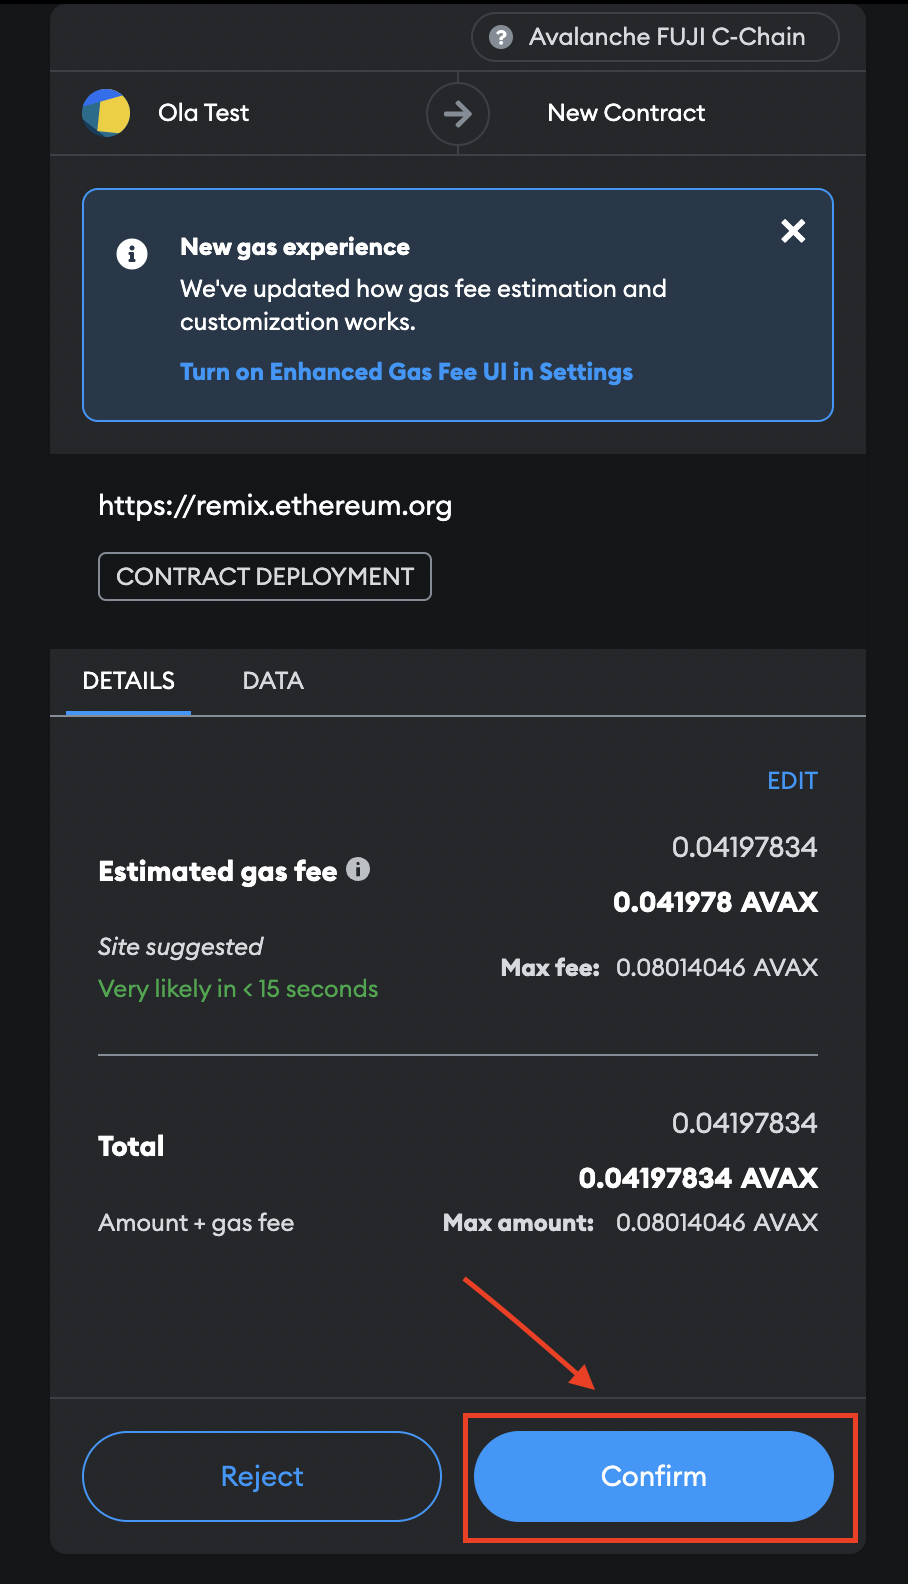
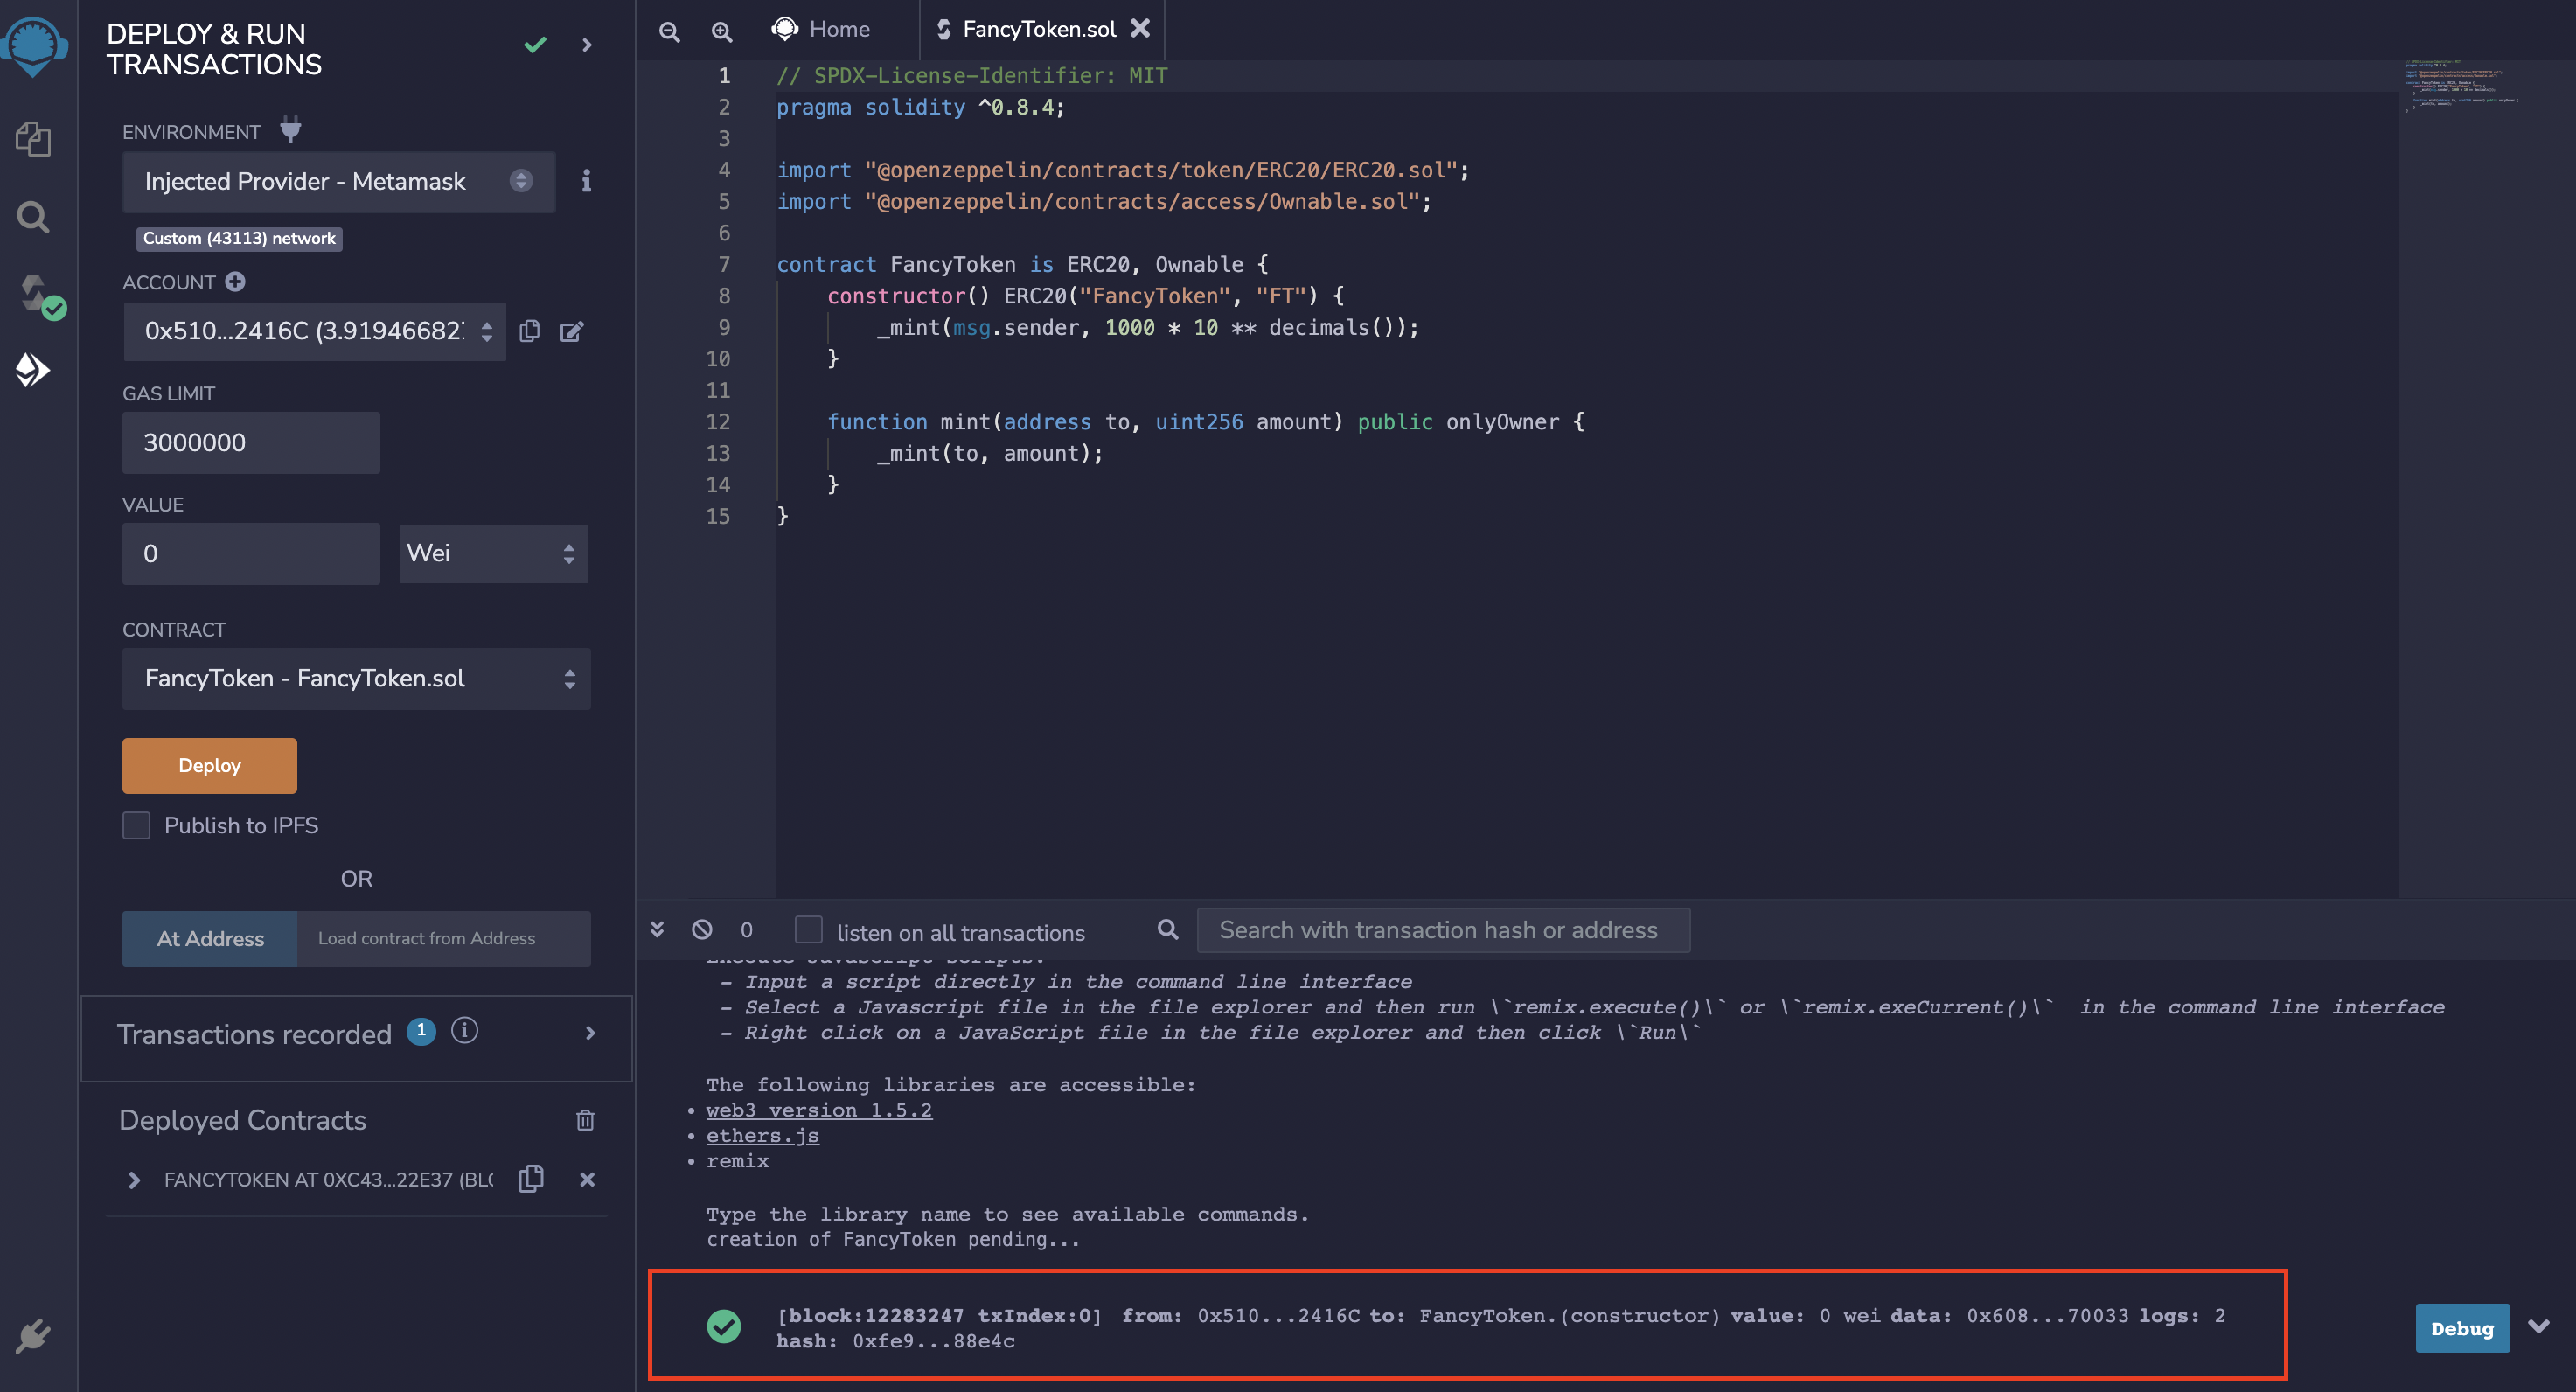
You will see a deployment message on the console, as shown below.
Import Token on MetaMask
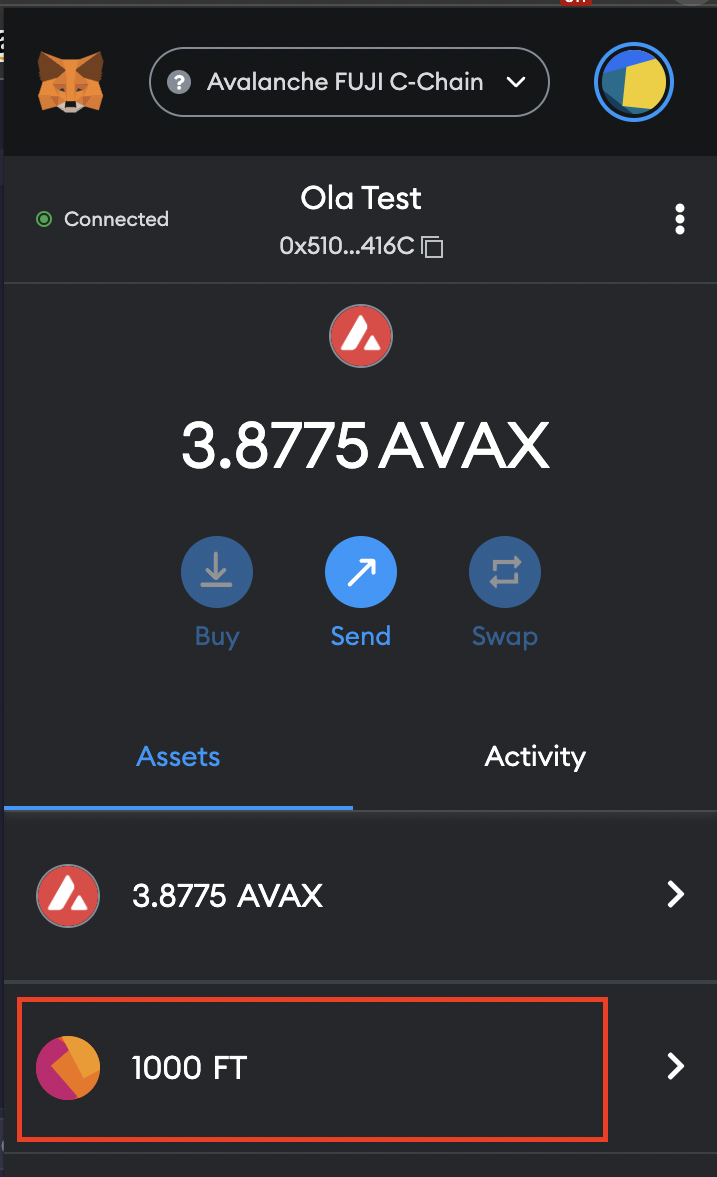
You have successfully deployed your token. In this step, you will import the token on MetaMask. Click on the icon below to copy the contract address you just deployed.
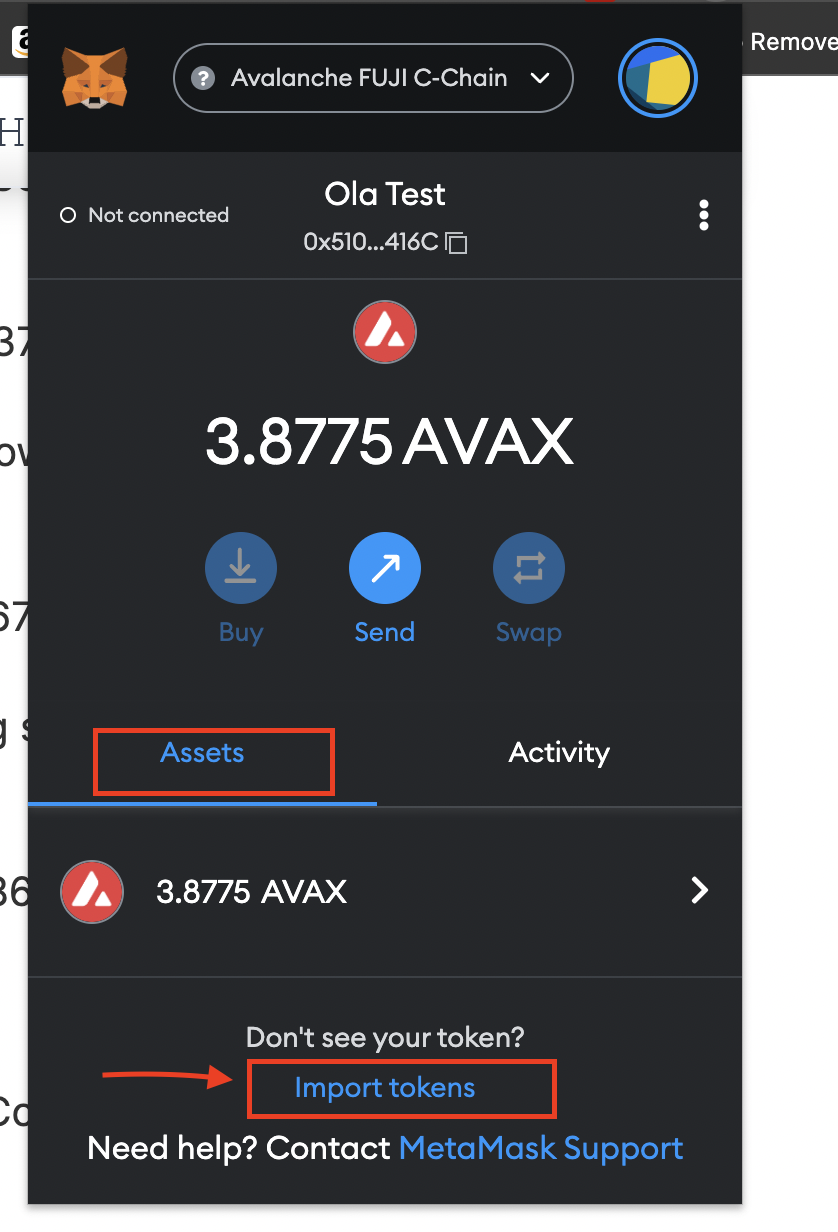
Next, click on the MetaMask logo on your browser, select Assets and then click on Import tokens as shown below.
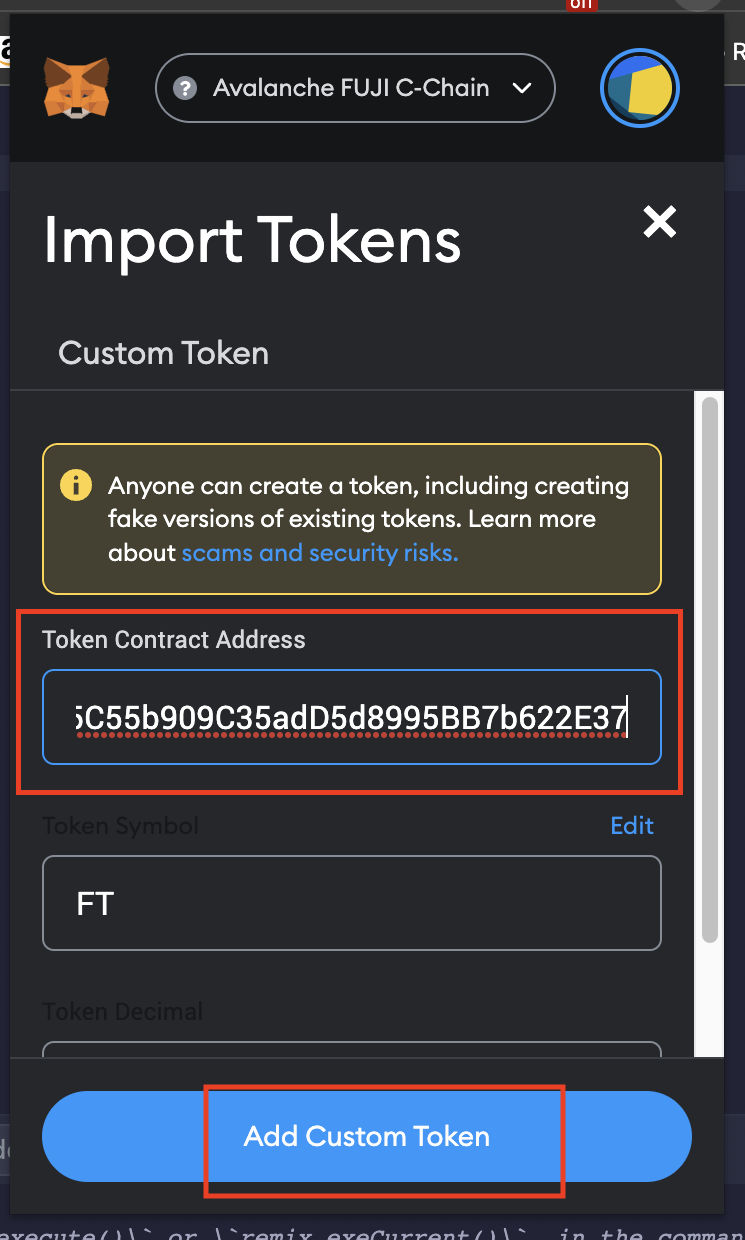
Paste the contract address you copied in the previous step; the token name will populate automatically. Then proceed by clicking on the Add Custom Token button below.
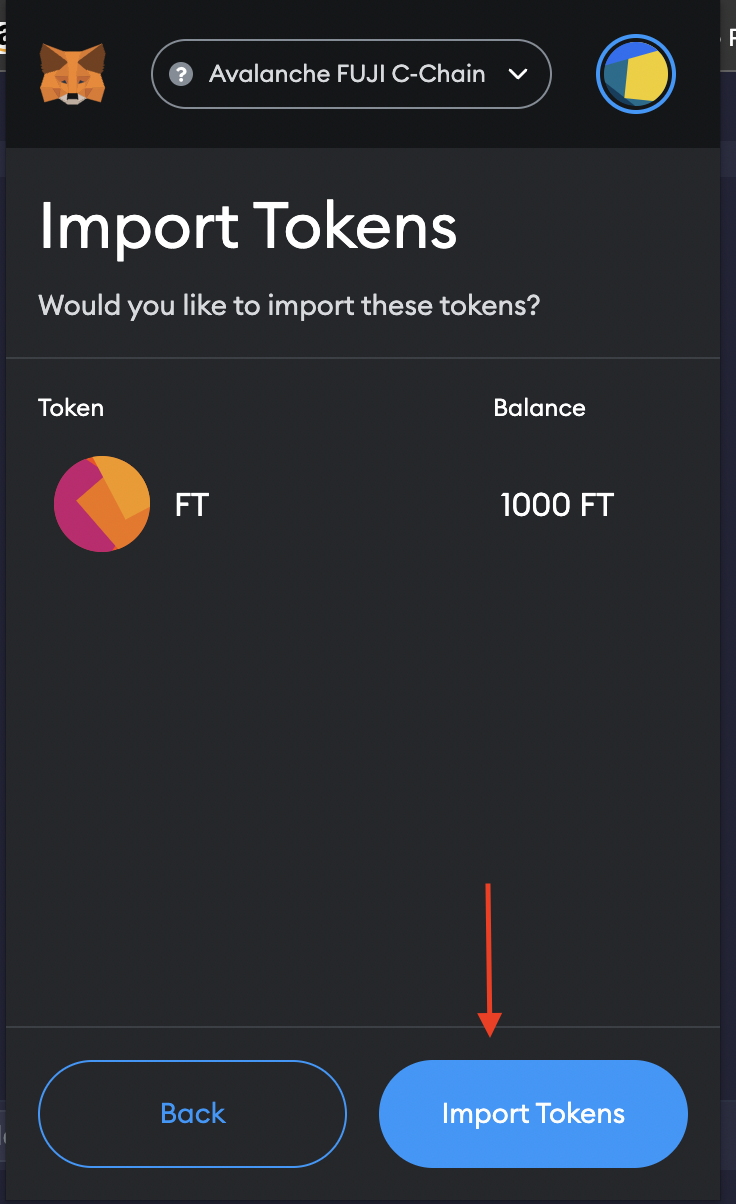
Voila 🥳 your token was just imported successfully.
Verify Smart Contract Deployment on Snowtrace
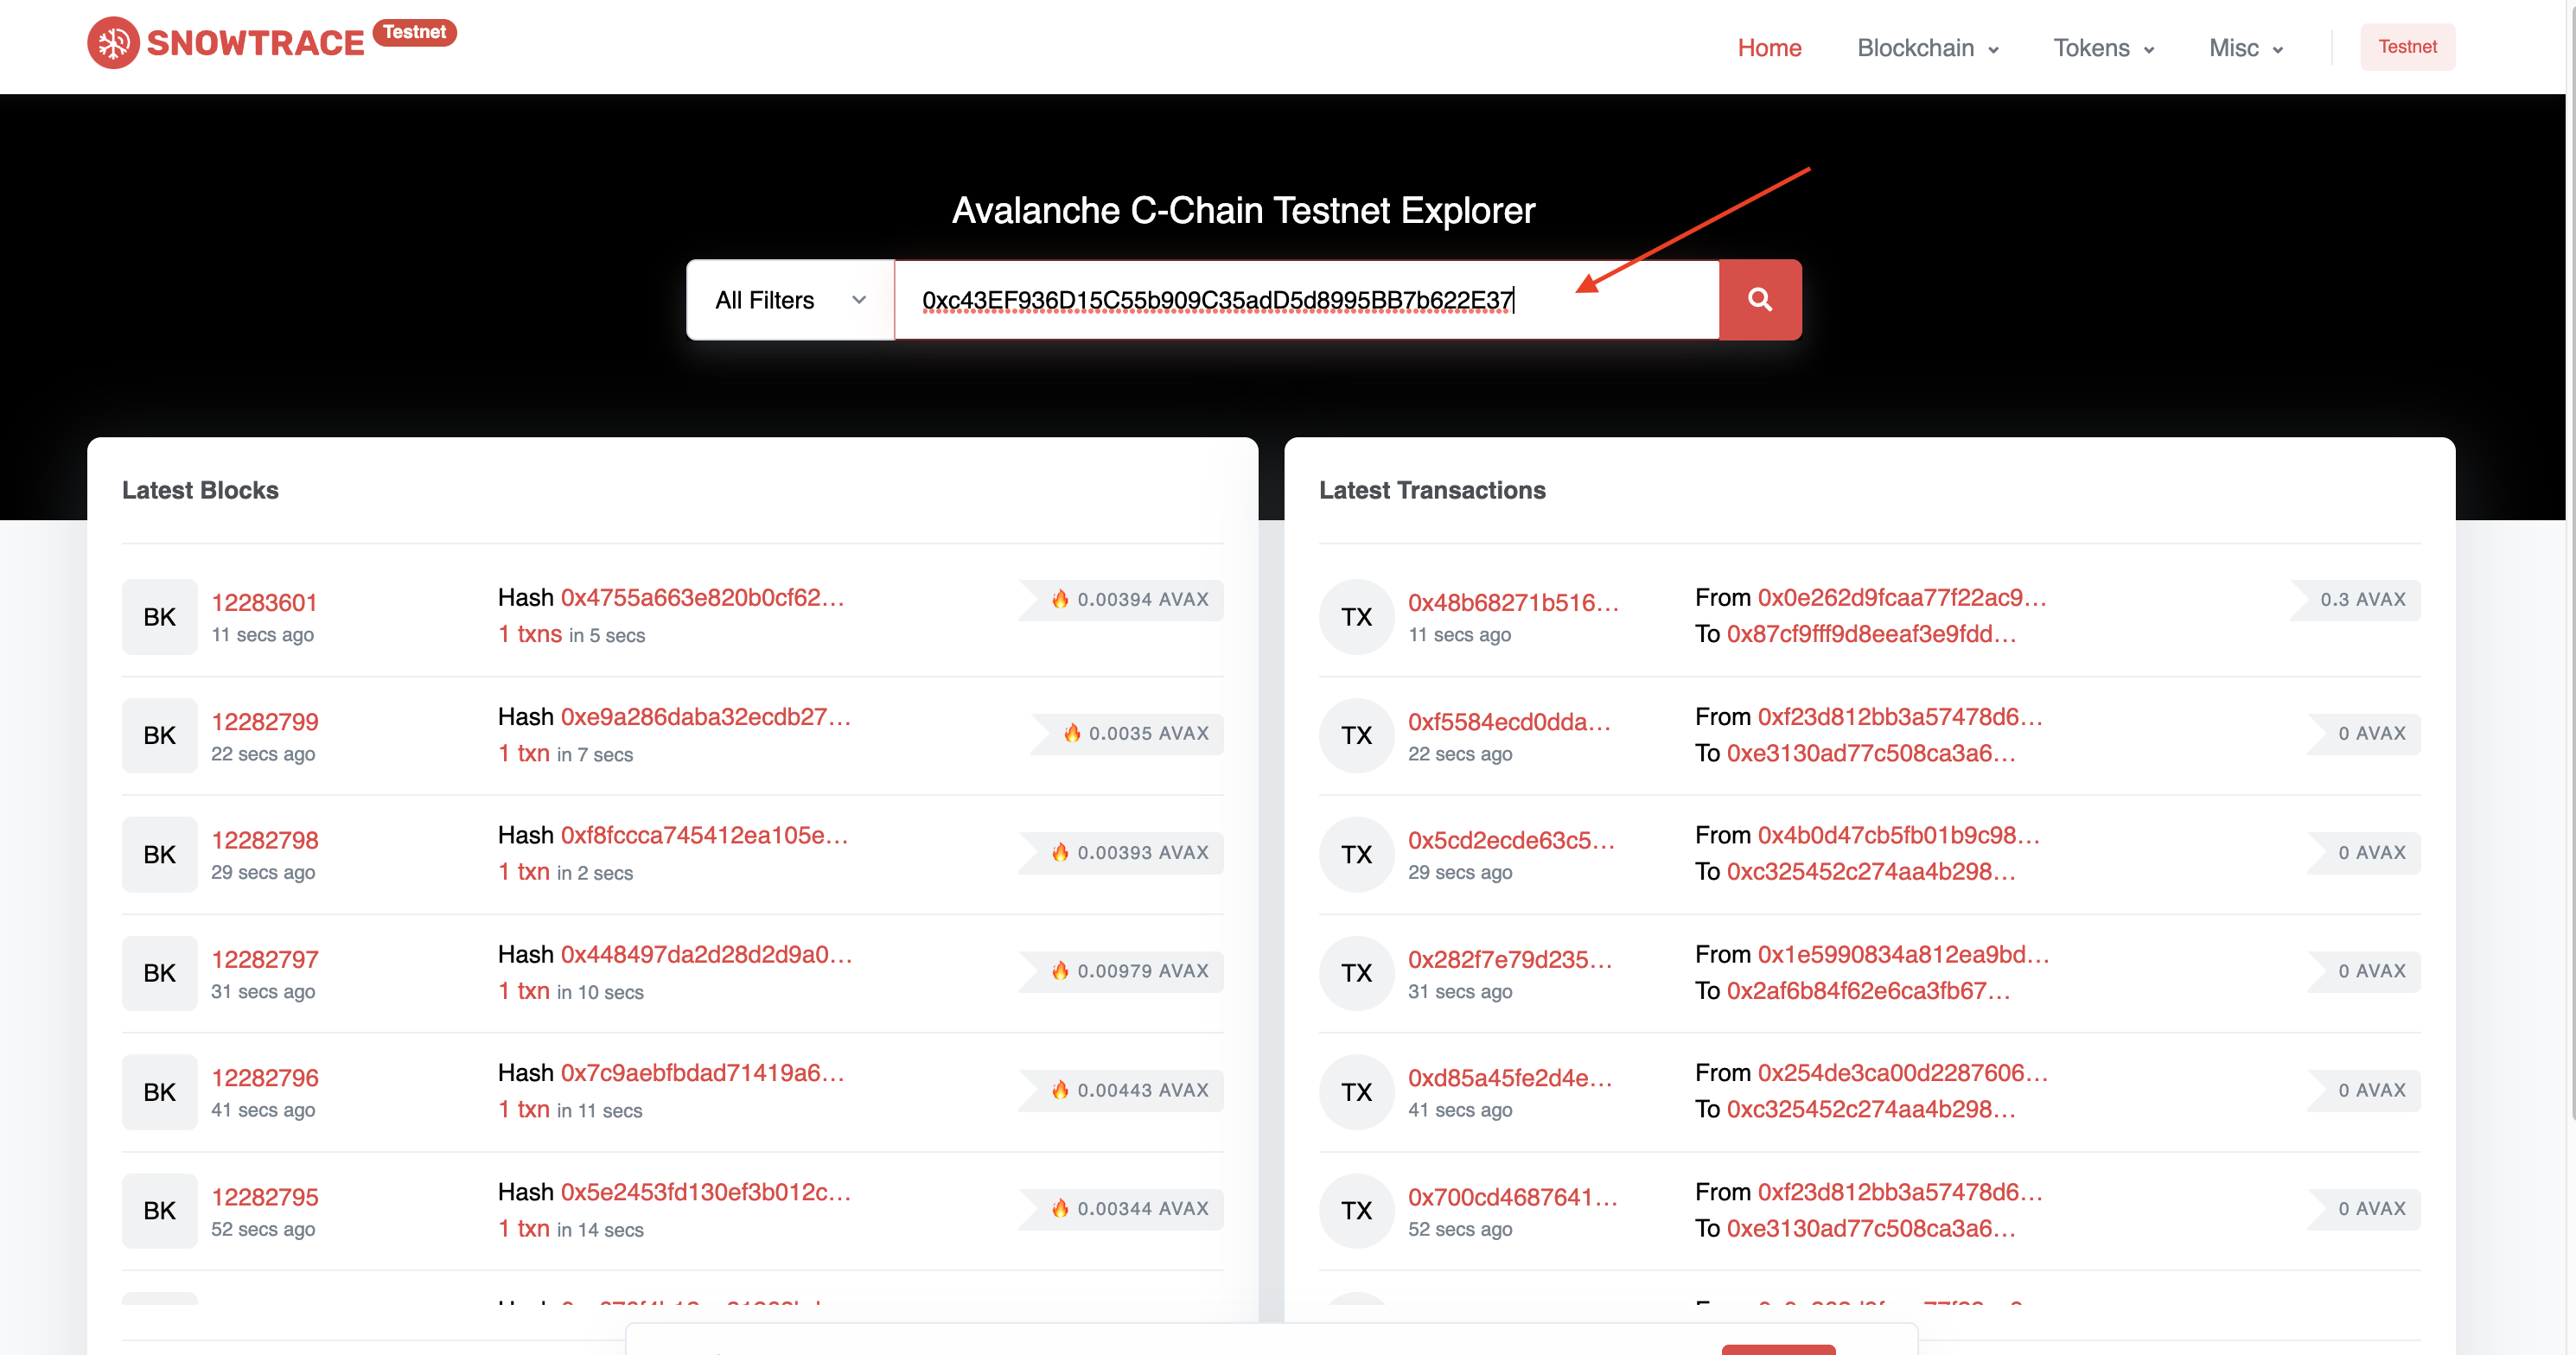
In this step, you will verify your smart contract deployment and other information on Snowtrace. SnowTrace enables you to browse and search the Avalanche C-Chain blockchain for transactions, addresses, tokens, prices, and other Avalanche C-Chain activities (AVAX)
Navigate to the Snowtrace testnet site and paste the contract address as shown below.
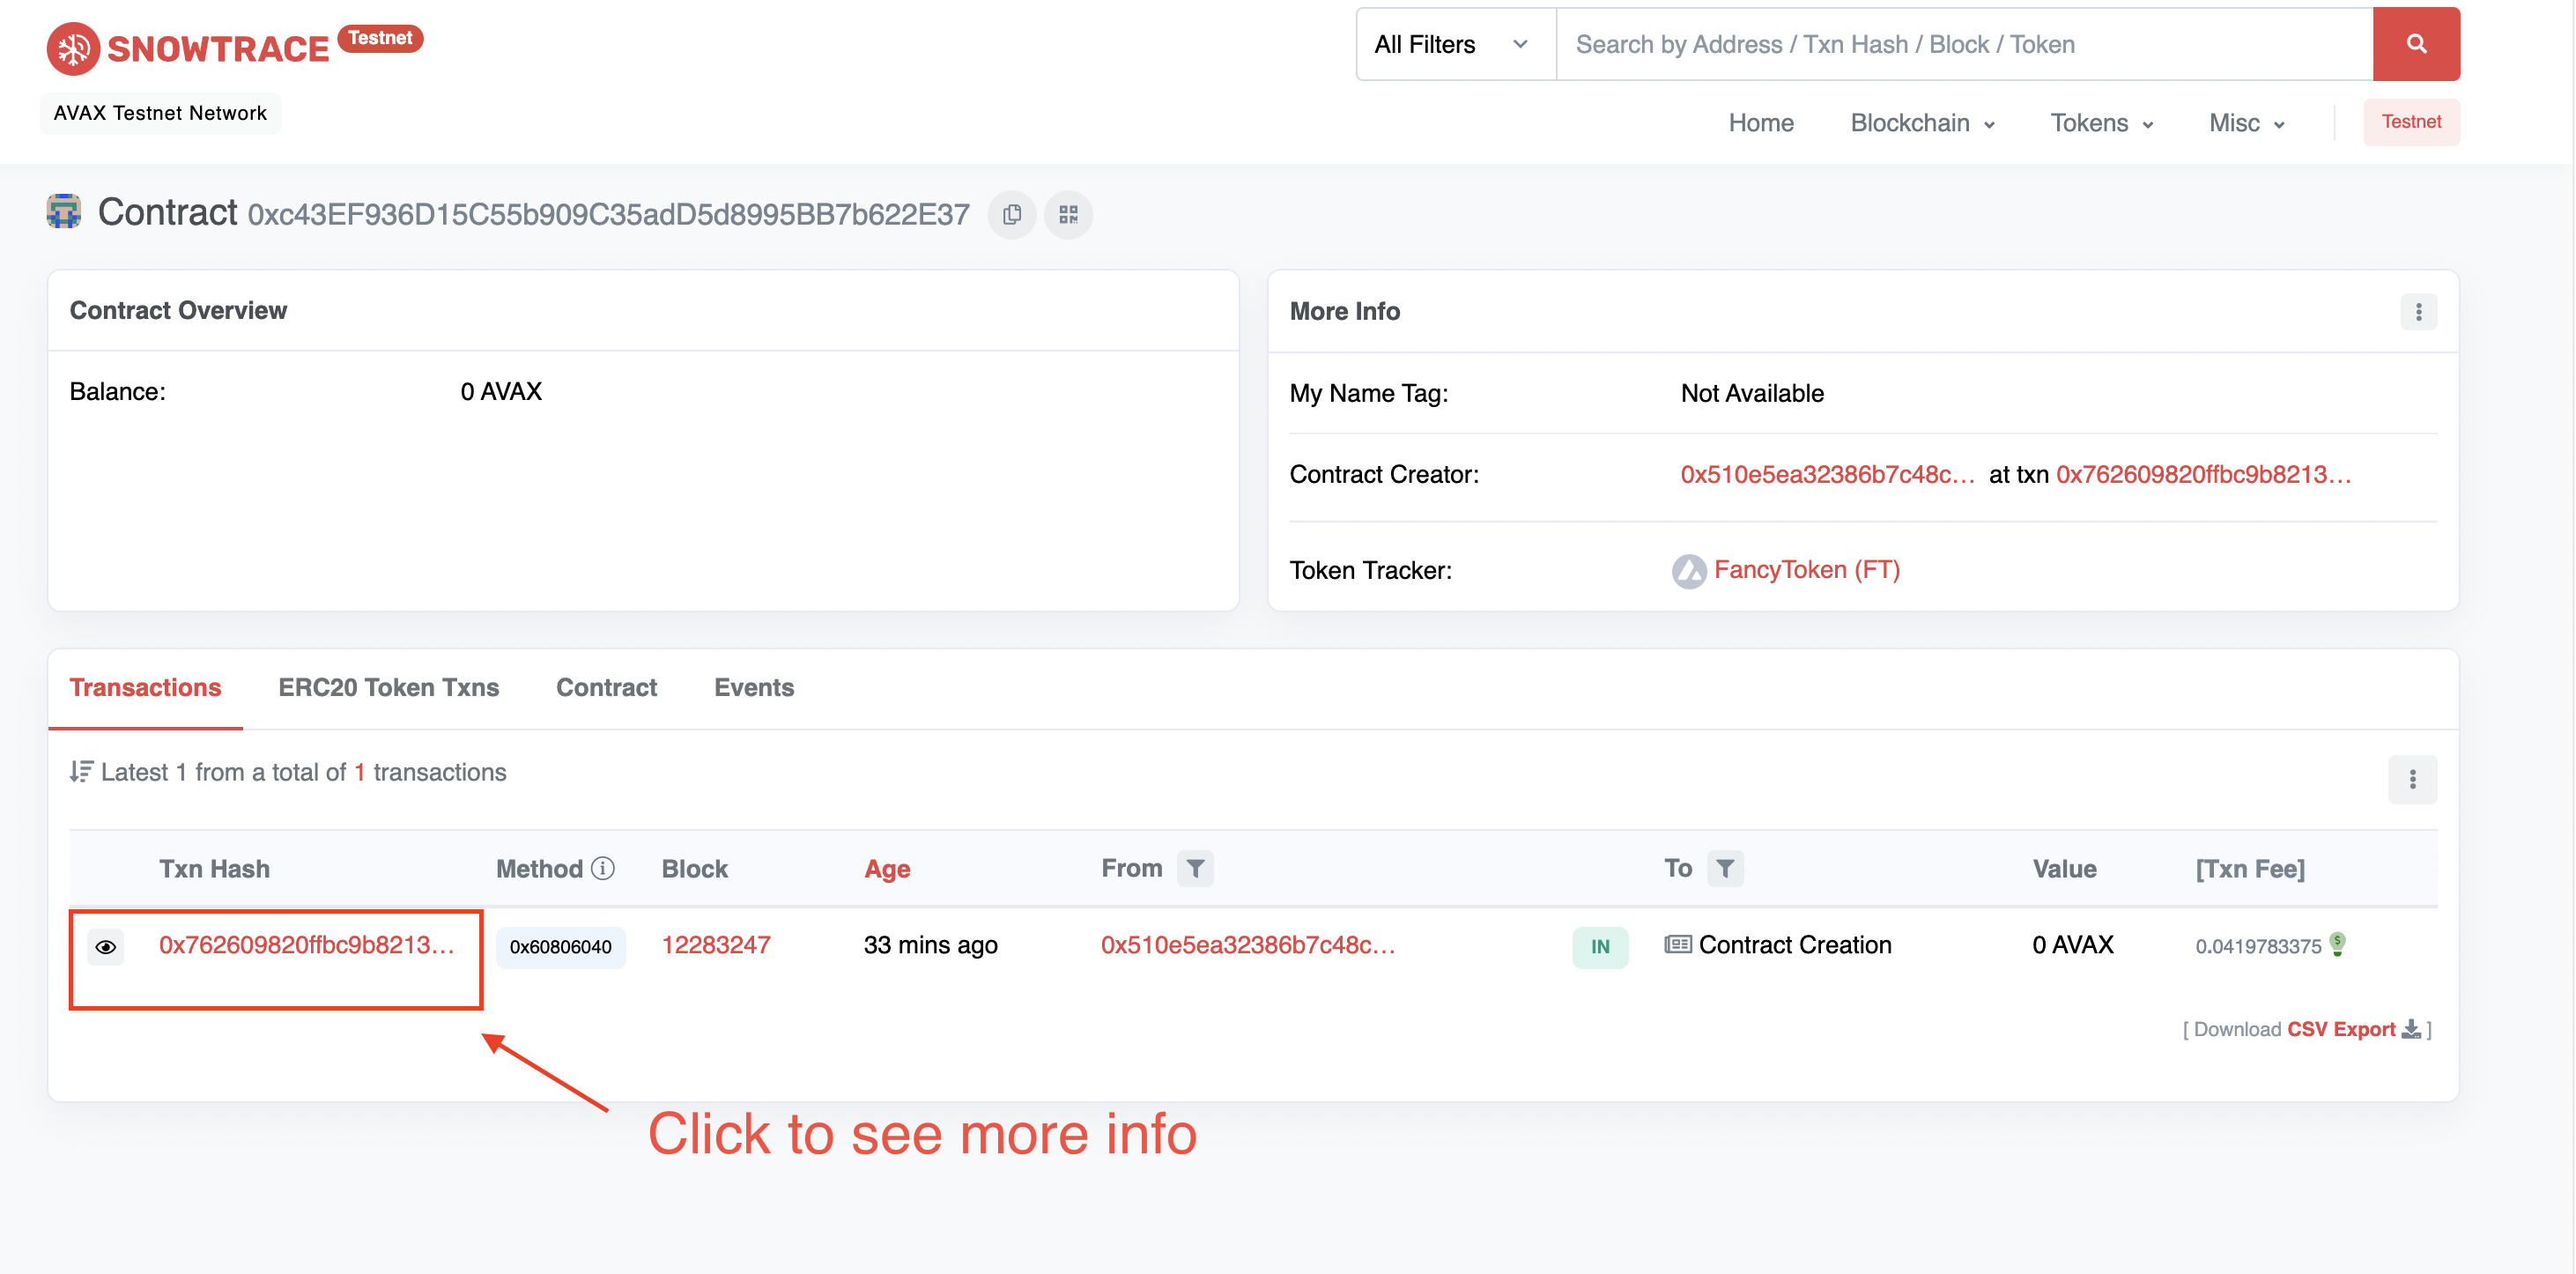
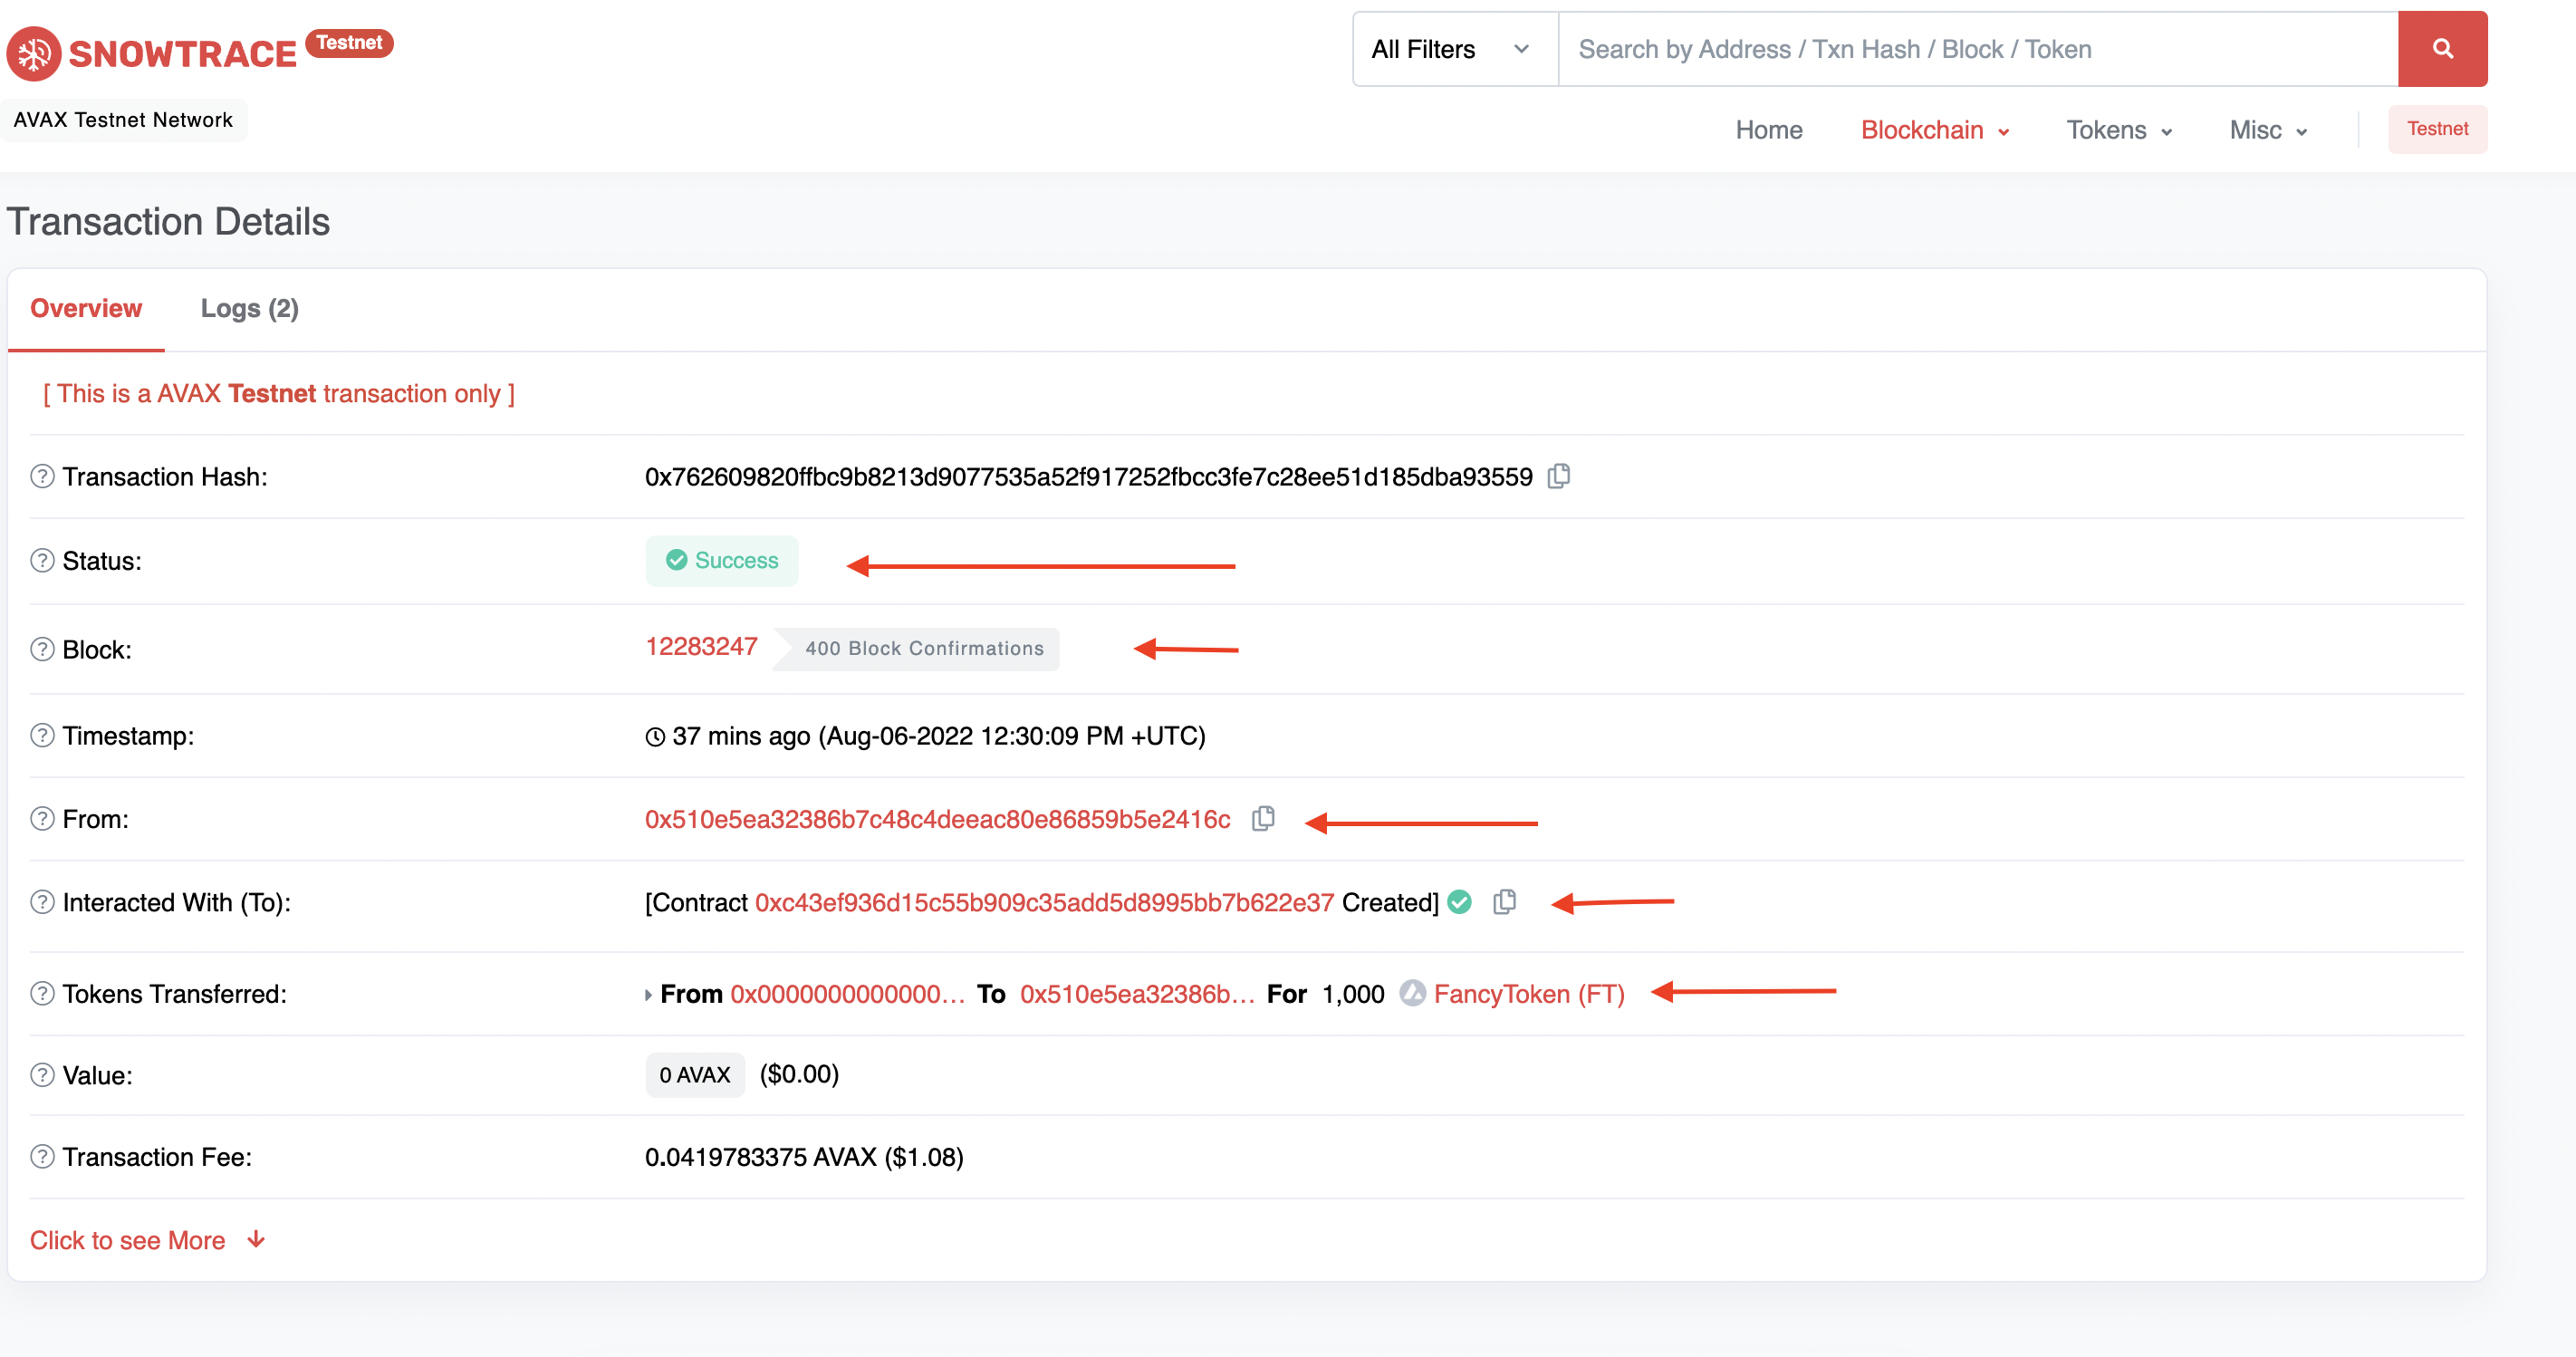
That's it. You can click here to view the smart contract of the project deployment.
Conclusion
In this article, you learned how to set up Avalanche on Metamask, fund the C-Chain address, introduce the Avalanche network, build and deploy a smart contract on the Avalanche network, and verify deployment on Snowtrace.
I'd love to connect with you at Twitter | LinkedIn | GitHub | Portfolio
See you in my next blog article. Take care!!!
About the author
Software Engineer | Developer Advocate | Technical Writer | Content Creator
Comments
Join the discussionGreat article, Olubisi Idris Ayinde
Web 3.0
I'll be sharing amazing content and resources on web3, how to build and deploy smart contracts, blockchain, and more in this series.