Build a Mini Buymeacoffee dApp Using Solidity + Ethereum Smart Contract + ReactJs + TailwindCSS

Software Engineer | Developer Advocate | Technical Writer | Content Creator
Blockchain is typically one of the highest-paying programming industries, with developers earning between $150,000 and $175,000 per year on average as salaried employees. Sound interesting, right?
To learn more about a developer roadmap and how to get started, Check here.
In this article, we will Build a Mini Buymeacoffee dAPP Using Solidity, Ethereum Smart Contract, ReactJs, and tailwind CSS. It'll be a platform where anyone on the internet can learn a little about us and send us money to purchase coffee + a note, with the information being kept on the blockchain via an Ethereum smart contract. (A smart contract is essentially code that stays on the blockchain and can be read and written from; we'll go over this in more detail later.)
We'll create the smart contract and deploy it. We will also build a website that will allow people to connect their wallets and engage with our smart contract.
Here is a link to the Live Demo and the GitHub Repositories 👉 Frontend and Backend/Smart Crontract
Prerequisite
- Let us ensure we have Node/NPM installed on our PC. If you don't have it, head over here to for a guide
Project Setup and Installation
Next, let's head over to the terminal. We'll need to cd into the directory we wish to work with and then run the following commands:
mkdir mini-buymeacoffee-be
cd mini-buymeacoffee-be
npm init -y
npm install --save-dev hardhat
Now, we should have a hardhat. Let's get a sample project going by running the command below:
npx hardhat
We'll go with the option of creating a sample project. Accept all requests. Installing hardhat-waffle and hardhat-ethers is required for the sample project. These are some of the other things we'll be using later:).
Just in case it didn't do it automatically, we will install these other requirements.
npm install --save-dev @nomiclabs/hardhat-waffle ethereum-waffle chai @nomiclabs/hardhat-ethers ethers
To make sure everything is working, run:
npx hardhat test
We will see a passed test result in our console.
It is now possible for us to Delete sample-test.js from the test folder. Delete sample-script.js from the scripts directory as well. After that, go to contracts and delete Greeter.sol.
The folders themselves should not be deleted!
Next, under the contracts directory, we'll create a file called CoffeePortal.sol. When using Hardhat, file layout is really crucial, so pay attention! We're going to start with the basic structure of every contract.
// SPDX-License-Identifier: UNLICENSED

pragma solidity ^0.8.0;

import "hardhat/console.sol";

contract CoffeePortal {

    constructor() payable {
        console.log("Yo! Smart Contract");
    }
}
To build and deploy our smart contract, navigate to the scripts folder, create a new file called run.js, and update it with the following code snippet:
const main = async () => {

// This will actually compile our contract and generate the necessary files we need to work with our contract under the artifacts directory.
  const coffeeContractFactory = await hre.ethers.getContractFactory('CoffeePortal');
  const coffeeContract = await coffeeContractFactory.deploy();

  await coffeeContract.deployed(); // We'll wait until our contract is officially deployed to our local blockchain! Our constructor runs when we actually deploy.

 console.log("Coffee Contract deployed to:", coffeeContract.address);
};

const runMain = async () => {
  try {
    await main();
    process.exit(0);
  } catch (error) {
    console.log(error);
    process.exit(1);
  }
};

runMain();
Let's run it!
npx hardhat run scripts/run.js
You should see something similar to what we have below:

We have a working smart contract 🥳 Let us deploy it to a network by making it available to everyone worldwide.
Under the scripts folder, create a file called deploy.js. Here's the code for it. It looks super similar to run.js.
const main = async () => {
  const [deployer] = await hre.ethers.getSigners();
  const accountBalance = await deployer.getBalance();

  console.log("Deploying contracts with account: ", deployer.address);
  console.log("Account balance: ", accountBalance.toString());

  const Token = await hre.ethers.getContractFactory("CoffeePortal");
  const portal = await Token.deploy();
  await portal.deployed();

  console.log("CoffeePortal address: ", portal.address);
};

const runMain = async () => {
  try {
    await main();
    process.exit(0);
  } catch (error) {
    console.error(error);
    process.exit(1);
  }
};

runMain();
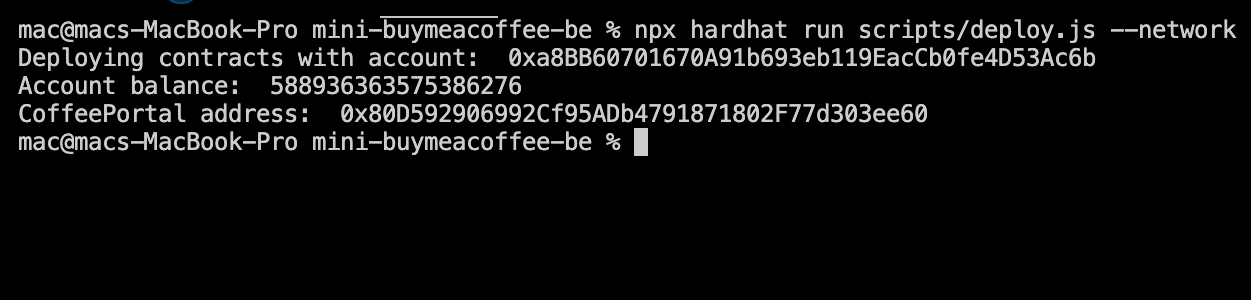
Now the command below we're going to deploy locally using the localhost network for test:
npx hardhat run scripts/deploy.js --network localhost
We should have something similar to what we have below:
Building and Deploying CoffeeContract to Blockchain
Everything is now in place, including the test script and the 'deploy.js' file. With the following code snippet, we'll update the Smart Contract, run.js, and deploy.js files:
contracts/CoffeePortal.sol
Update scripts/run.js
Update scripts/deploy.js
Now it's time to get down to business, deploying to the real blockchain.
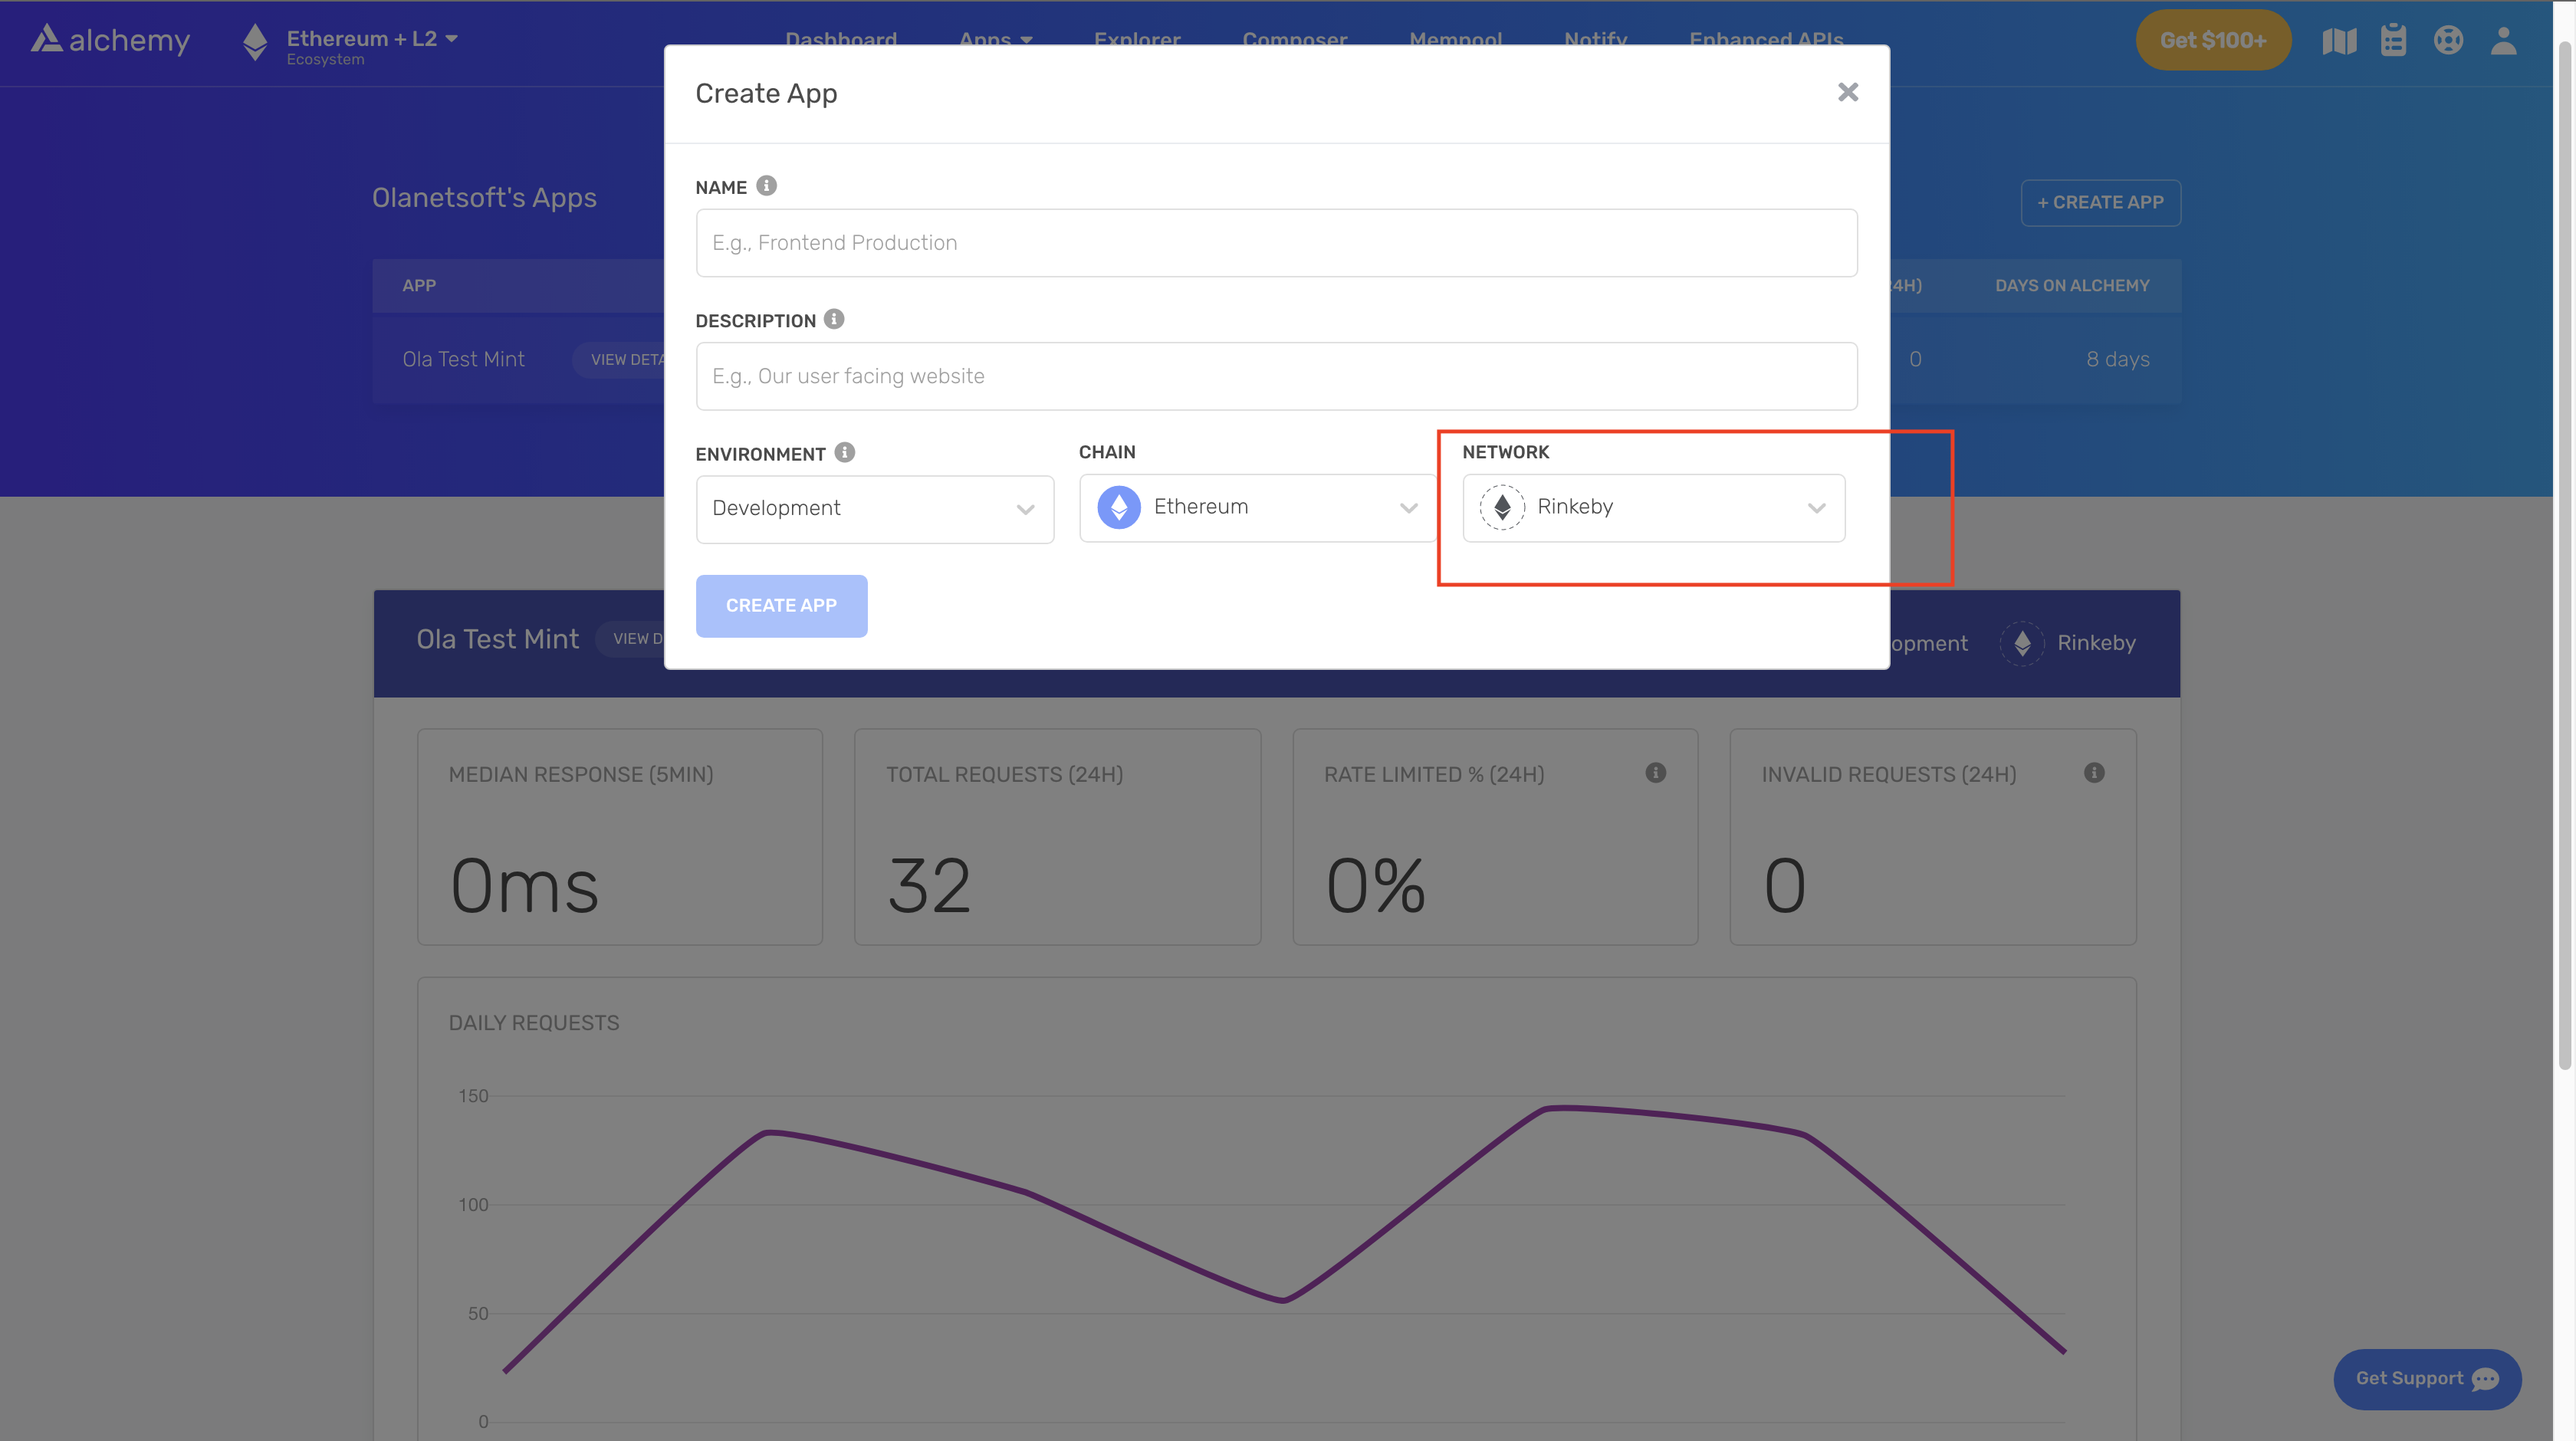
We'll need to sign up for an Alchemy account before we can deploy to the blockchain.
Alchemy basically allows us to broadcast our contract creation transaction so that miners can pick it up as soon as possible. The transaction is then broadcasted to the blockchain as a legitimate transaction once it has been mined. After that, everyone's copy of the blockchain is updated.
We'll create an app as shown below after signing up. Remember to change the network selection to Rinkeby because that's where we'll be deploying.
We switched it from mainnet to Rinkeby for a reason. Because it's real money, and it's not worth squandering! We'll start with a "testnet," which is a clone of "mainnet" but utilizes fictitious money so we can experiment as much as we like. However, it's crucial to note that testnets are operated by genuine miners and are designed to simulate real-world conditions.
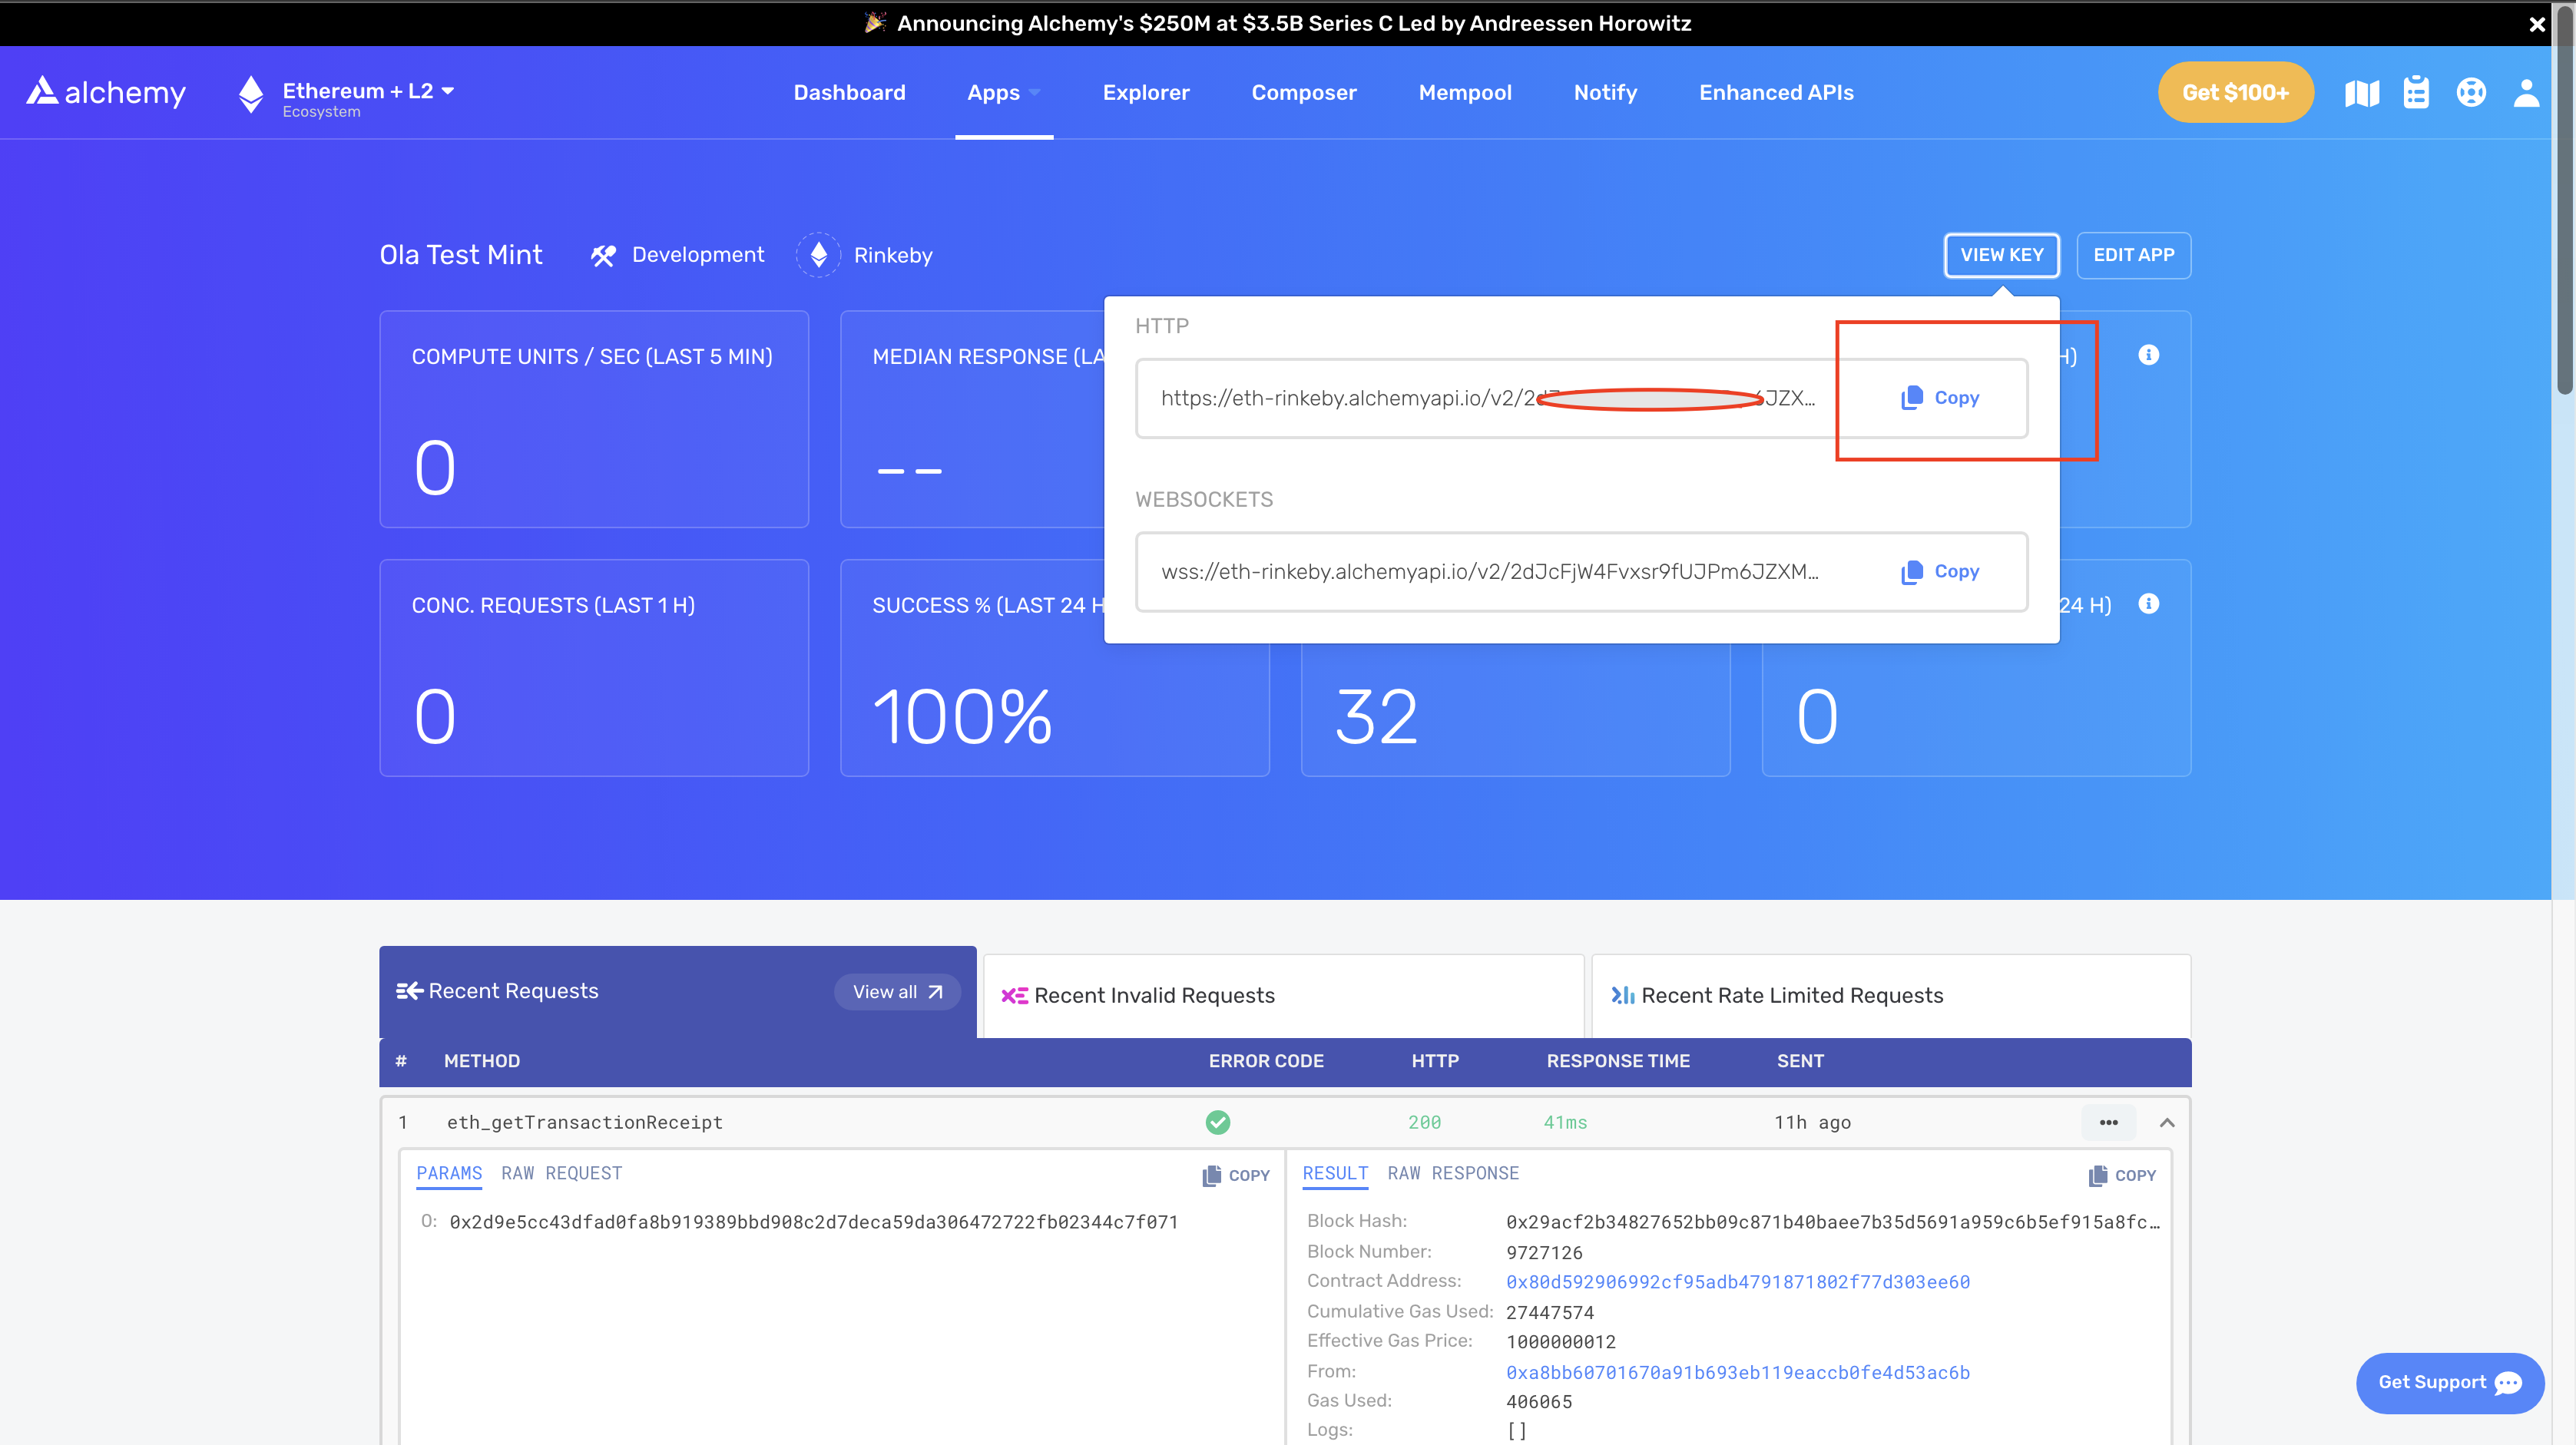
Afterward, we will need to grab our keys as shown below, and store them for later use:
We'll need some fake ETH in our testnet account, and we'll have to request some from the network. This fake ETH can only be used on this testnet. Rinkeby can get some phony ETH by using a faucet.
| Name | Link | Amount | Time |
| MyCrypto | https://app.mycrypto.com/faucet | 0.01 | None |
| Buildspace | https://buildspace-faucet.vercel.app/ | 0.025 | 1d |
| Ethily | https://ethily.io/rinkeby-faucet/ | 0.2 | 1w |
| Official Rinkeby | https://faucet.rinkeby.io/ | 3 / 7.5 / 18.75 | 8h / 1d / 3d |
Table by Buildspace
Our hardhat.config.js file needs to be updated. This can be found in the smart contract project's root directory.
require("@nomiclabs/hardhat-waffle");
require("dotenv").config();

// This is a sample Hardhat task. To learn how to create your own go to
// https://hardhat.org/guides/create-task.html
task("accounts", "Prints the list of accounts", async (taskArgs, hre) => {
  const accounts = await hre.ethers.getSigners();

  for (const account of accounts) {
    console.log(account.address);
  }
});

// You need to export an object to set up your config
// Go to https://hardhat.org/config/ to learn more

/**
 * @type import('hardhat/config').HardhatUserConfig
 */
module.exports = {
  solidity: "0.8.4",
  networks: {
    rinkeby: {
      url: process.env.STAGING_ALCHEMY_KEY,
      accounts: [process.env.PRIVATE_KEY],
    },
  },
};
If we look at the code snippet above, we can see that some keys were read from the .env file, as well as the import at the top of require("dotenv").config(), which implies we'll need to install the dotenv package and also create a .env file using the command below:
npm install -D dotenv

touch .env
Inside the .env file, add the following keys:
STAGING_ALCHEMY_KEY= // Add the key we copied from the Alchemy dashboard here
PRIVATE_KEY= // Add your account private key here
To get our account private key is easy, check out this post.
Now we can run the command to deploy our contract to a real blockchain network
npx hardhat run scripts/deploy.js --network rinkeby
Here's what our output should look like:

Yay 🥳 we just deployed our contract.
Set up Frontend React Client
It's time to get our website up and running! Our smart contract is completed, but we need to figure out how our front end can interact with it as soon as possible!
To create a new project, we use the npx create-next-app -e with-tailwindcss command to scaffold a new project in a directory of our choice.
This command creates a Next.js project with TailwindCSS set up. TailwindCSS is a utility-first CSS framework packed with classes to help us style our web page.
To install the dependencies, we use the commands:
cd <project name>
npm install ethers react-toastify
Once the app is created and the dependencies are installed, we will see a message with instructions for navigating to our site and running it locally. We do this with the command.
npm run dev
Next.js will start a hot-reloading development environment accessible by default at http://localhost:3000
We need to connect our wallet to the blockchain in order for our website to communicate with it. Our website will have permission to call smart contracts on our behalf after we connect our wallet to our website. Remember, it's the same as logging into a website.
All of our work will be done in index.js, which can be found under pages.
We need to import abi and update our contractAddress in the code sample above. Let's start by creating a folder named utils, then using the following command to create a file called CoffeePortal.json inside the utils folder.
mkdir utils
touch CoffeePortal.json
Following that, we'll need our contract address as well as the content that will be updated in the CoffeePortal.json file. What's the best way to get it?
Let's go back to the smart contract project we worked on before, then navigate to artifacts/contracts/coffeePortal.json and copy the entire content inside it, as well as our contract address, which was displayed in our terminal when we deployed our contract to the blockchain.
We will update the CoffeePortal.json file with what we copied and also update index.js as shown below:
// ...

import Head from "next/head";

// Import abi
import abi from "../utils/CoffeePortal.json";

export default function Home() {
  /**
   * Create a variable here that holds the contract address after you deploy!
   */
  const contractAddress = "";  // Add contract address here

   // ...
  return (
    <div className="flex flex-col items-center justify-center min-h-screen py-2">
      [...]
    </div>
  );
}
Its time to test our app, we should have something similar to what we have below when we visit http://localhost:3000
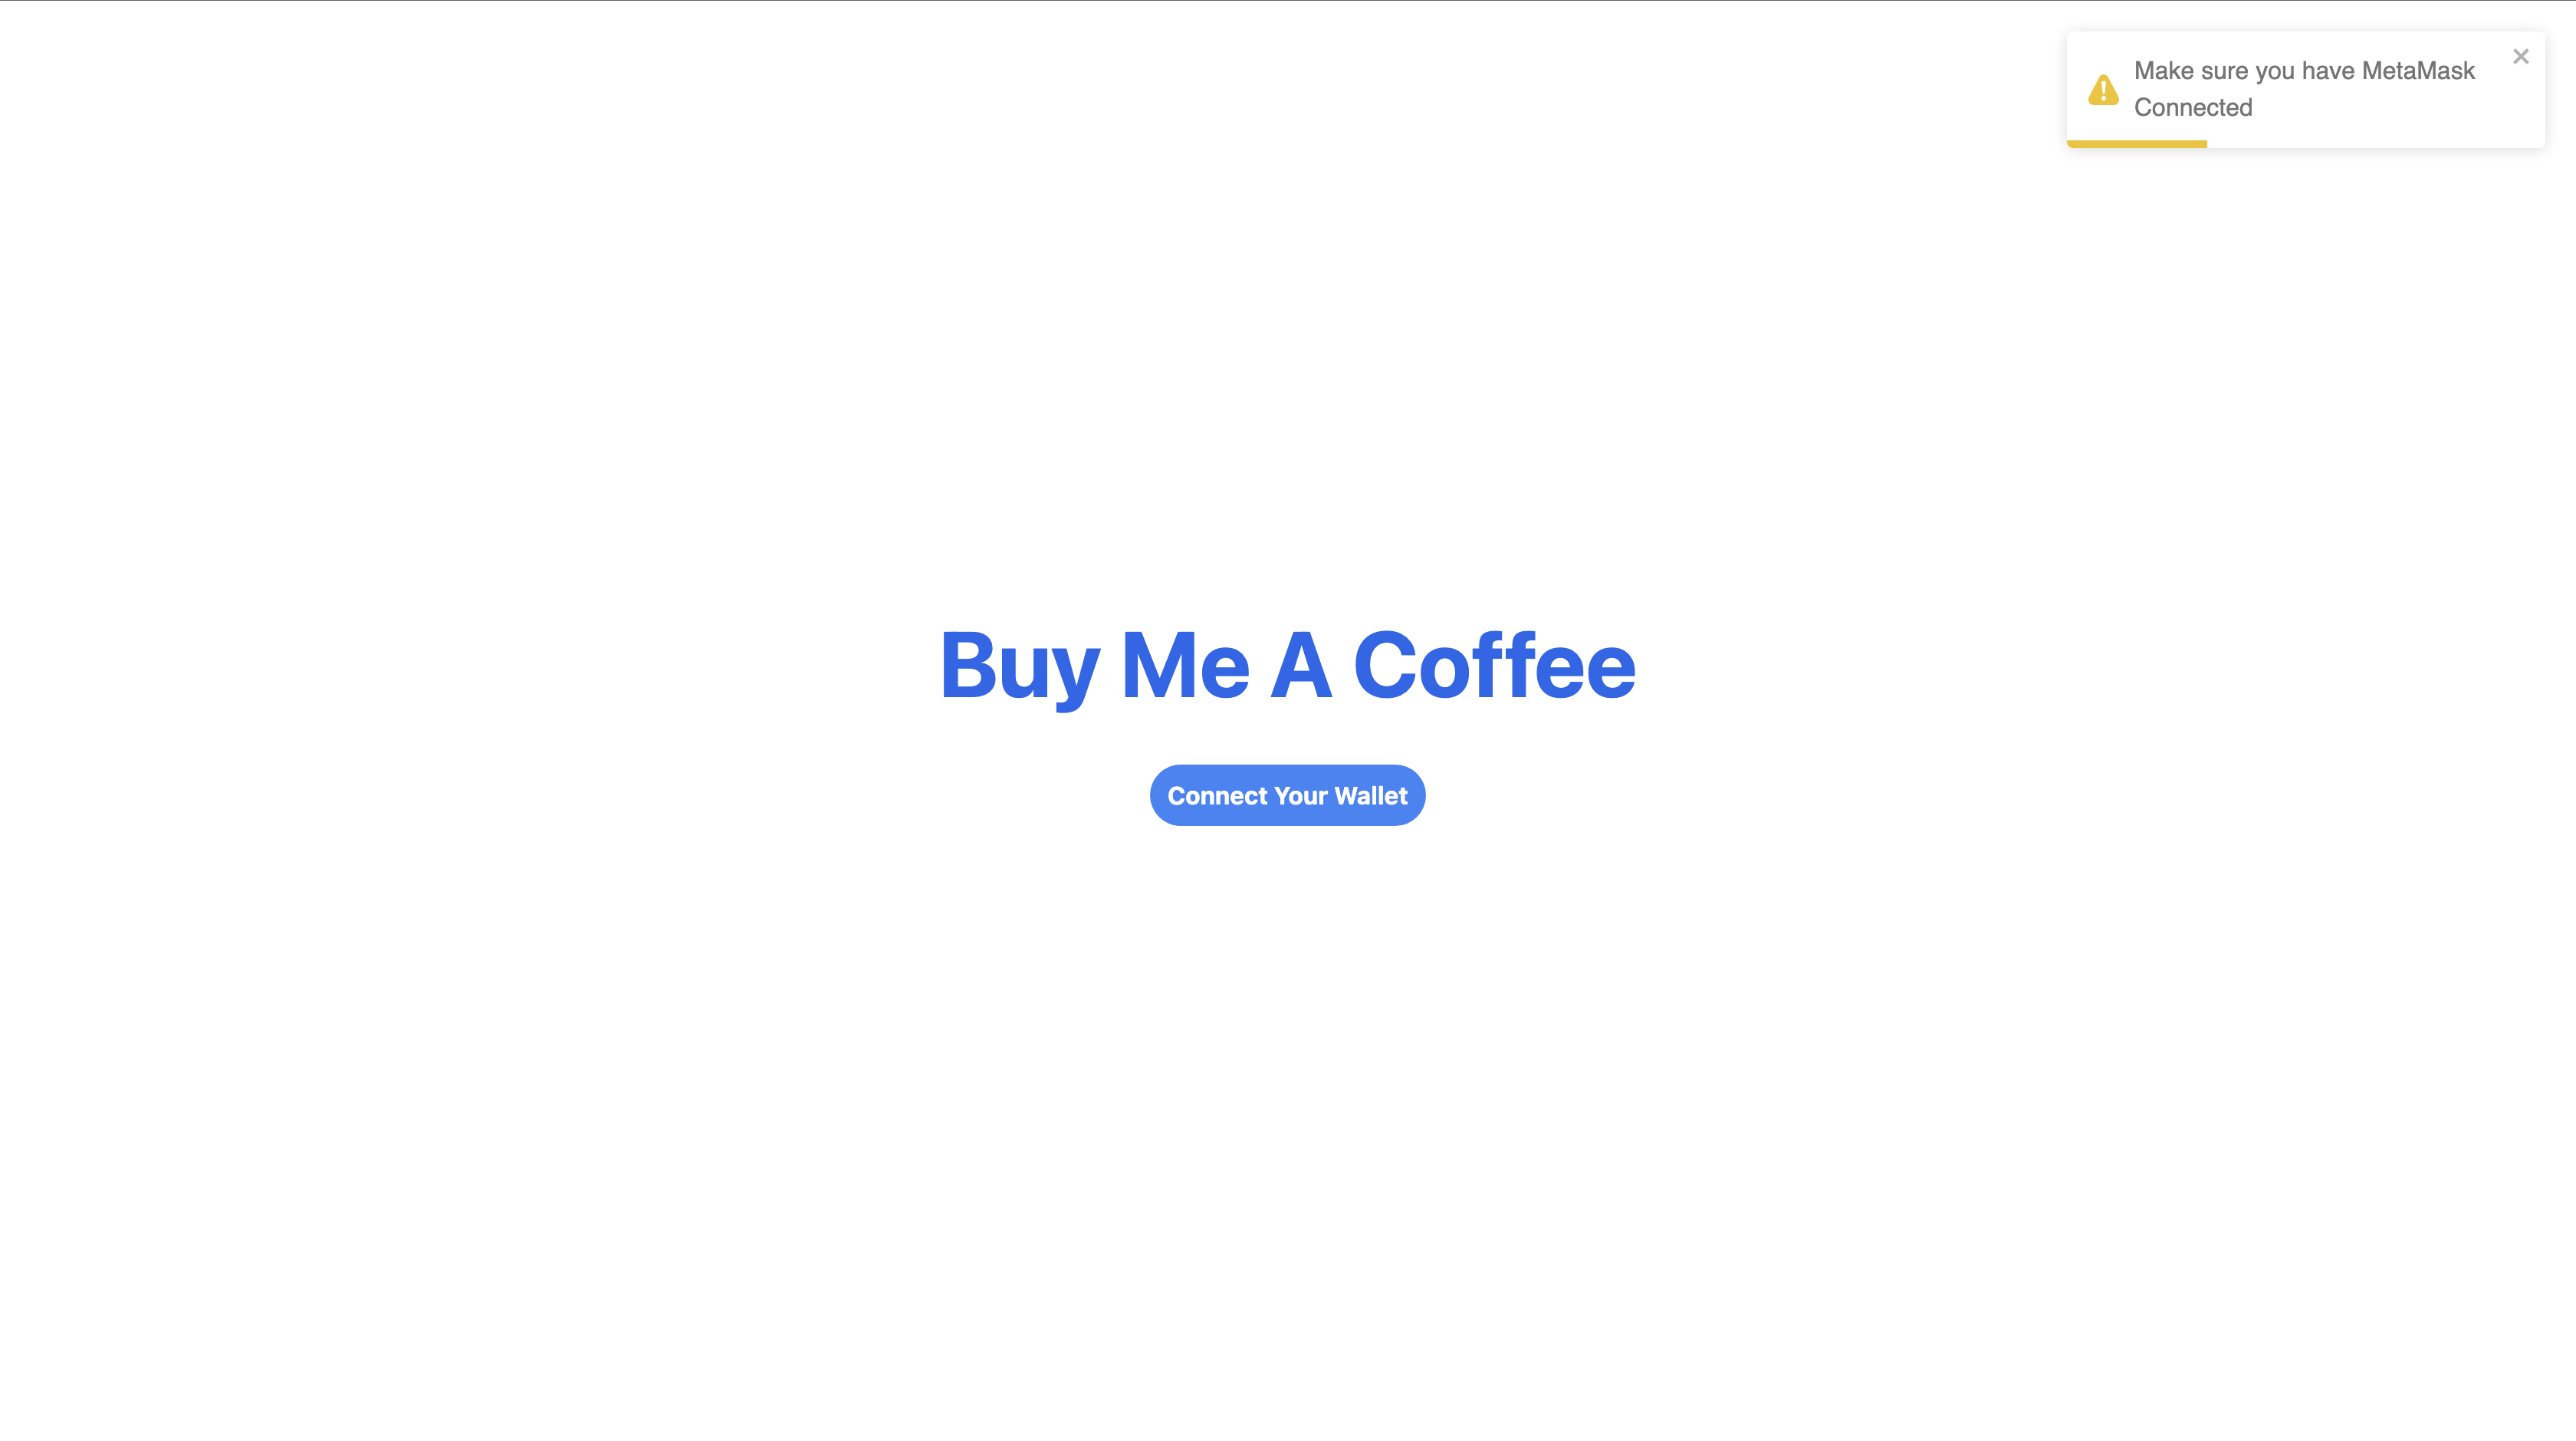
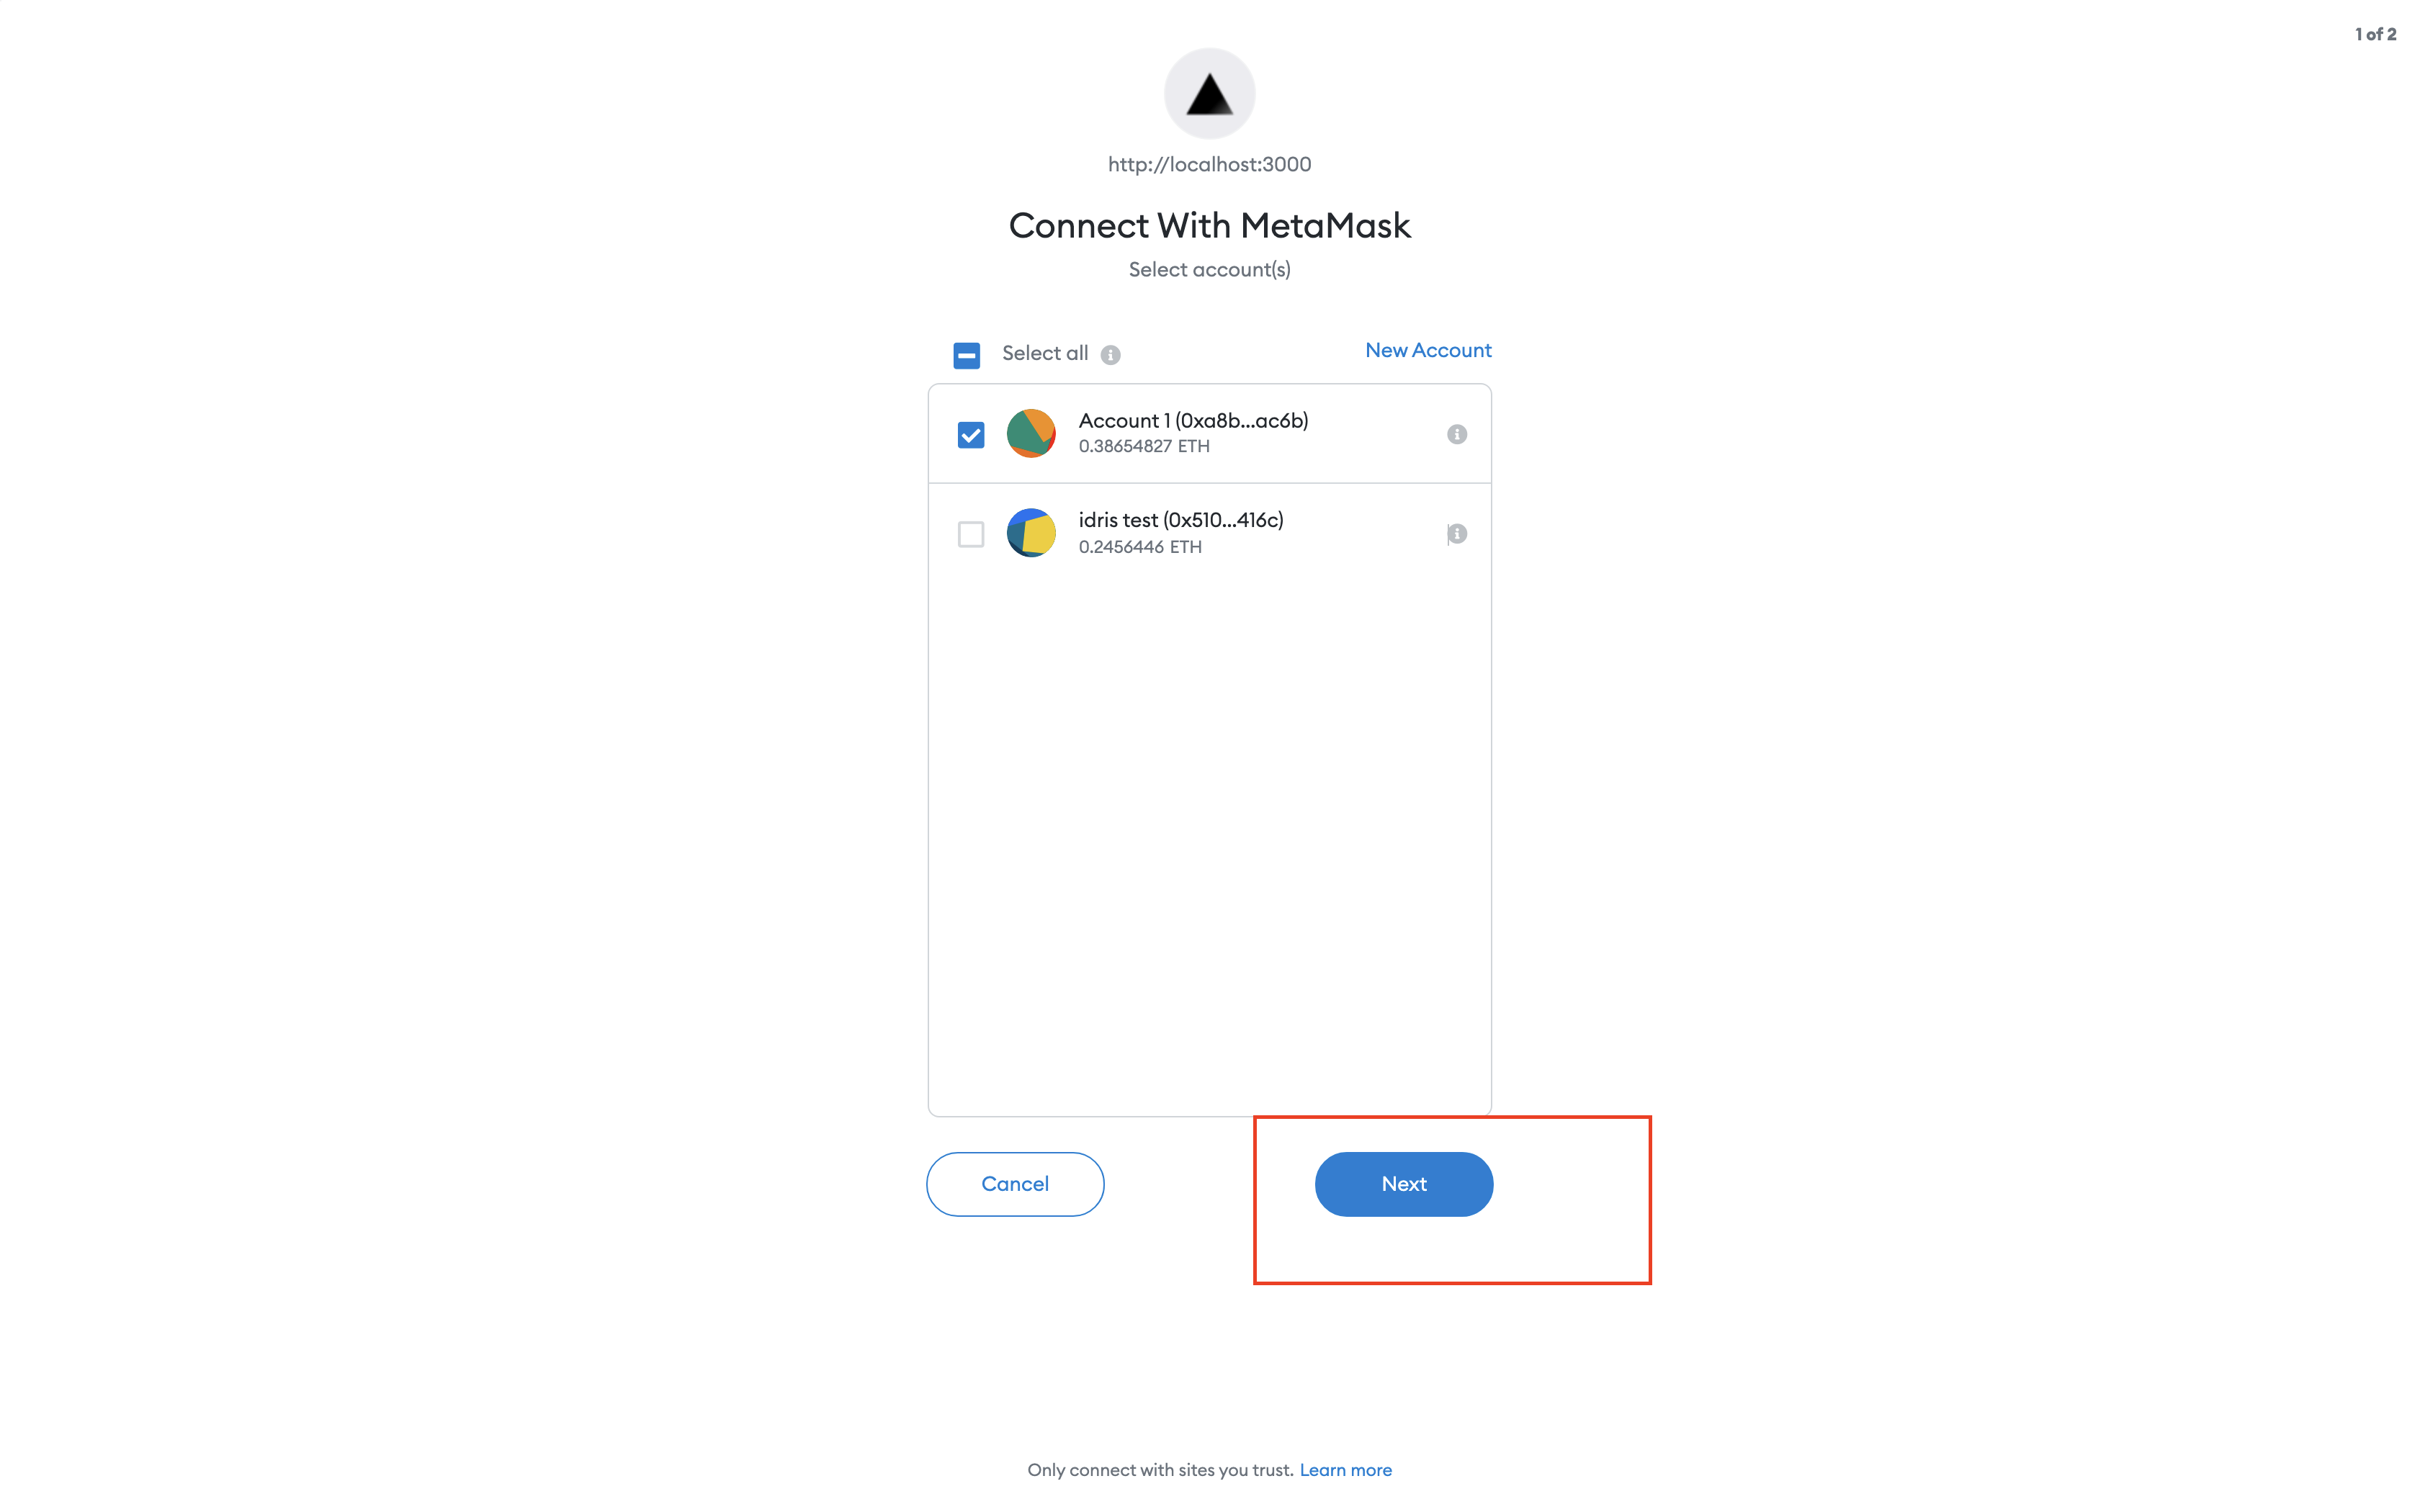
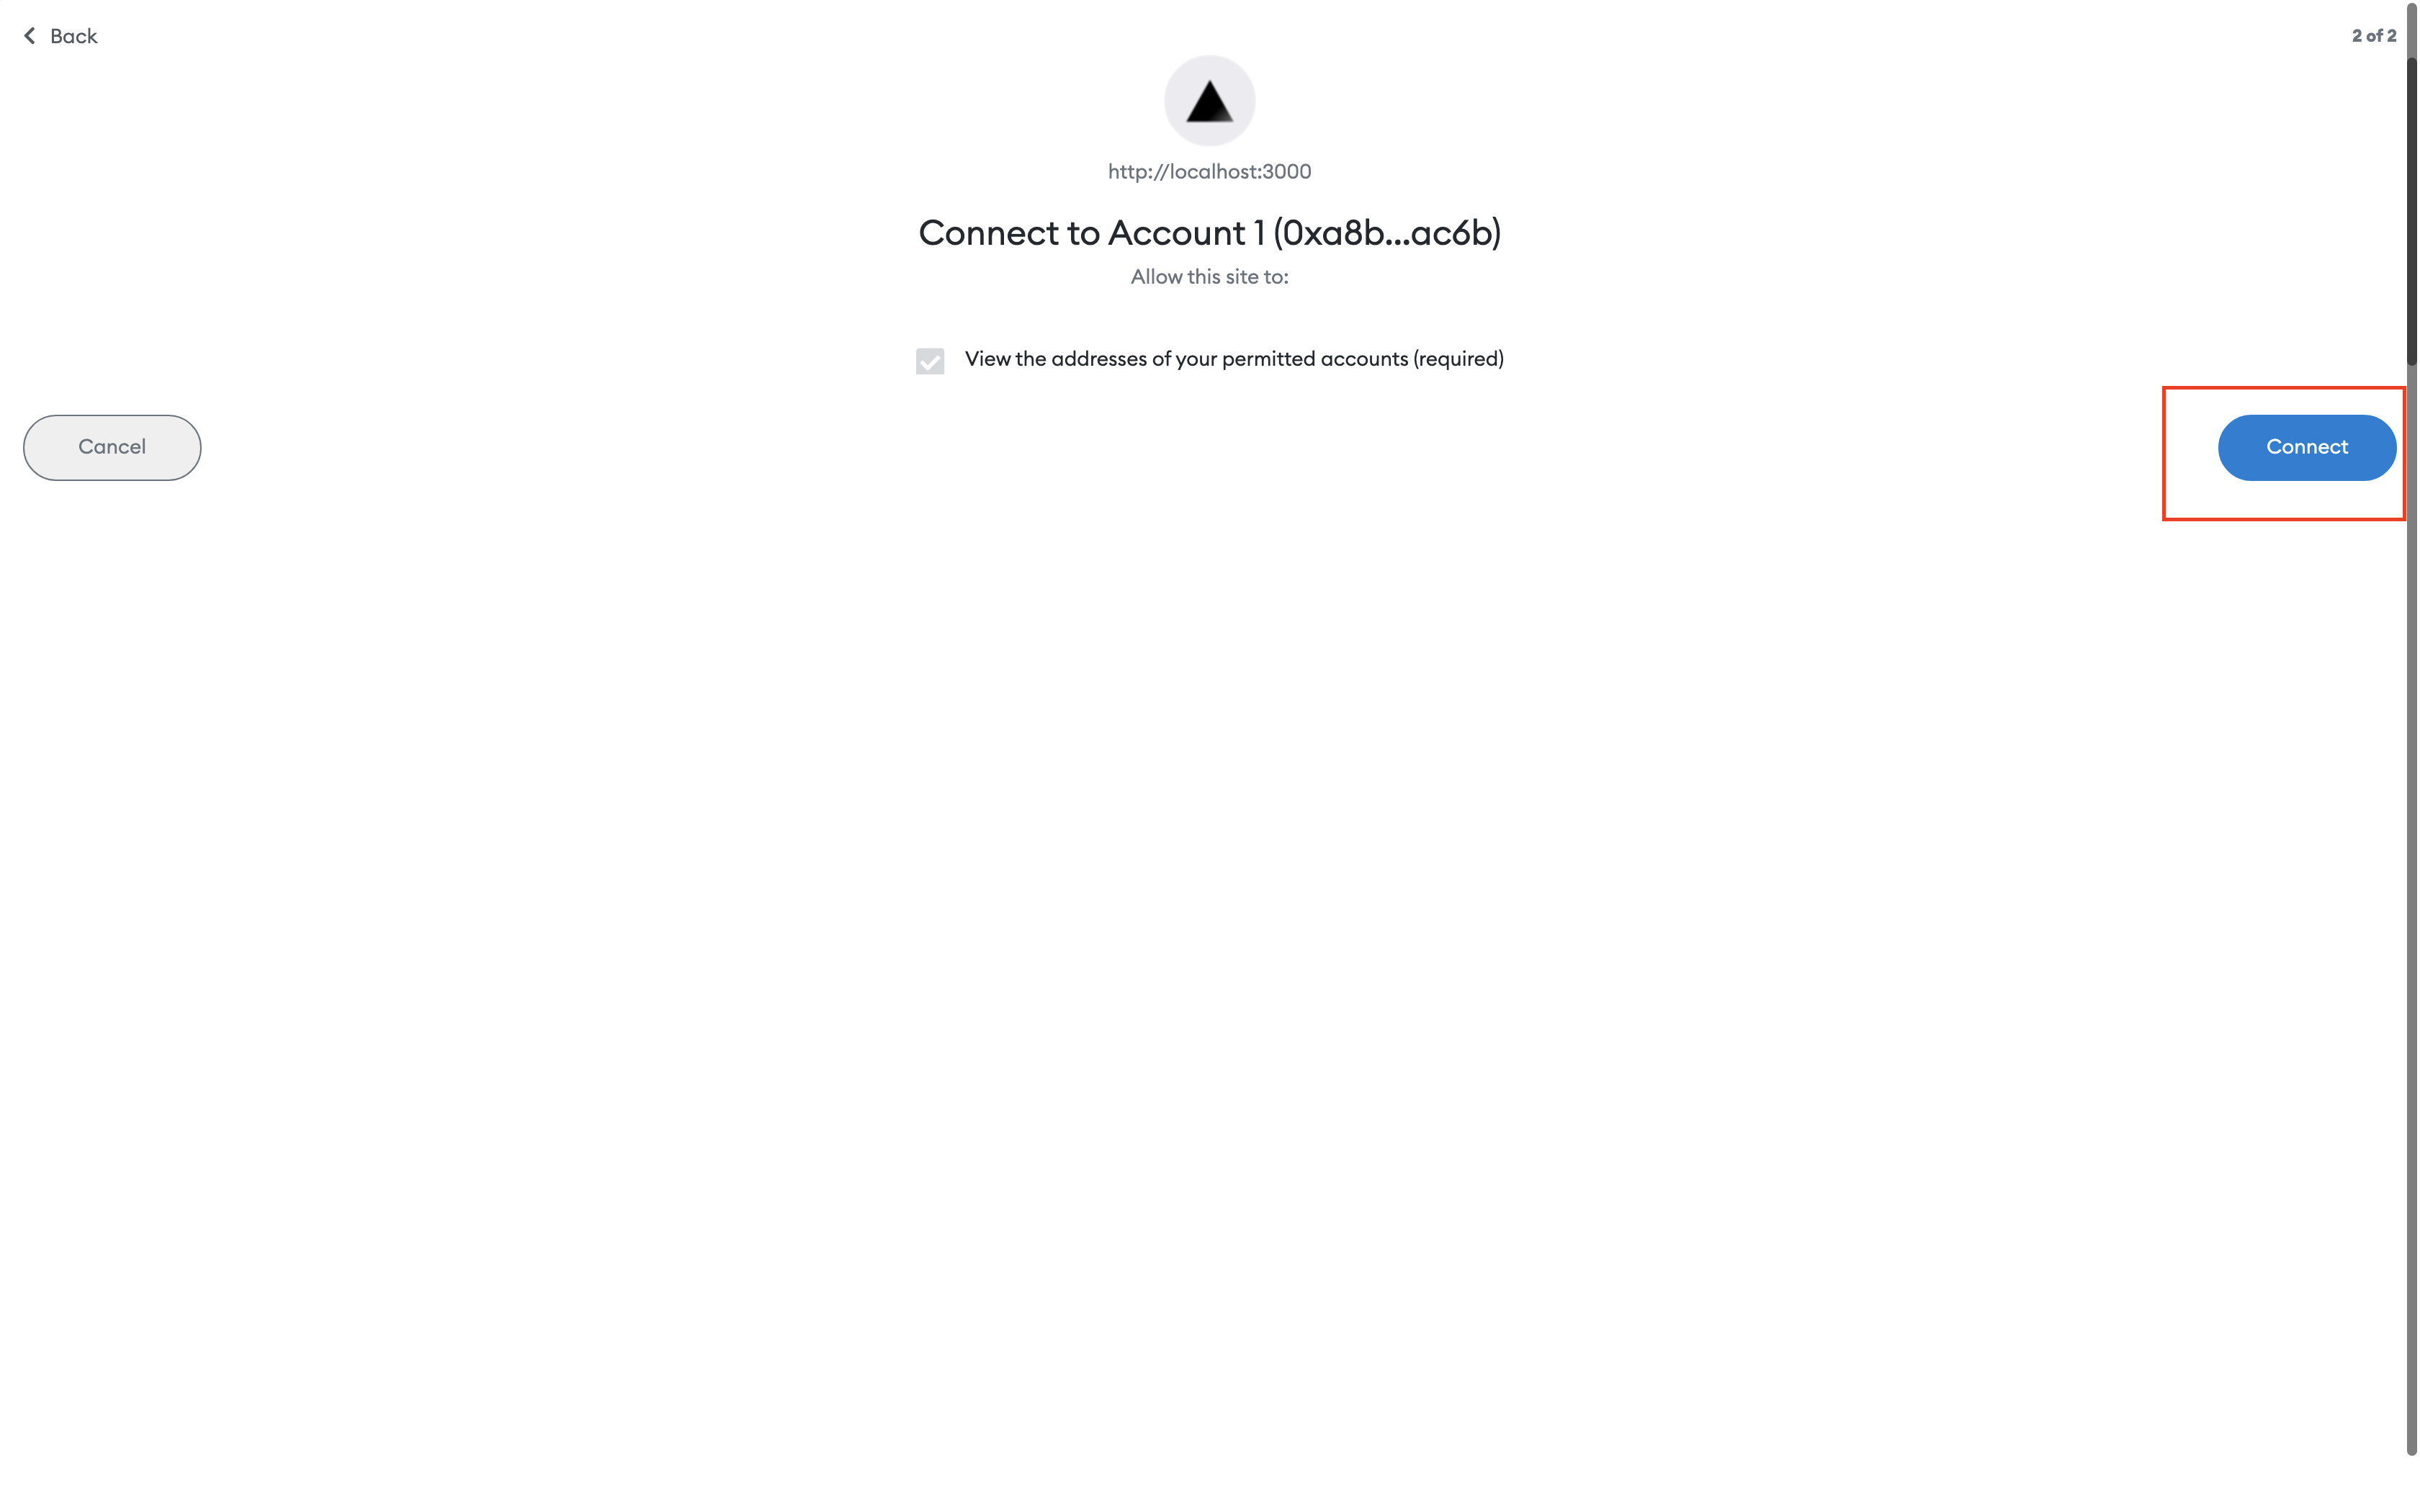
Next, clicking connect wallet button should redirect us to the MetaMask UI where we will grant the site access as shown below:
Then our UI should look similar to what is shown below:
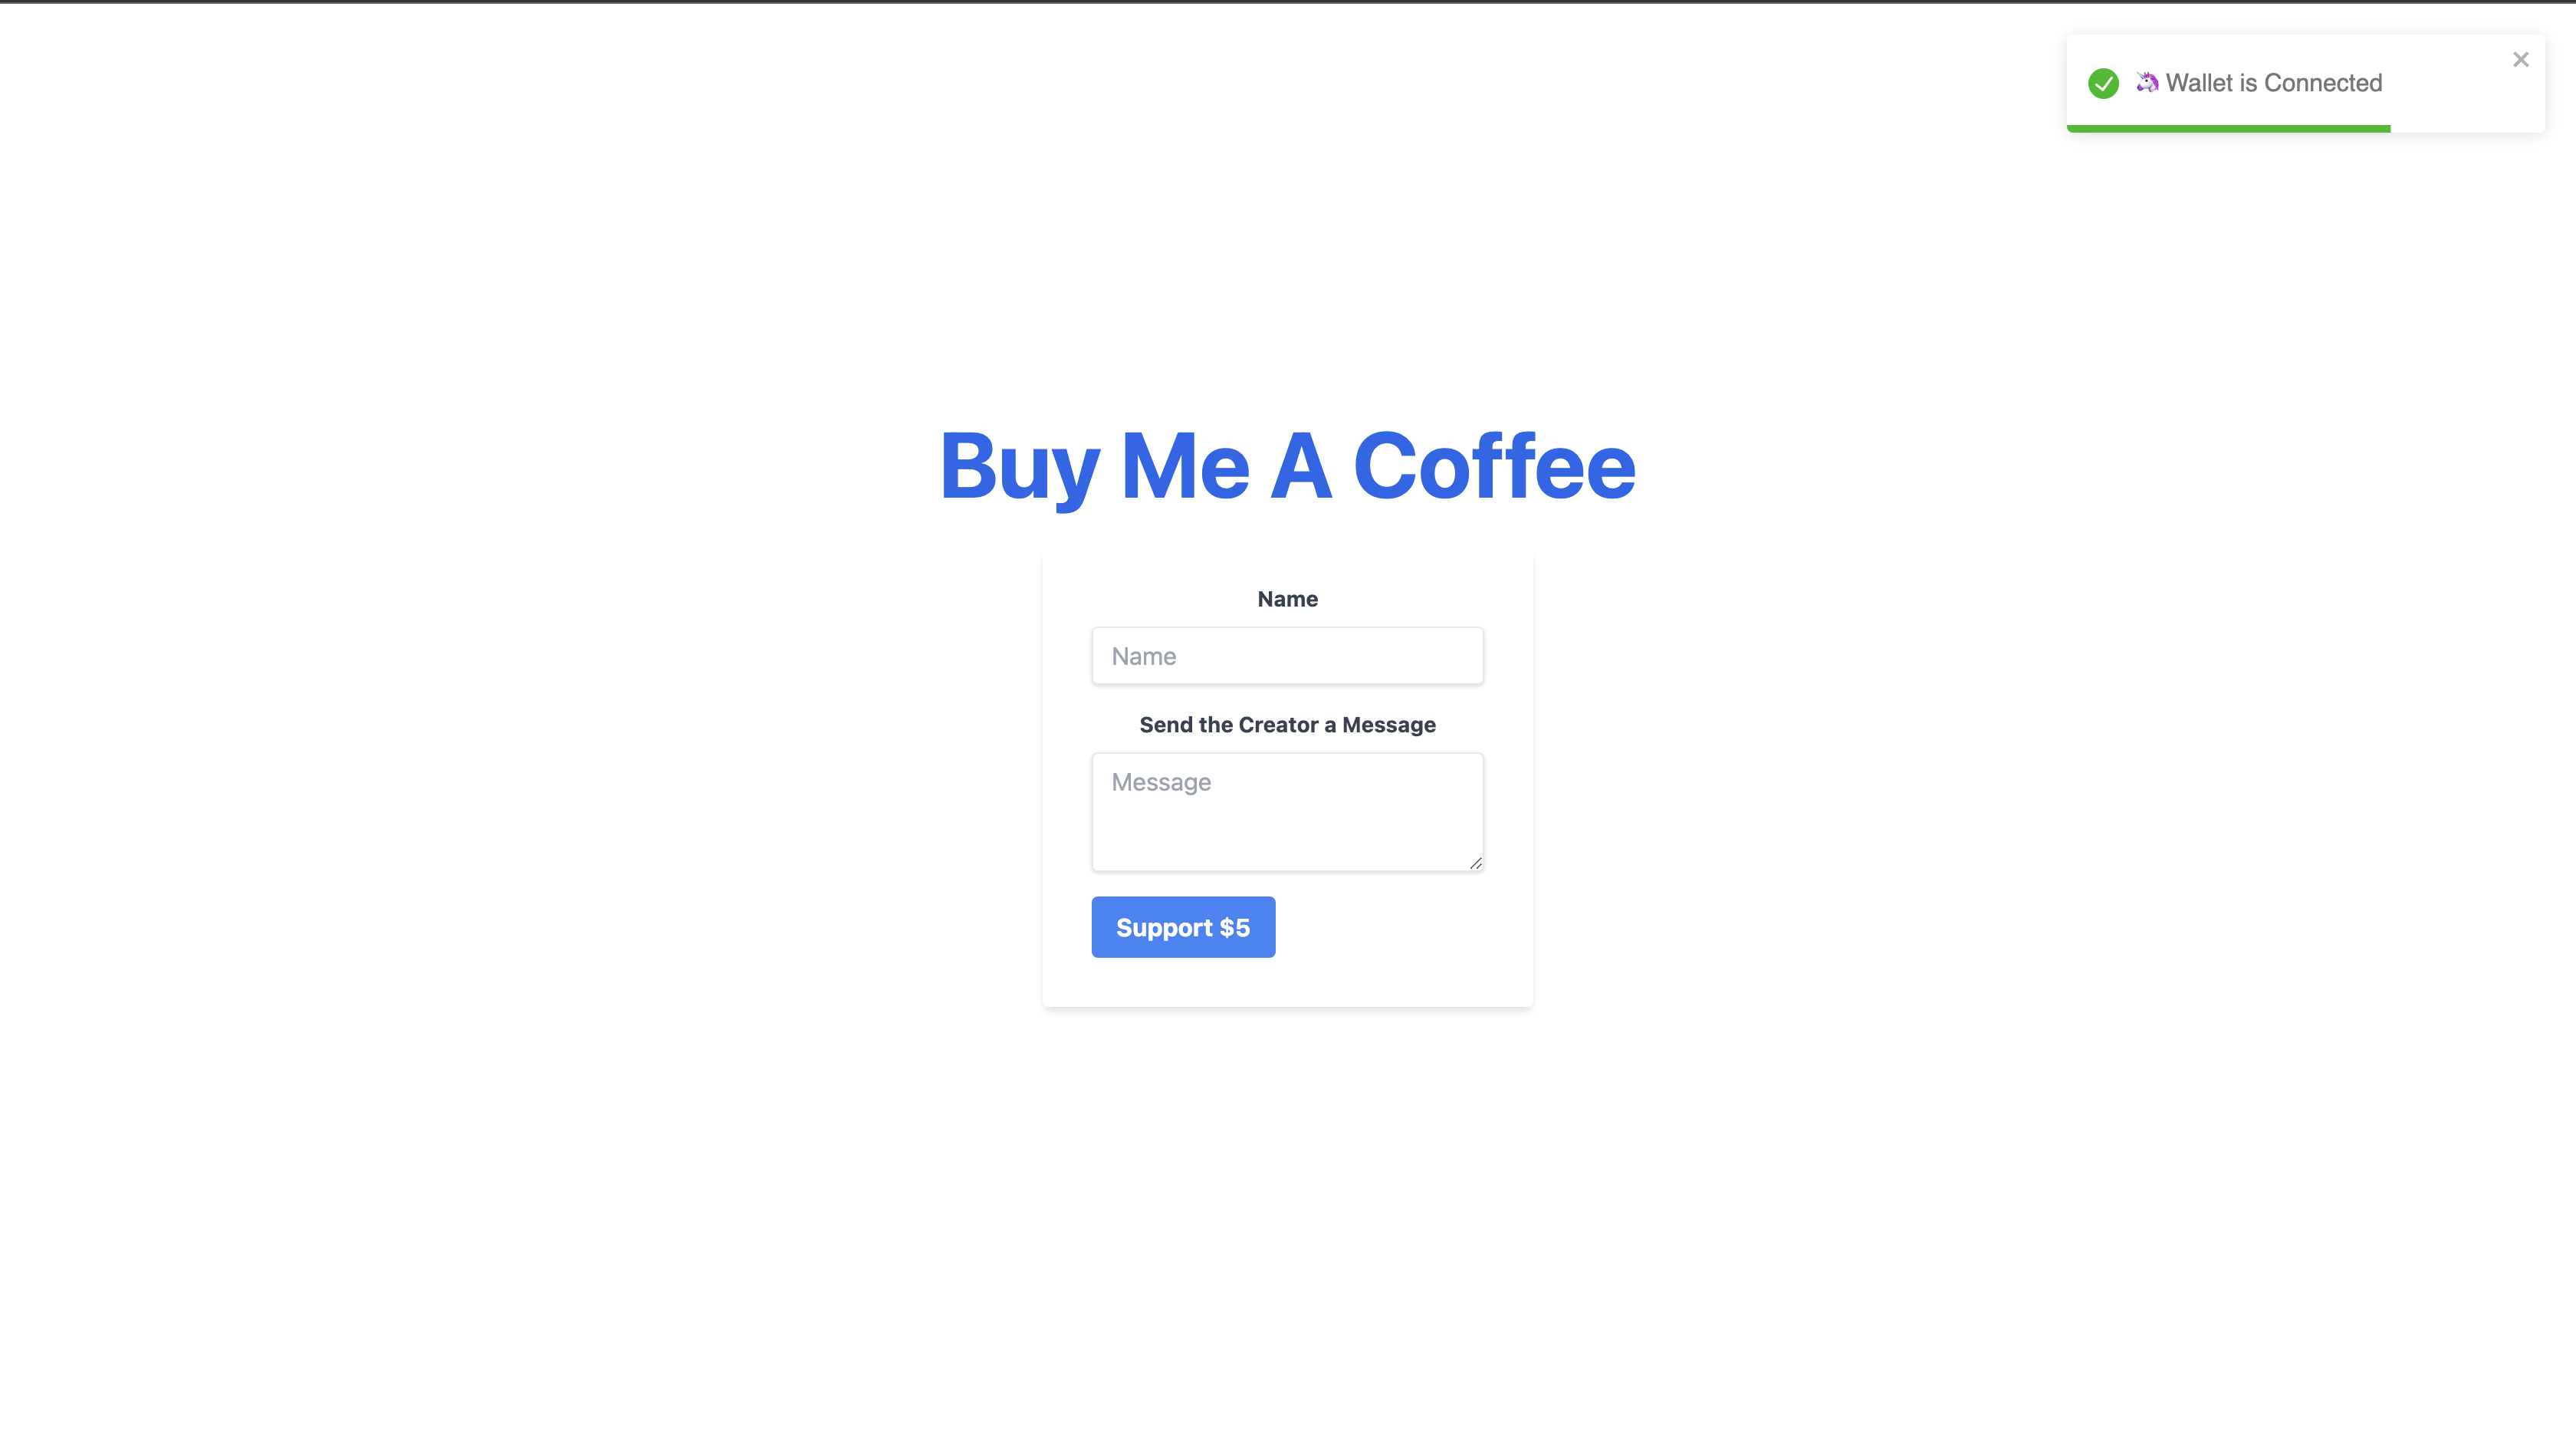
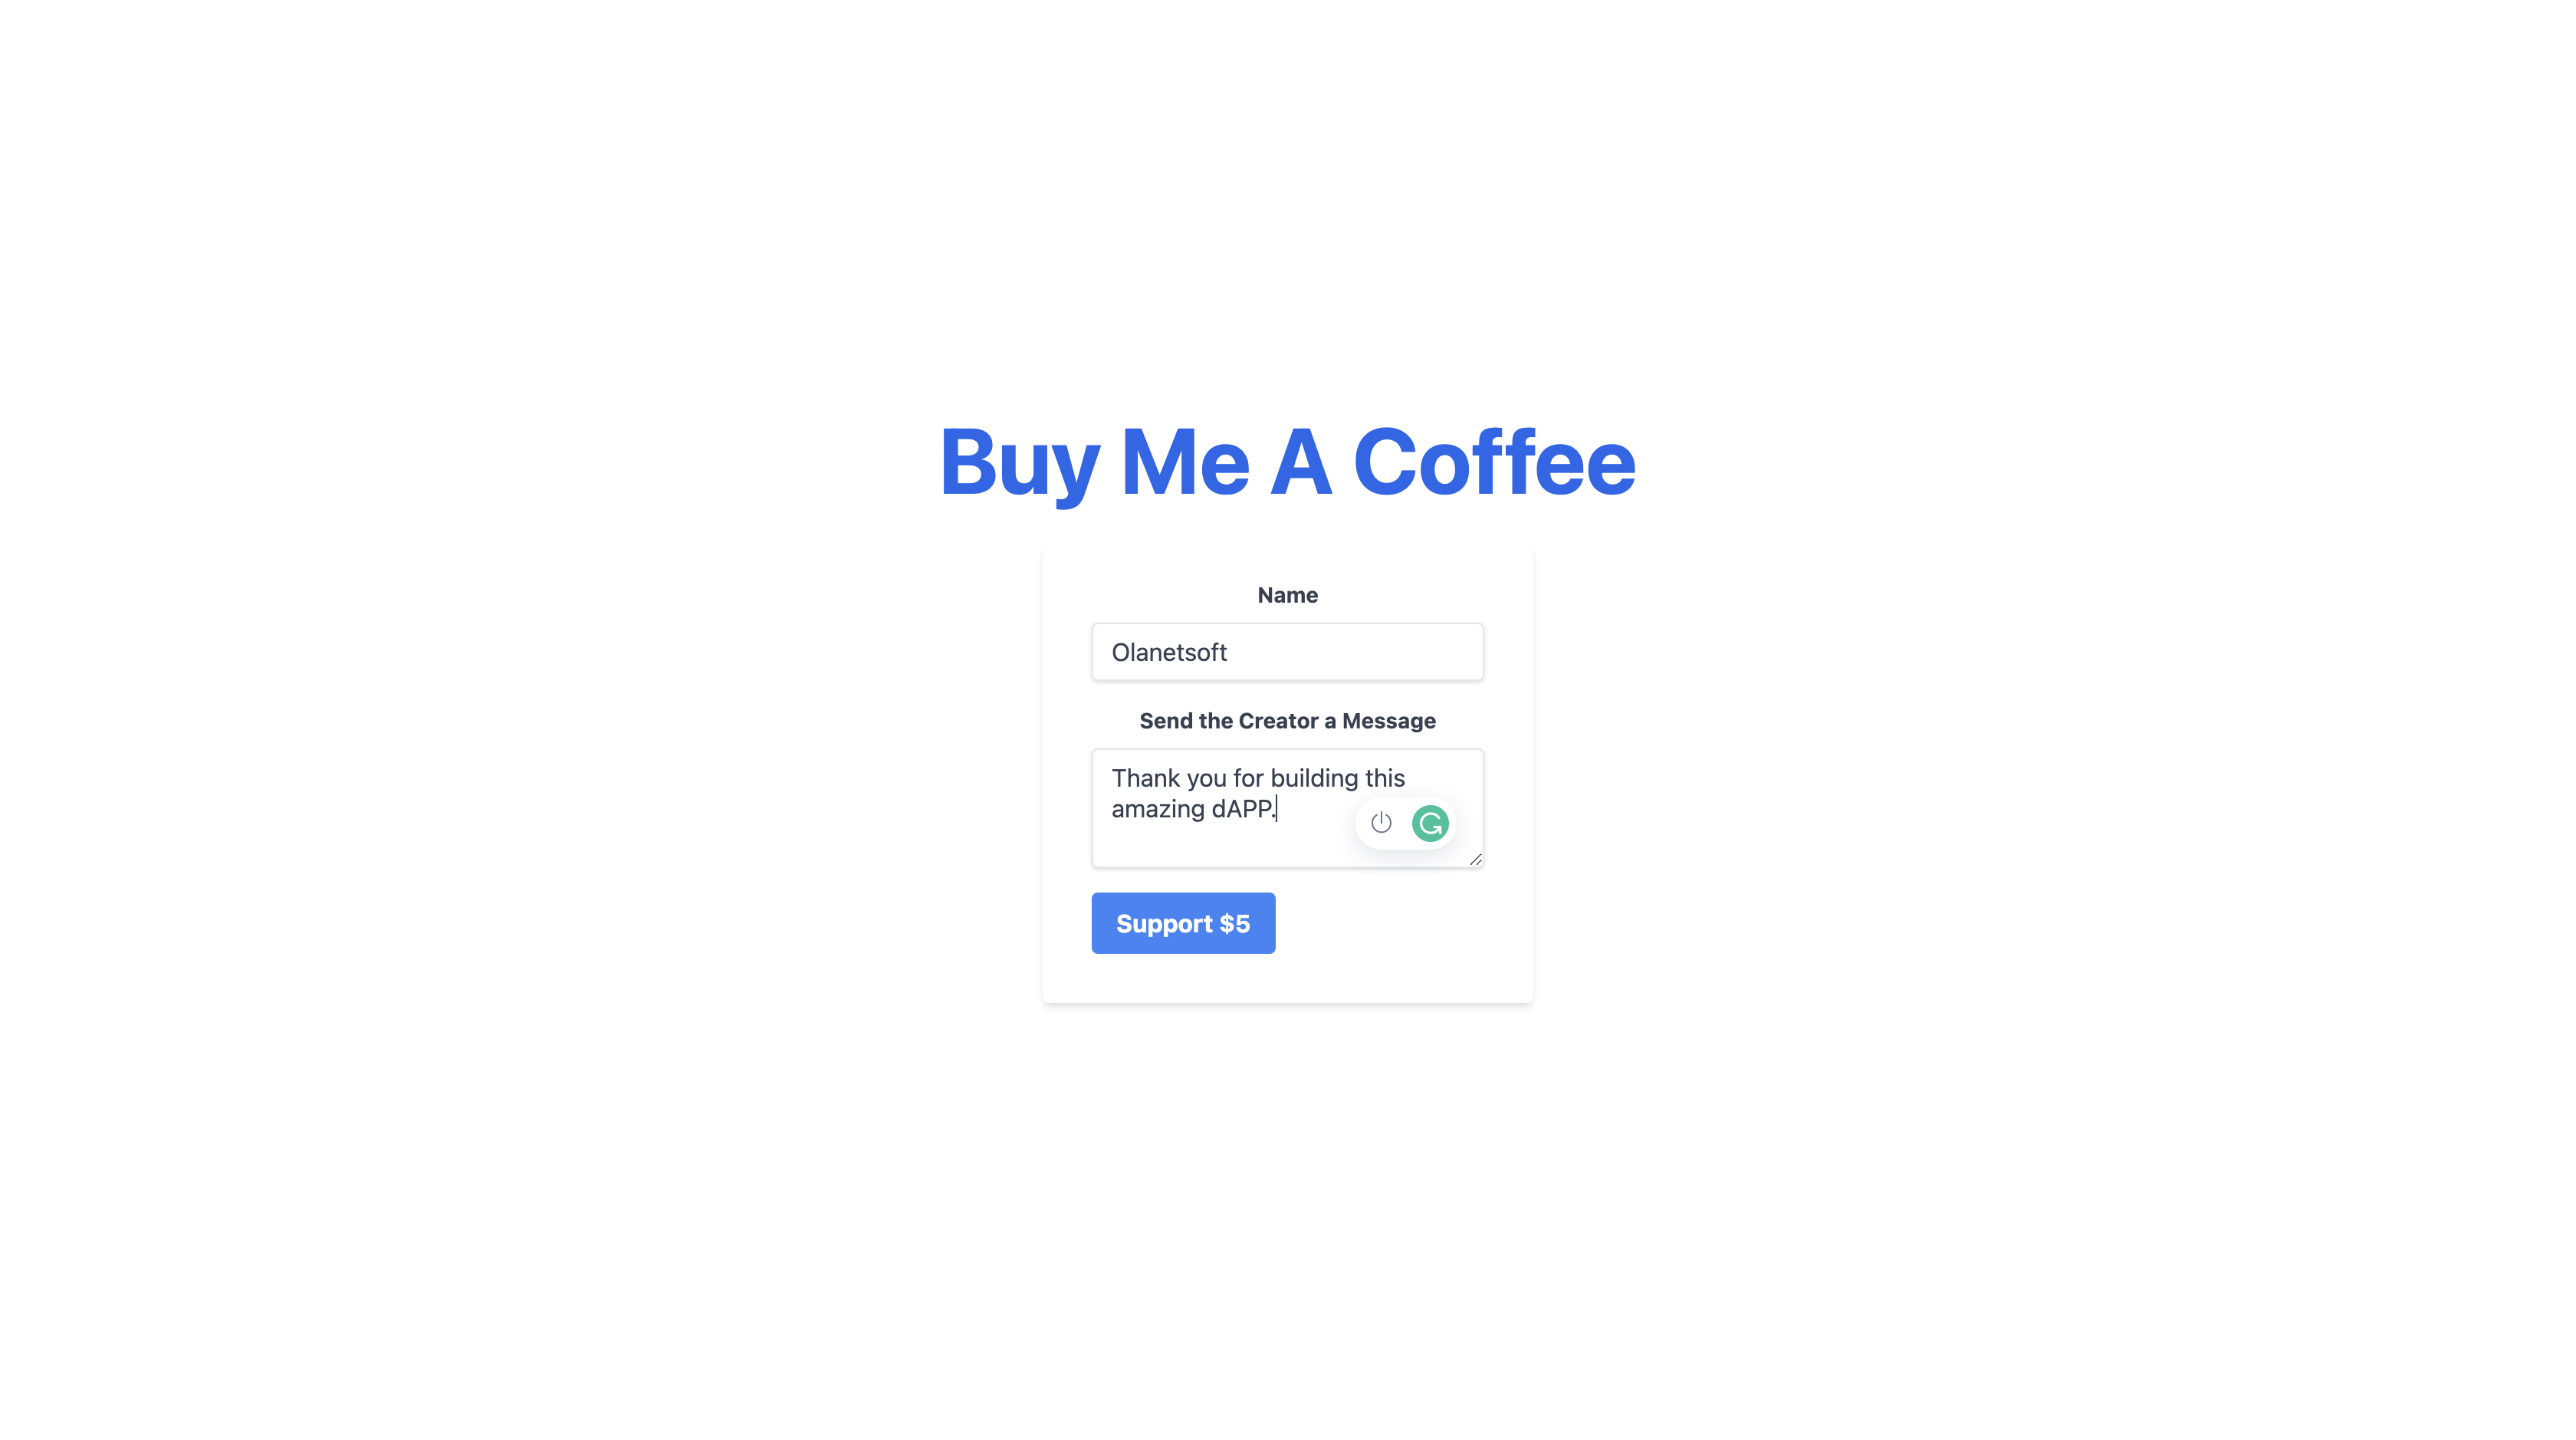
We can now support, by buying a coffee worth $5 and also providing our name and any preferred message to the owner 😊
Next,
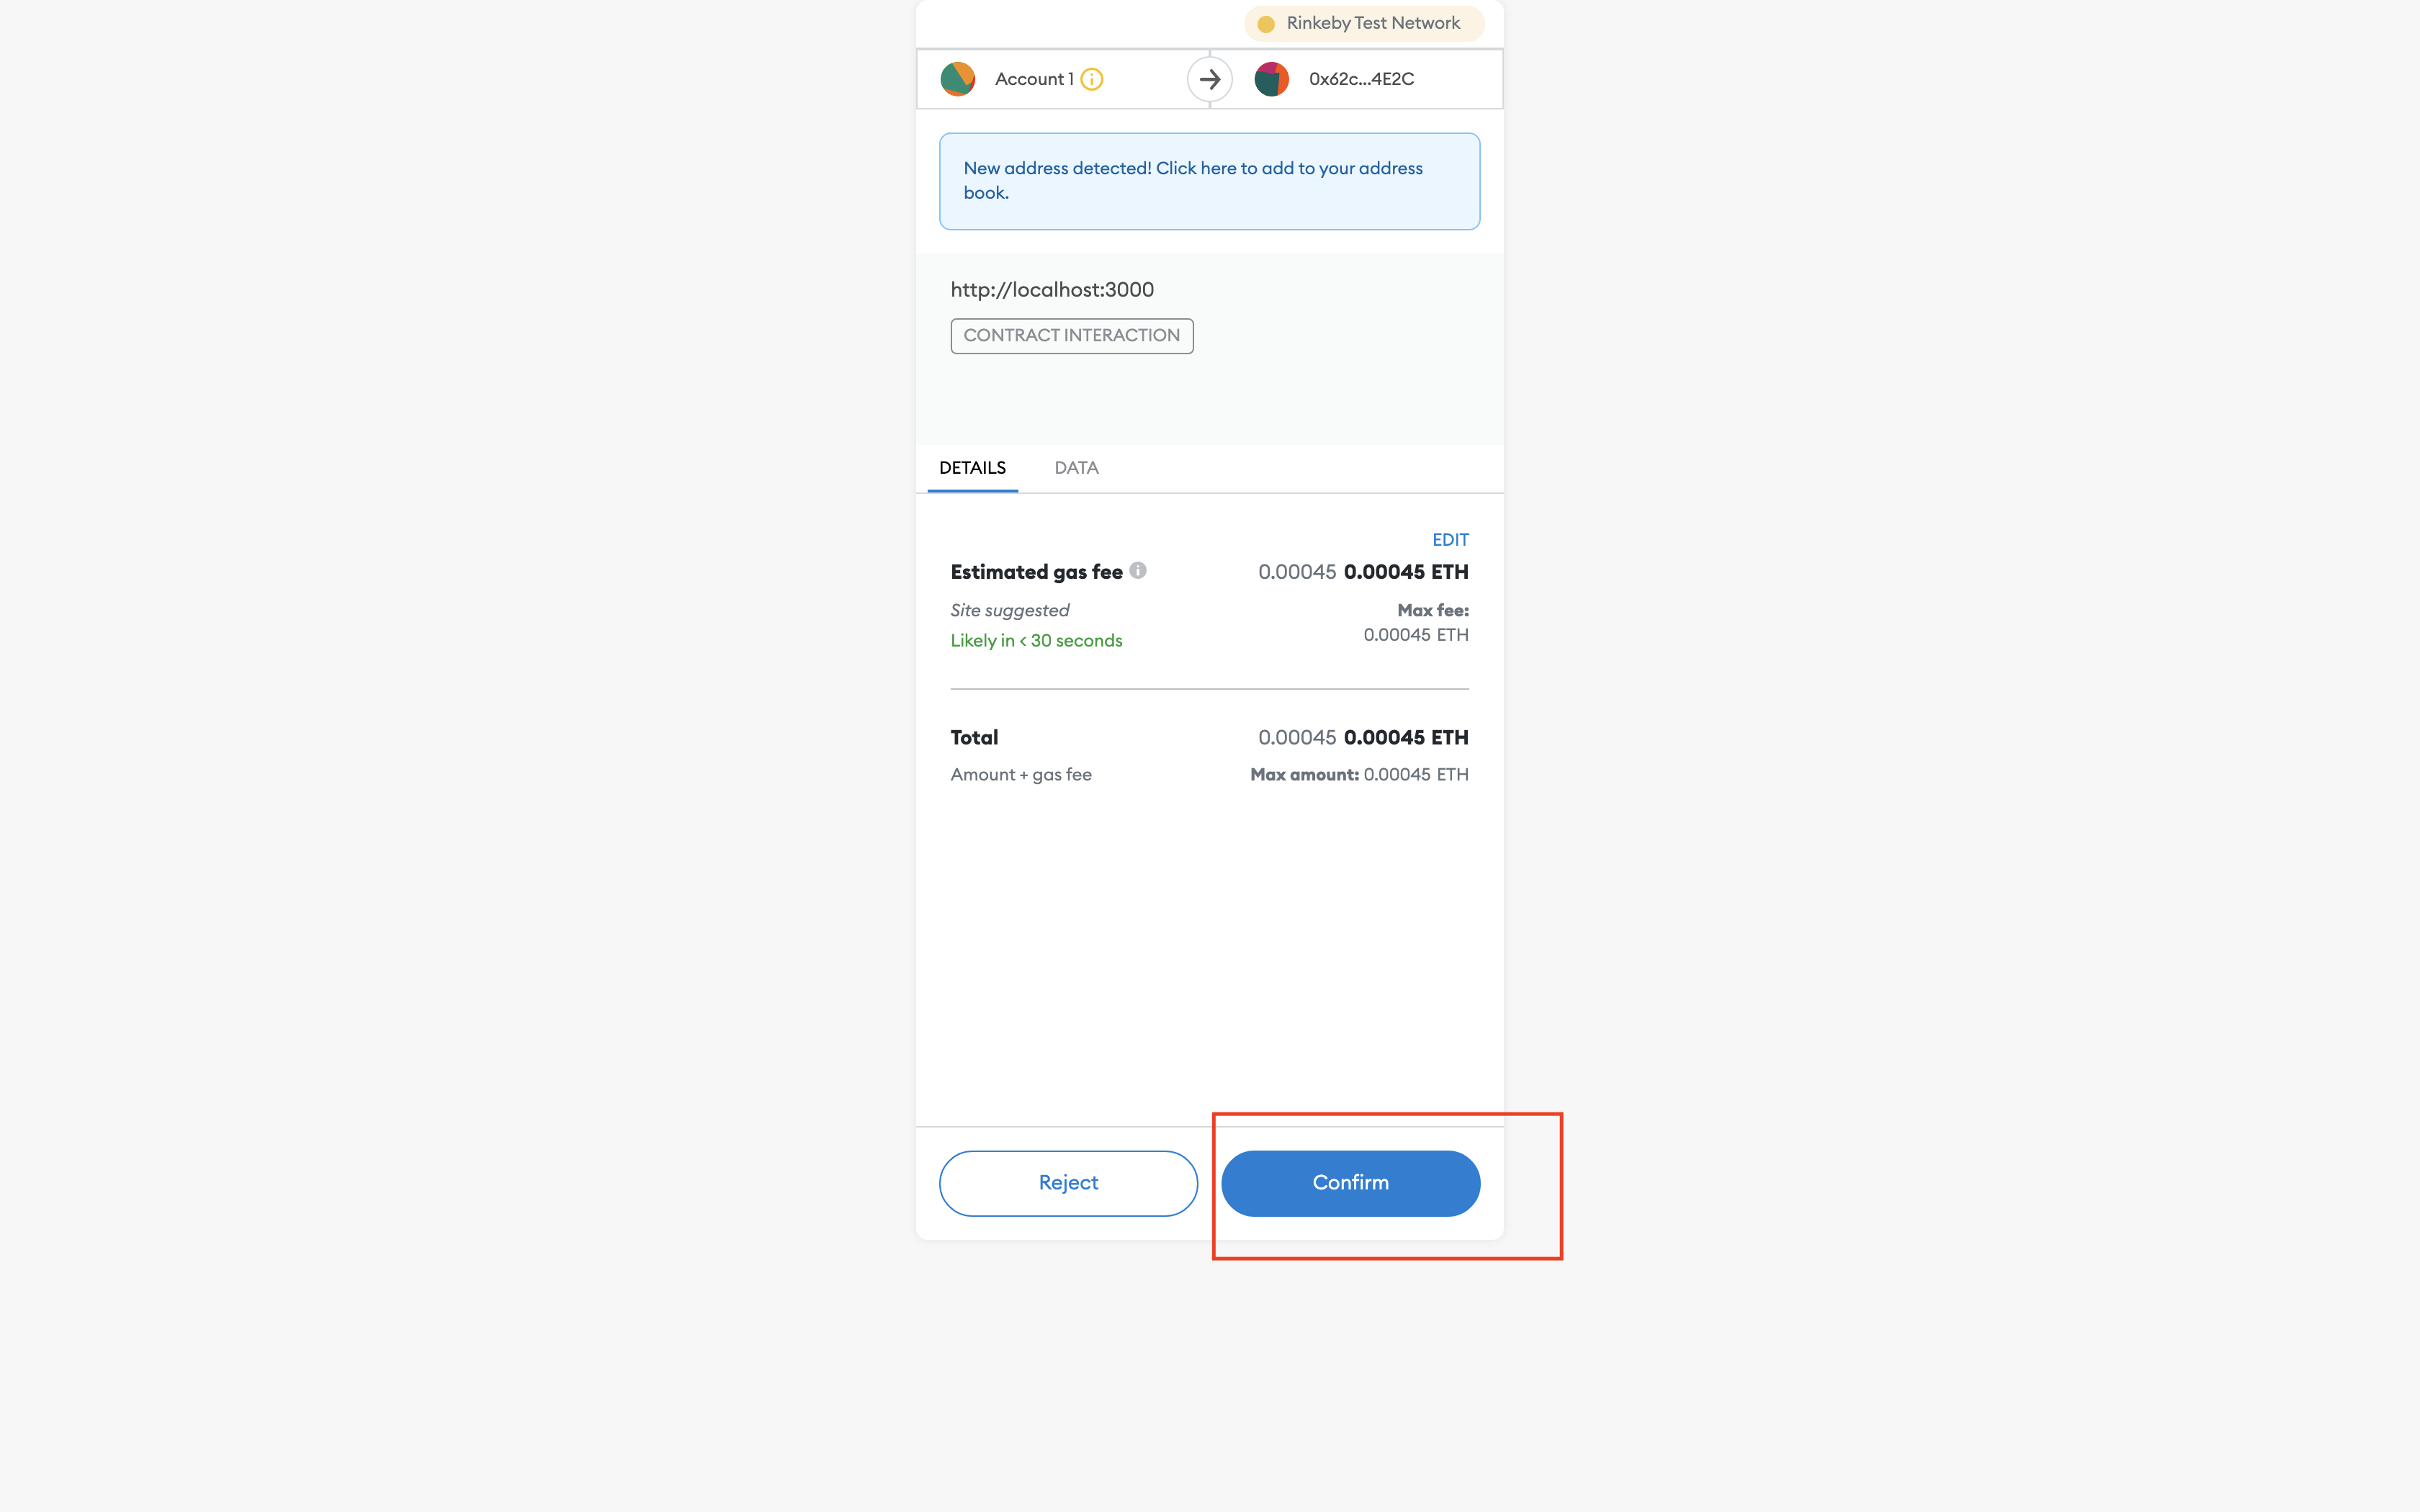
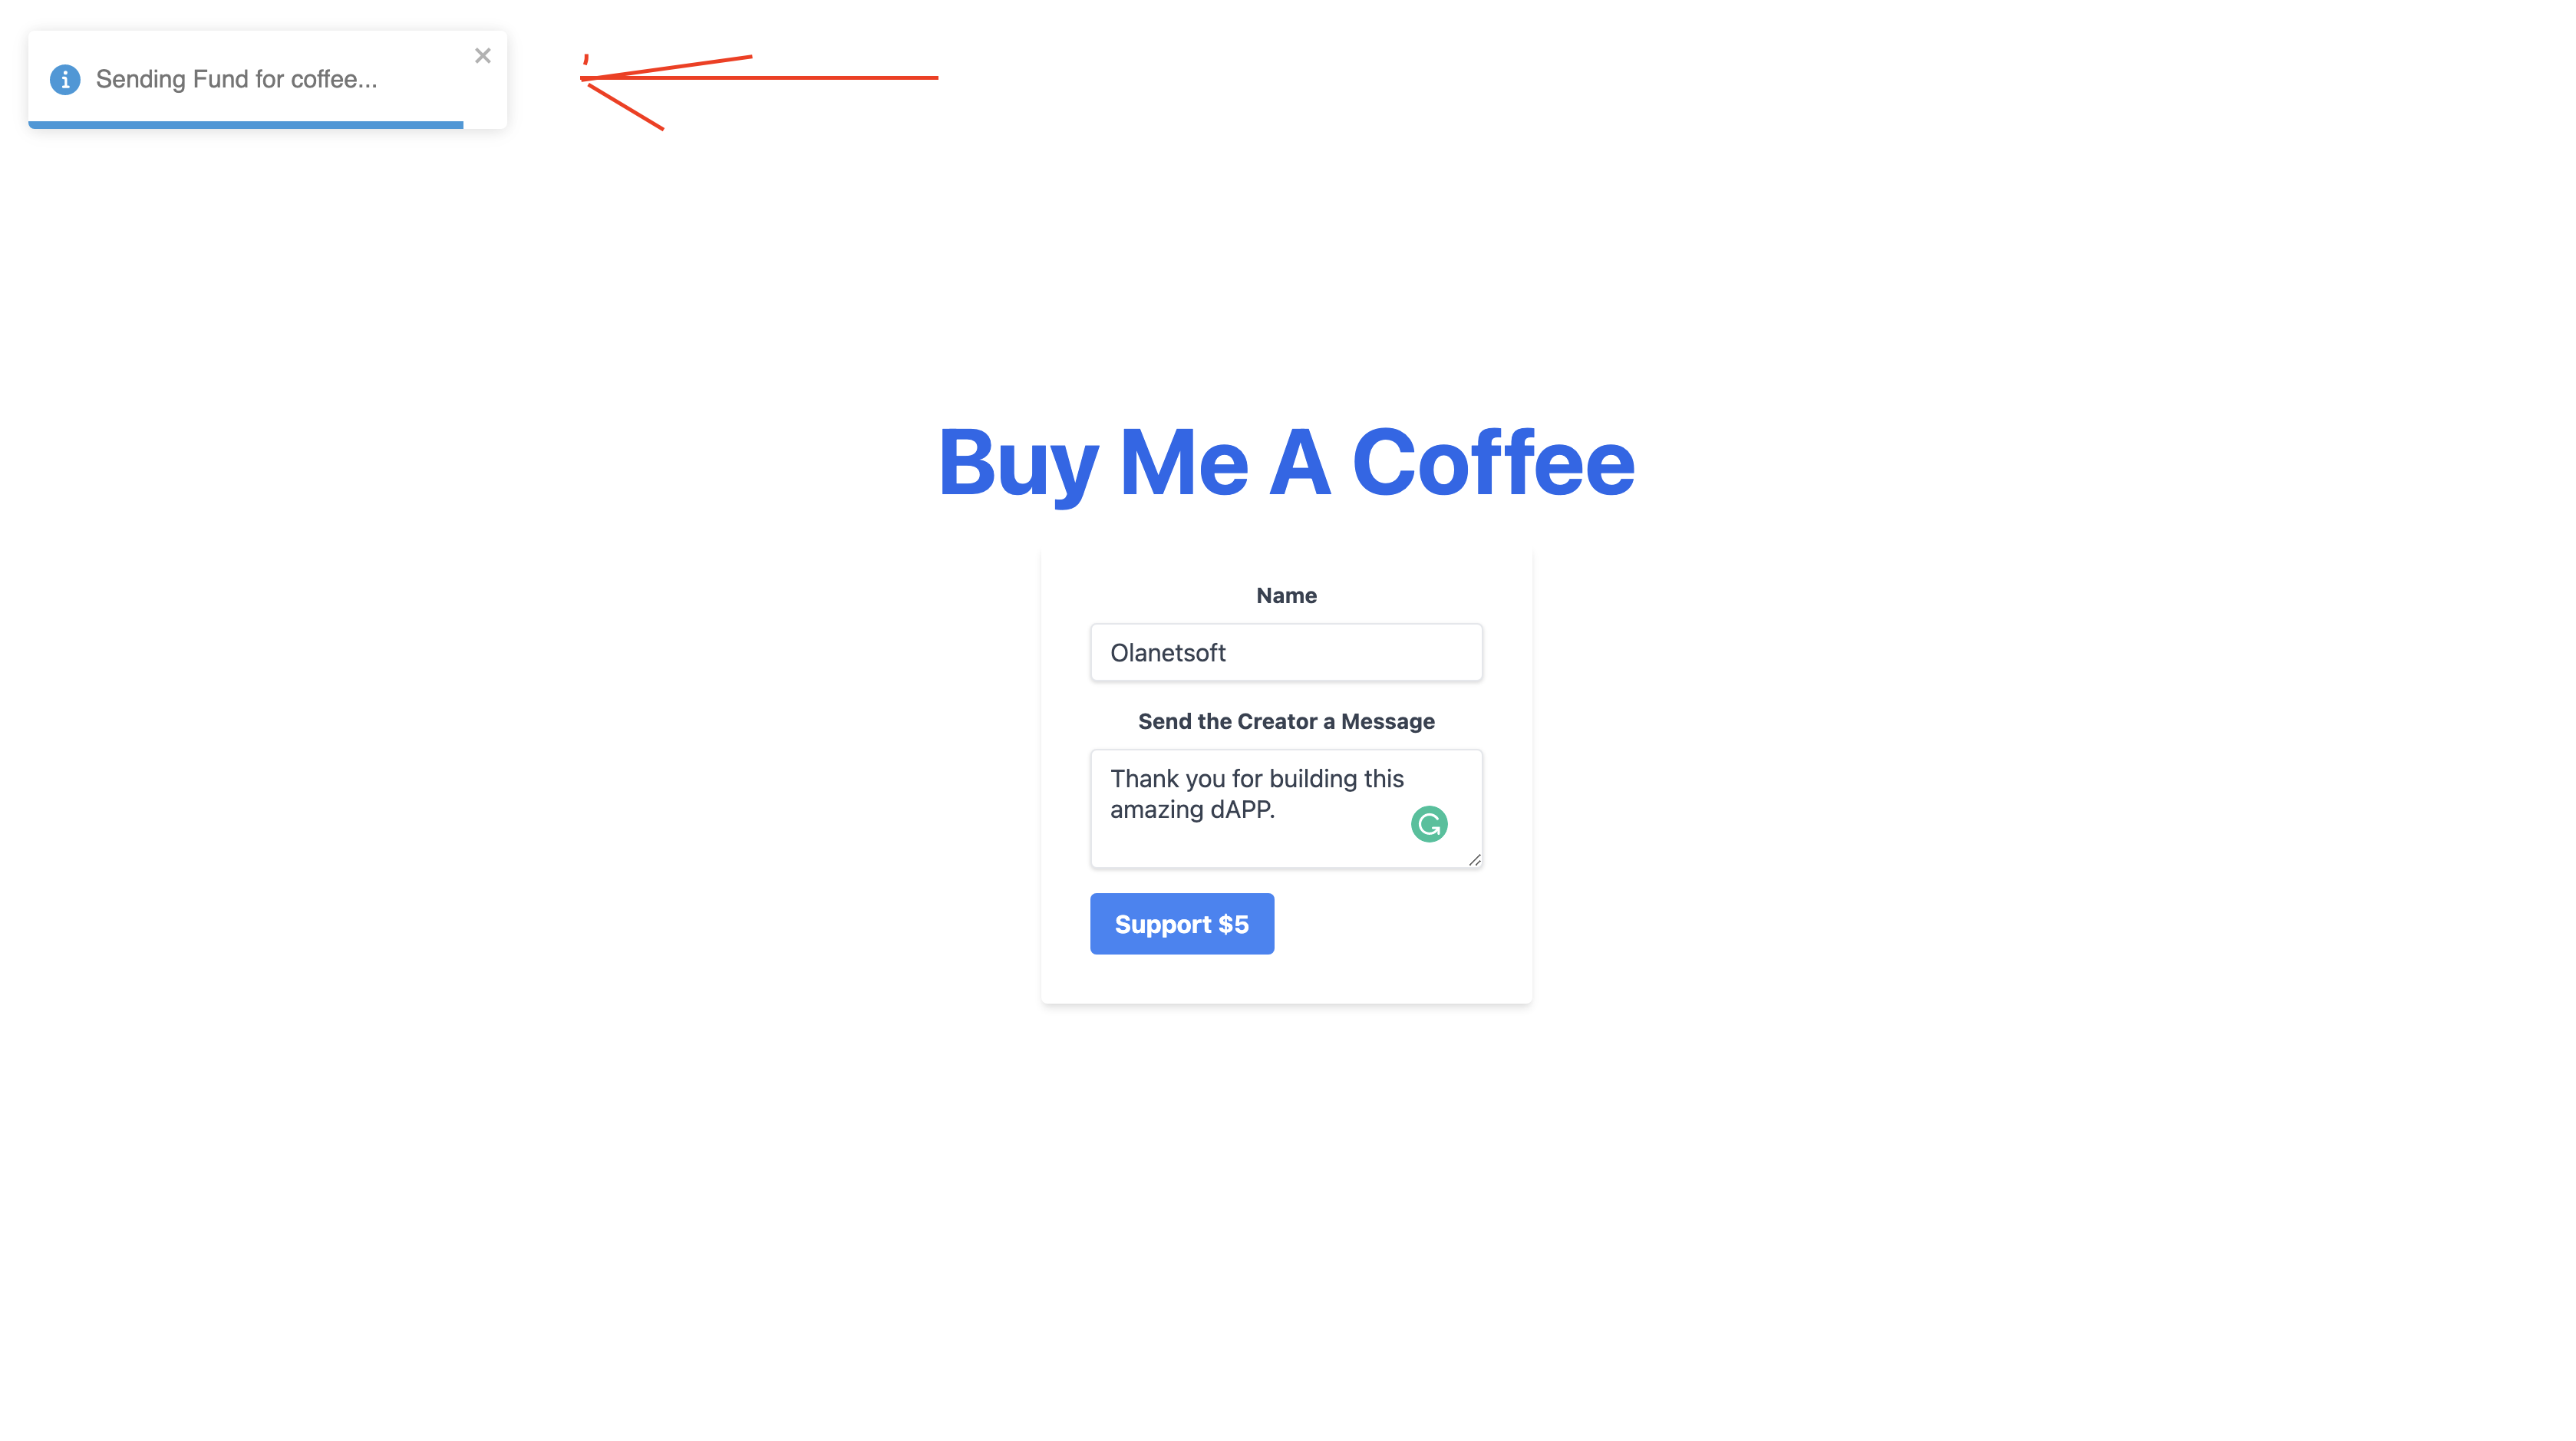
Completed...
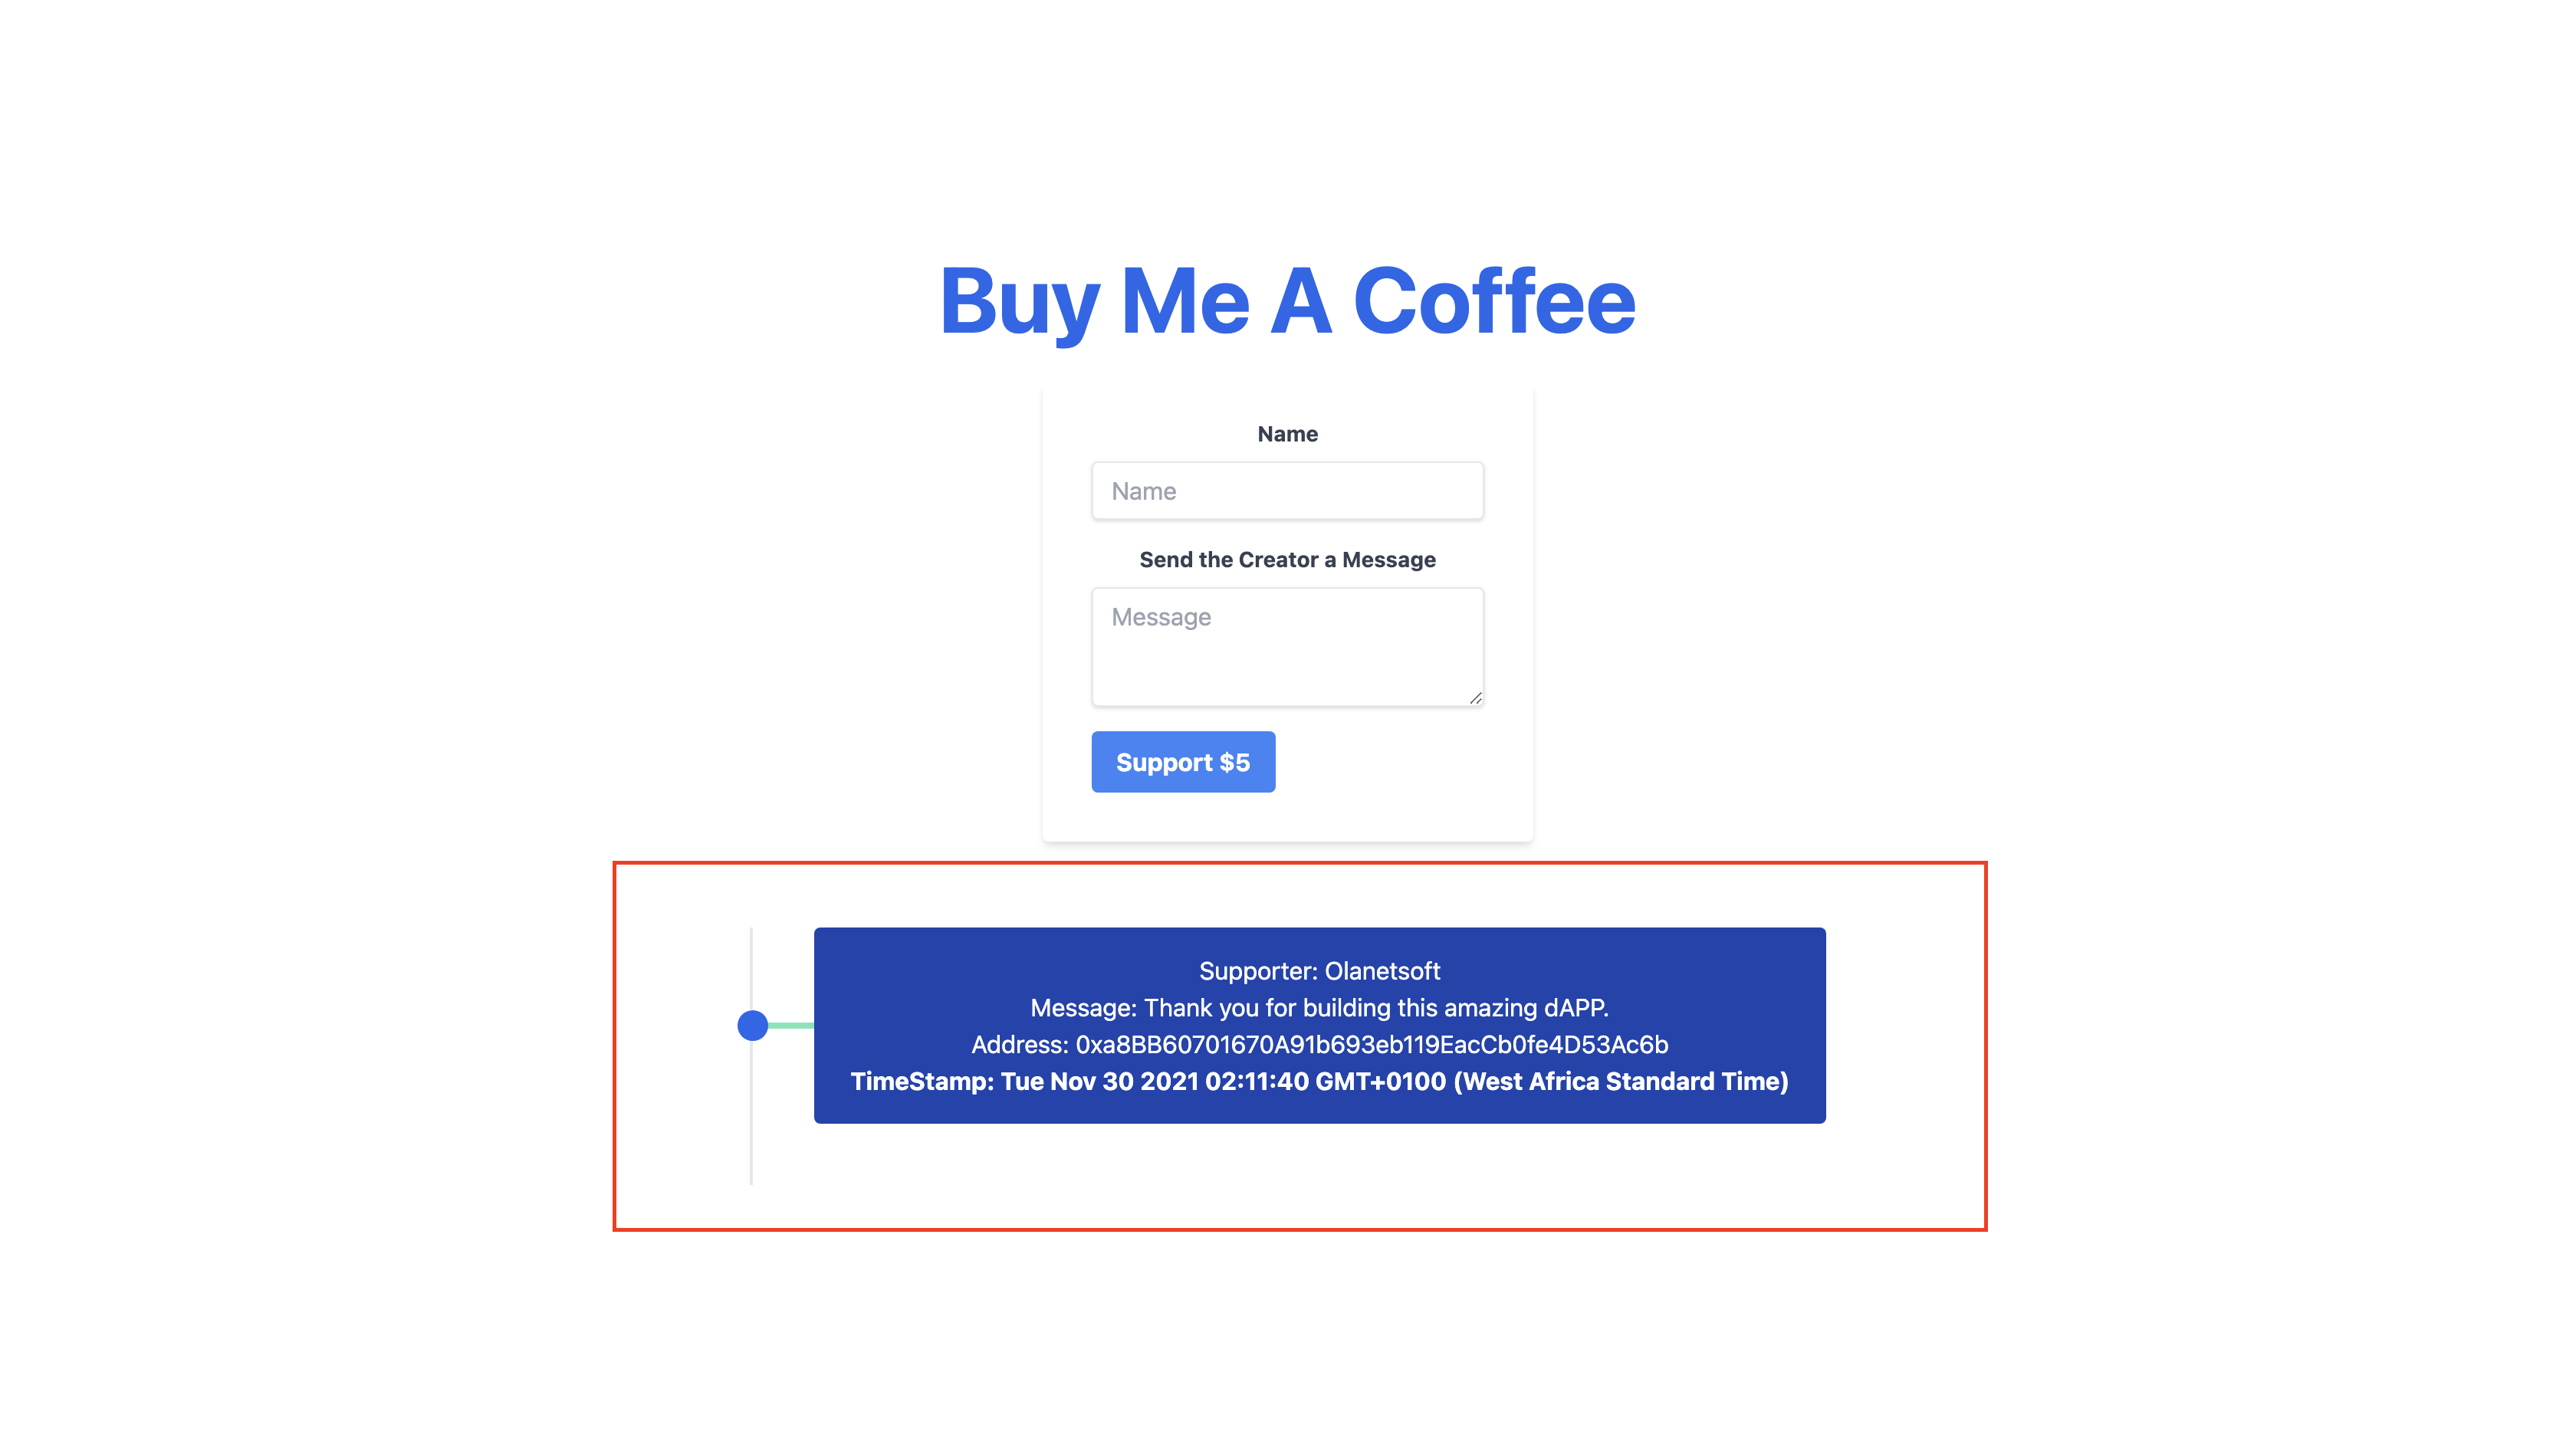
Another coffee support:
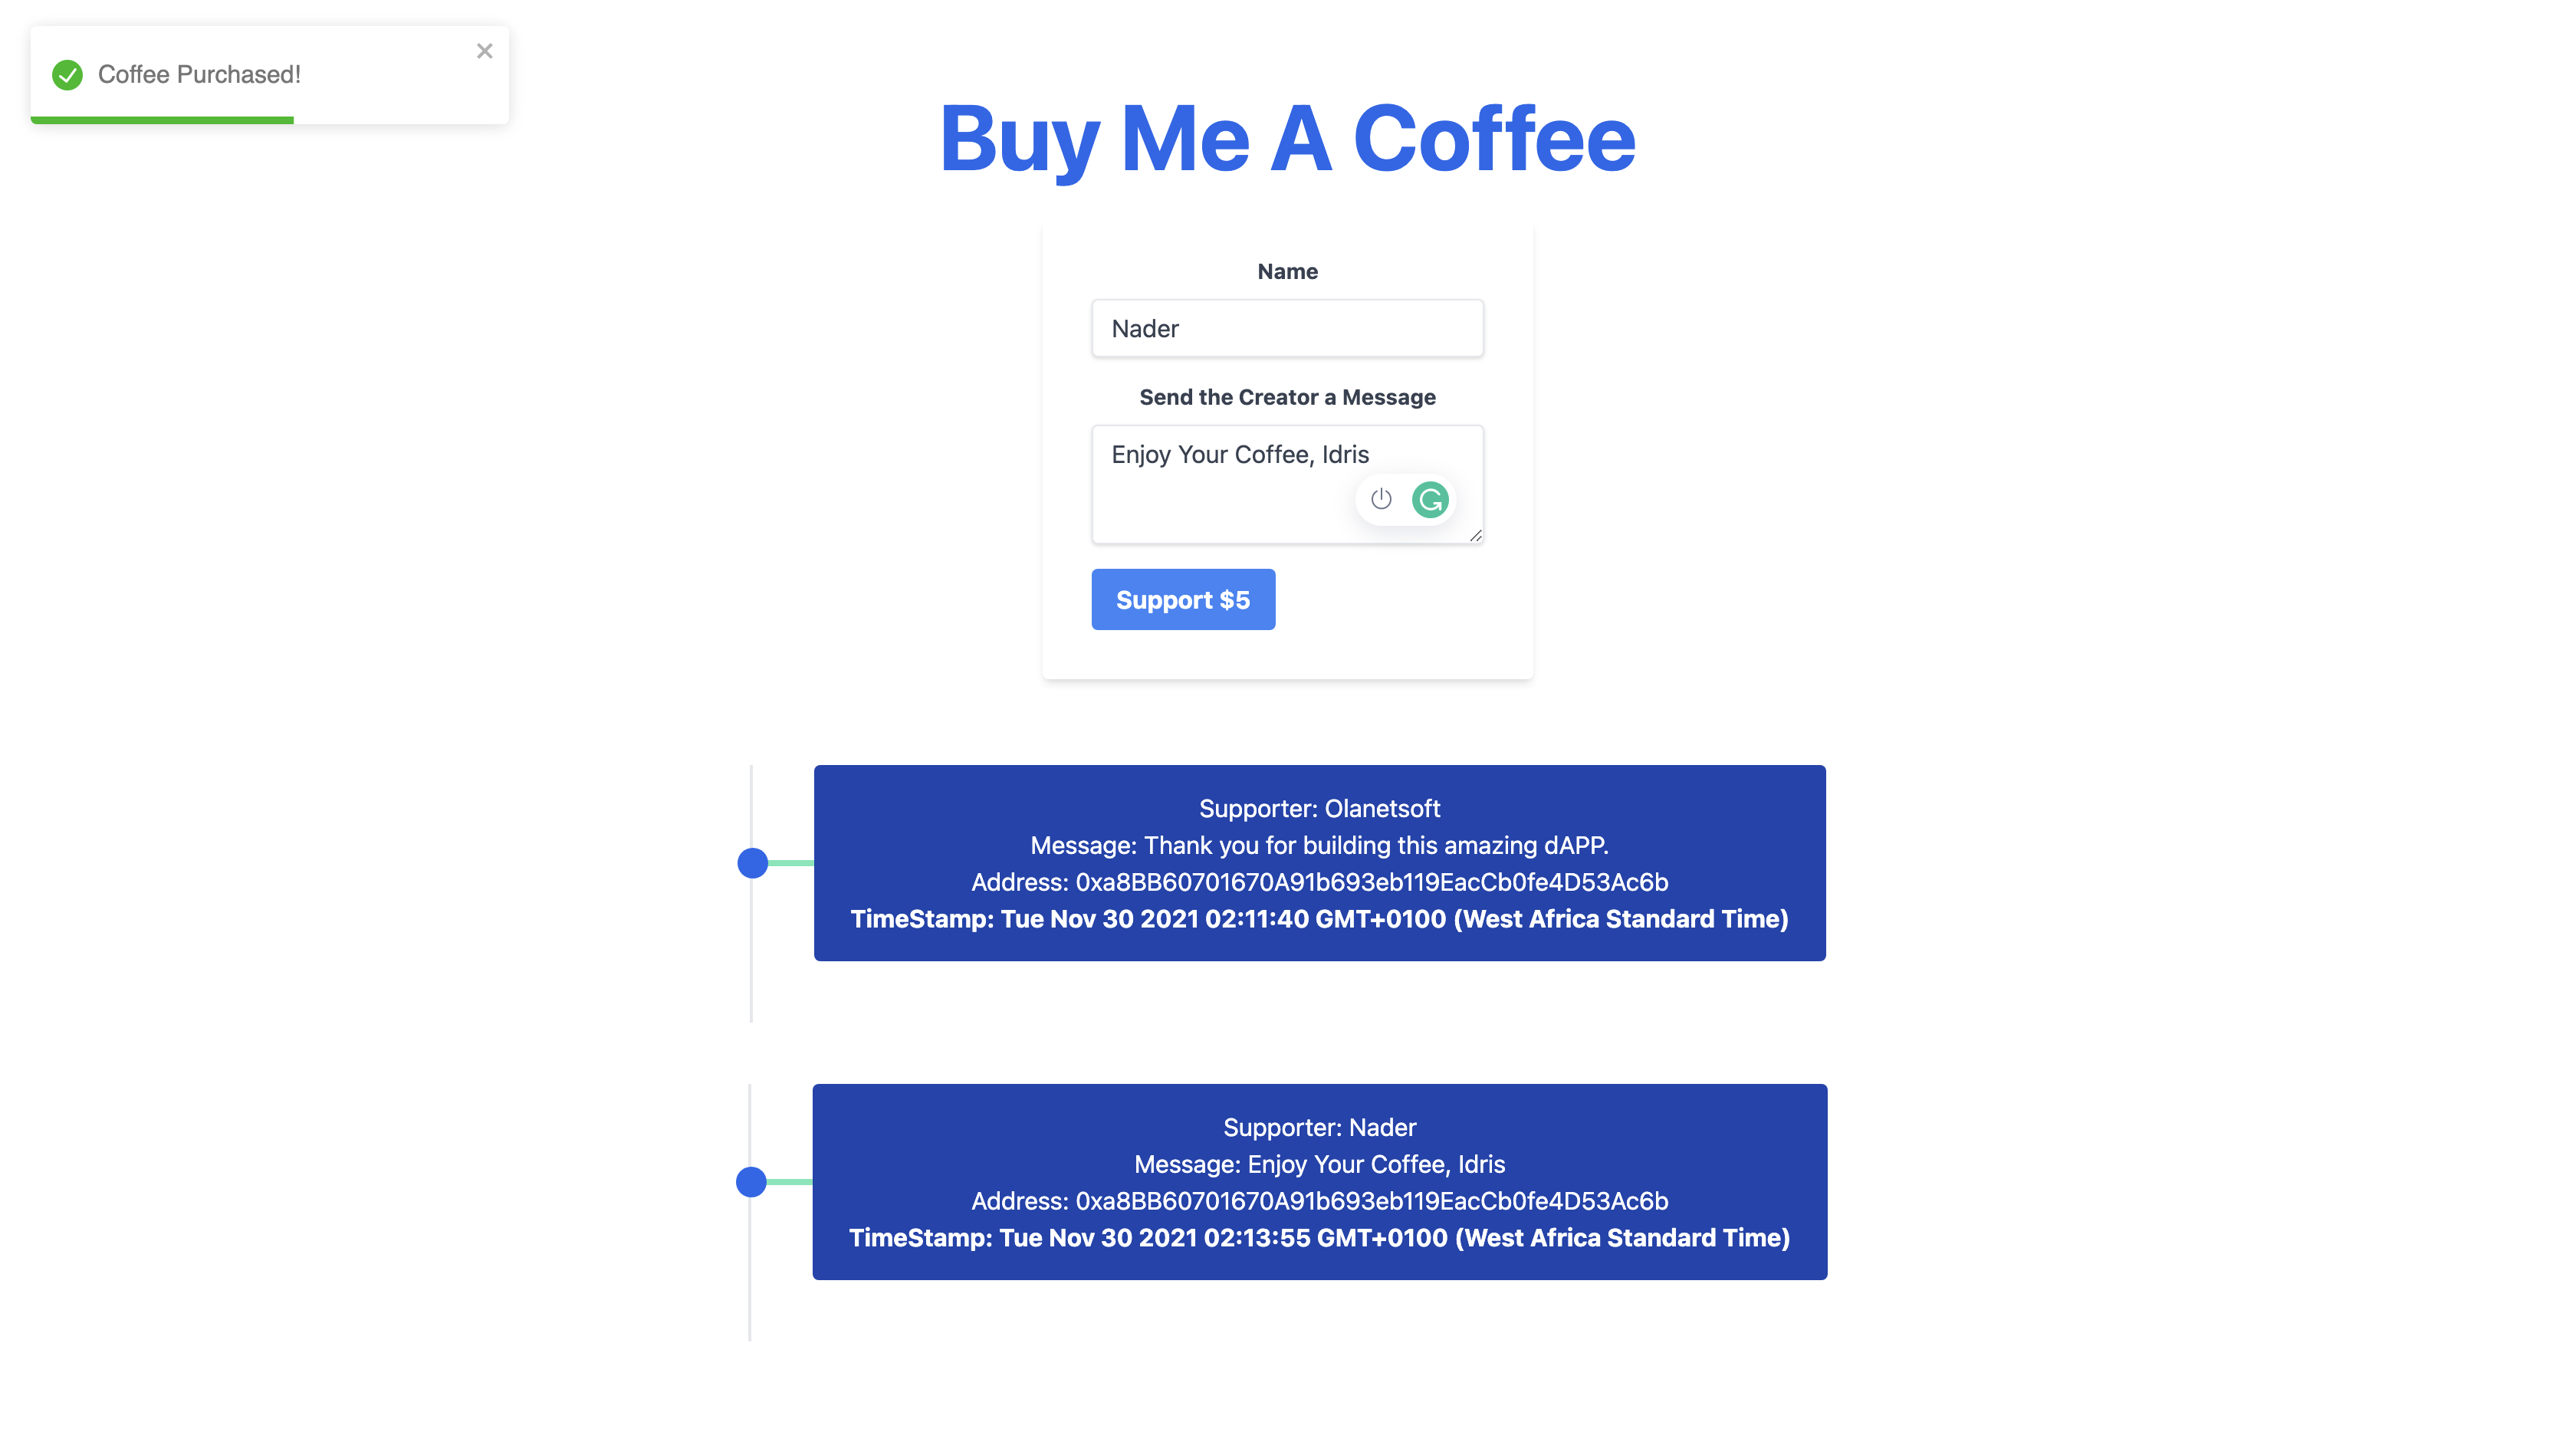
If we observe, the page updates in real-time once a transaction is completed; this is the result of the event we introduced to our smart contract, and React, of course, effortlessly updates the UI.
Conclusion
In this article, we learned how to build a mini buymeacoffee dAPP using solidity, ethereum smart contract, react, and tailwind CSS.
References
I'd love to connect with you at Twitter | LinkedIn | GitHub | Portfolio
See you in my next blog article. Take care!!!